Choosing hair extensions sounds easy until real details show up. Color can look right online and wrong in daylight. Length can look beautiful in a photo and thin at the ends in real life. A method can work well for one client and feel like a burden for another. So the right choice needs a real process, not just inspiration pictures.
To choose the right hair extensions, first decide the real goal, then match the method to daily life, the color to real hair in natural light, the length to body proportion, the grams to natural density, and the texture to the client’s usual pattern. The right plan should look natural, feel comfortable, and be realistic to maintain.

Most buying mistakes happen because people choose backwards. They start with a trend photo, a length number, or a pretty shade. A better result comes from using a simple order: goal first, method next, then color, length, grams, texture, and maintenance.
Step 1: Be Clear About the Real Goal
Before choosing any product, define what the extensions need to do.
Some clients want:
- only more volume
- only more length
- both length and volume
- something for daily wear
- something only for weekends or events
- a very flat invisible finish
- the easiest possible maintenance
This is the first decision because different goals need different methods.
A simple way to decide:
- if the goal is occasional glam, start with clip-ins or halo
- if the goal is daily wear with a flatter finish, consider tape-ins
- if the goal is long wear and reuse, consider wefts
- if the goal is precise filling in smaller areas, consider keratin or micro methods
If the goal is not clear, the whole plan usually becomes messy later.
Step 2: Choose the Right Method for Real Life
The best extension method is not the one that looks best in a video. It is the one that fits the client’s real life.
Clip-Ins and Halo
These are best for:
- occasional wear
- events
- quick volume
- clients who do not want salon maintenance
They are also the easiest way to test whether the client really likes longer or fuller hair before moving into a semi-permanent method.
Tape-Ins
These are good for:
- flat results
- medium-term wear
- faster installs
- clients who want a cleaner finish without a very long appointment
But they require:
- clean base care
- regular move-ups
- no heavy oils near the adhesive
Hand-Tied and Genius Wefts
These are usually better for:
- longer wear
- reusable installs
- salon clients who want a premium result
- clients who can return for row maintenance
Keratin Bonds and Micro Bonds
These are better when:
- very precise placement matters
- the stylist needs more control in smaller zones
- the client accepts longer install and removal time
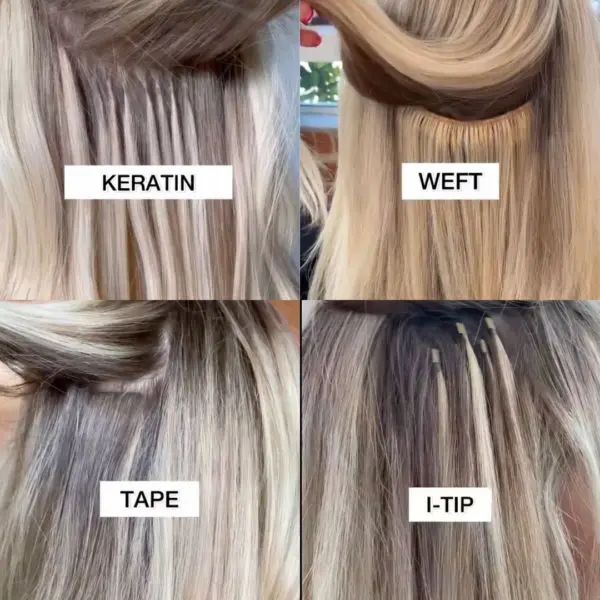
| Method | Best For | Main Trade-Off |
|---|---|---|
| Clip-ins | Occasional wear | Must remove daily |
| Halo | Quick volume | Not ideal for strong daily activity |
| Tape-ins | Flat finish, medium upkeep | Adhesive area needs careful care |
| Hand-tied / Genius wefts | Long wear, reusable installs | Needs row maintenance |
| Keratin / Micro bonds | Precision placement | Longer install and removal time |
A practical rule:
if the client does not like maintenance, do not sell a high-maintenance system.
Step 3: Match the Color the Right Way
A lot of extension failures are actually color failures.
The right way to match color is not guessing from one indoor photo. It should be done in a more reliable way.
Best Ways to Match Color
Option 1: Take photos in natural light and ask online
This is one of the most practical methods for online buying.
The client should:
- stand near a window or go outside in indirect daylight
- take photos of the mid-lengths and ends
- avoid yellow indoor lighting
- avoid filters
- send 2–3 angles, including back view
This gives the supplier or stylist a much more realistic base to recommend shades.
Option 2: Match in person with real samples
This is even better when possible.
A stylist or buyer can:
- compare the hair directly in daylight
- place real extension swatches under the natural hair
- check the match from different angles
Option 3: Use a color ring
For salon buyers and serious wholesale buyers, a color ring is one of the best tools.
A color ring helps with:
- level comparison
- undertone comparison
- mix-color planning
- repeated orders later
This is especially useful for brands and salons that want consistent reordering.
The Right Matching Order
Always match in this order:
- level
- undertone
- dimension
Level
Check how dark or light the hair is.
Undertone
Then check whether the tone is:
- warm
- cool
- neutral
Dimension
If the natural hair is not flat, the extensions should not be flat either. Many clients need:
- lowlights
- mixed tones
- rooted shades
- shadowed top areas
| Step | What to Check | Practical Method |
|---|---|---|
| 1 | Level | Compare swatches in daylight |
| 2 | Undertone | Check warm, cool, or neutral tone |
| 3 | Dimension | Add rooted or mixed shades if needed |
A useful salon rule:
if two shades both look close, blend two shades instead of forcing one flat color.

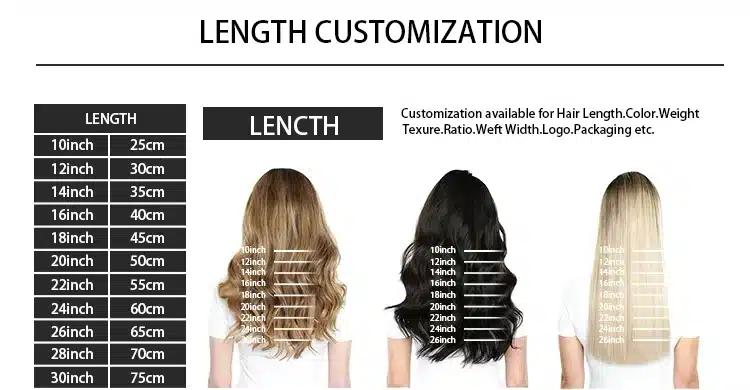
Step 4: Choose the Right Length by Real Proportion
Length is not just a number. It is about where the hair lands on the body and how full it still looks at the ends.
On many average heights:
- 16 inches often lands around the bust
- 18 inches around the lower bust
- 20 inches around the ribs
- 22 inches around the waist
- 24 inches closer to the hip line
But this changes with:
- height
- shoulder width
- haircut
- curl or wave pattern
A Practical Way to Choose Length
Option 1: Use a tape measure at home
This is simple and accurate.
The client can:
- place a tape measure from the crown or desired install point
- let it fall to the target length
- check where it lands on the body
This is much better than guessing from a number.
Option 2: Use body markers
Ask where the client wants the hair to land:
- above bust
- bust
- lower bust
- ribs
- waist
- hip area
That gives a more visual goal.
Option 3: Check the natural haircut
If the natural hair is very short and the target is very long, the client usually needs:
- more grams
- more layering
- more blending effort
- a method that supports a cleaner transition
Curly and Wavy Hair Needs More Length Allowance
A wave can reduce visible length by 1–2 inches. A curl can reduce it more. So curly and wavy clients often need extra inches to get the final look they expect.
Step 5: Choose the Right Grams and Density
This is where many buyers go wrong.
If the weight is too light, the hair looks thin at the ends. If it is too heavy, the install can feel bulky or stressful.
The right grams depend on:
- natural density
- target length
- method
- final fullness goal
Practical Weight Guide
| Natural Density | Length Goal | Clip-Ins Guide | Semi-Permanent Guide |
|---|---|---|---|
| Fine | +2–4 inches | 80–120 g | 120–160 g |
| Medium | +4–6 inches | 120–160 g | 160–200 g |
| Thick | +6–8 inches | 160–220 g | 180–220 g |
A Simple Way to Judge Grams
Ask these questions:
- Is the client’s natural hair fine, medium, or thick?
- Is the goal only a small increase, or a big length jump?
- Does the client want soft natural fullness or a thick glam result?
A practical buying method:
- if unsure, start lighter with removable hair
- if semi-permanent, ask the stylist or supplier to recommend grams based on density and target length
- do not judge grams by length alone
The longer the target length, the more grams are usually needed to keep the bottom full.
Step 6: Match the Texture to the Client’s Real Hair
Texture is what makes the blend look easy or obvious.
The best texture is usually the one that matches how the client’s hair behaves on a normal day.
A Practical Matching Rule
- straight hair usually blends best with straight or soft body wave
- soft wave blends best with body wave or loose wave
- curly hair needs a curl-matched texture
Do not match to the hair on its best styling day. Match to the hair on its normal daily day.
How to Decide More Accurately
Ask the client:
- Do you usually air-dry?
- Do you heat-style every day?
- Is your area humid?
- Does your hair puff up or stay smooth?
These answers help decide whether the extension texture should be:
- straight
- body wave
- loose wave
- curly
A simple rule:
if the extension texture fights the natural texture every day, the client will get tired of it.
Step 7: Check Lifestyle and Scalp Before Finalizing
A method can look good in theory and still be wrong for real life.
For Athletes and Swimmers
Better options are usually:
- lighter installs
- cleaner base care
- flatter methods
- systems that can dry faster
For Sensitive Scalps
Better options are usually:
- low tension
- flatter installs
- lighter grams
- careful placement
For Thin Hairlines or Fragile Edges
The plan should include:
- less weight near the front
- more distance from weak zones
- better concealment
- more conservative mapping
For Frequent Travelers
Lower-maintenance systems or removable options often make more sense.
| Lifestyle or Scalp Type | Better Direction |
|---|---|
| Athlete / swimmer | Lighter map, faster-drying system |
| Sensitive scalp | Lower tension, flatter placement |
| Thin hair | Light grams, careful concealment |
| Travel-heavy schedule | Flexible or lower-maintenance system |
| Updo styling | Flat rows or hidden placements |
A practical rule:
if the client cannot realistically maintain the method, it is the wrong method.

Step 8: Set the Budget the Right Way
Budget should never be judged only by the day-one price.
The better question is:
what will this system cost across its full wear life?
Include These Costs
- install cost
- move-up or maintenance cost
- product cost
- home care cost
- brushing tools
- storage if removable
- replacement cycle
Compare by Total Value
A higher-quality hair set may cost more at first, but it often:
- styles better
- tangles less
- lasts longer
- holds color better
- creates fewer complaints
That often makes it the cheaper option over time.
A practical question for buyers:
would you rather pay less once, or solve the same hair problem repeatedly?
A Simple Real-World Decision Process
If the choice still feels confusing, use this order:
- define the goal
- choose the method
- match the color in daylight or with a color ring
- measure the target length
- choose the grams based on density and fullness goal
- match the texture to normal daily hair
- check the scalp and lifestyle fit
- confirm budget and maintenance
This is the most practical way to avoid expensive mistakes.
My View
From a manufacturer’s point of view, most extension mistakes happen because people choose in the wrong order.
They choose a trend first. Or they choose length first. Or they buy a color online without checking it in real light.
The better order is much simpler:
start with the goal, then choose the method, then refine color, length, grams, and texture.
And in real business, practical steps matter:
- send natural-light photos for color matching
- use real swatches or a color ring when possible
- measure length on the body instead of guessing
- ask for gram recommendations based on natural density
- choose a method that fits daily life, not only a good photo
That is the difference between a random extension purchase and a plan that actually works.
FAQ
What is the easiest extension type for beginners?
Clip-ins are usually the easiest because they are removable and low risk.
How can I match extension color more accurately online?
Take 2–3 photos in natural light with no filter and send them to the supplier or stylist.
What if two shades both look close?
Blend two related shades or add dimension instead of forcing one flat color.
How many grams make a full head?
It depends on density, method, and target length, but 120–160 g is a common starting point for many medium-density installs.
Which method gives the flattest finish?
Tape-ins, hand-tied wefts, and genius wefts are usually chosen when a flatter result matters.
Is full cuticle hair worth it?
Yes, especially for buyers who want longer wear, better styling, and fewer problems across repeated cycles.
Conclusion
To choose the right hair extensions, start with the goal first, then choose the method, and only after that refine color, length, grams, and texture. The best result comes from practical matching: natural-light color checks, real length measuring, correct gram planning, and a method that fits real life.