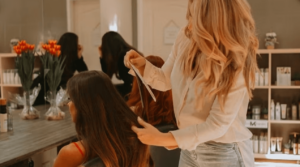
Clip-in hair extensions look simple, but poor placement can still make them bulky, visible, or uncomfortable. The clips are easy. The blending is the real skill.
To put in clip-in hair extensions, start with clean, dry, detangled hair. Section the hair horizontally, attach the widest wefts near the lower back sections, add smaller side pieces, secure the clips close to the roots, and blend the extensions with your natural hair.
For salons, stylists, and hair brands, clip-ins are not only a temporary beauty product. They are often the first extension product a client tries, so comfort, color match, hair quality, clip strength, and clear instructions all affect trust.

Why Are Clip-In Hair Extensions So Popular?
Clip-in hair extensions are popular because they give clients a fast result without tape, glue, beads, or heat. They can be applied at home, removed at night, and reused many times with proper care.
For salons, clip-ins are also useful for trials, bridal styling, photoshoots, events, and clients who are not ready for semi-permanent extensions.
But here is the point many buyers miss: easy application does not mean low quality is acceptable. If the clips are weak, the hair is dry, or the color match is poor, the client will still blame the product.
Who Are Clip-In Hair Extensions Best For?
Clip-ins are best for clients who want temporary length, volume, or color without a salon installation. They are also good for clients who want to test extensions before choosing tape-ins, wefts, I tips, or keratin methods.
| Client Type | Why Clip-Ins Work | What to Watch |
|---|---|---|
| First-time extension users | Low commitment and easy removal | Must learn placement and blending |
| Bridal or event clients | Fast volume for one-day styling | Color match must be accurate |
| Online retail buyers | Easy to understand and sell | Product instructions must be clear |
| Fine hair clients | Can add light volume temporarily | Avoid heavy sets or visible clips |
| Salon consultation clients | Good trial before semi-permanent methods | Manage expectations clearly |
Clip-ins are gentle when used correctly, but they should not be worn during sleep. They should also not be clipped onto weak or fragile areas every day.

How to Put In Clip-In Hair Extensions Step by Step
1. Prep the natural hair
Start with clean, dry, detangled hair. Clip-ins hold better when the roots are not too oily or damp.
For fine hair, a light texture spray or gentle root teasing can help the clips stay secure. Do not apply too much product, because heavy buildup can make blending harder.
2. Section the hair
Use a tail comb to create a horizontal part about one inch above the nape. Clip the rest of the hair away.
The section should be clean and even. If the parting is messy, the weft may sit unevenly and become visible when the client moves.
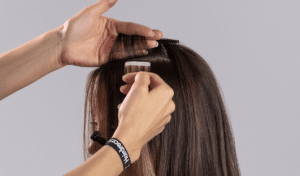
3. Attach the First Weft
Start with one of the wider wefts at the lower back section. Open the clips, place the weft close to the roots, and snap the clips closed from the middle outward.
The weft should feel secure but not tight. If the client feels pulling, the section may be too thin or the clips may be placed too close to the scalp.
4. Layer the Extensions
Move upward section by section. Use wider wefts in the back and smaller wefts as you move toward the sides.
Do not place too many wefts near the crown. That area moves more and can expose bulky clips if the placement is too high.
5. Add side pieces carefully
Use smaller wefts near the sides, above the ears, or where extra blending is needed.
The side pieces should be light. Heavy side placement can pull on fine hair and make the clips easier to see.
6. Blend and Style
After all wefts are clipped in, gently brush the natural hair and extensions together. Curling or waving both together can help hide shorter natural layers.
If heat tools are used, apply heat protectant and avoid direct high heat on the clips or stitched areas.
Here is a simple placement checklist for salons and first-time users:
| Placement Area | Best Practice | Common Mistake |
|---|---|---|
| Nape area | Start low with a wider weft | Placing the first weft too high |
| Back sections | Use wider wefts for volume | Uneven sectioning |
| Side sections | Use smaller, lighter wefts | Heavy pieces near the hairline |
| Crown area | Keep clips low enough to hide | Placing clips too close to the top |
| Blending | Style natural hair and extensions together | Leaving short layers visible |
| Comfort | Clips should feel secure, not tight | Pulling on thin sections |
A good clip-in install should feel secure, flat, and natural. If the clips pull, show, or feel heavy, the placement or product weight needs adjustment.
How to Make Clip-Ins Look Natural?
1. Match color, texture, and end density
Clip-ins should match the client’s hair color, texture, and end fullness. A close color match is not enough if the extension ends are too thin or too shiny.
2. Add grip for fine hair
For fine hair, gently tease the root area where the clips sit. This gives the clips more grip and helps prevent slipping.
3. Do not overload the head
Too many wefts can look bulky and unnatural. The goal is not to use every piece. The goal is to create balance, comfort, and a clean blend.
4. Store clip-ins properly
After removal, brush the clip-ins gently and store them in a hanger, silk bag, or clean extension case. Poor storage can cause tangling, dryness, and broken clips.
Common Clip-In Placement Mistakes
Most clip-in problems are not caused by the idea of clip-ins. They are caused by poor placement, poor blending, or the wrong product weight.
| Mistake | What Happens | Better Choice |
|---|---|---|
| Placing clips too high | Clips become visible | Keep wefts below the crown |
| Using too many wefts | Hair looks bulky | Use only what the head can hide |
| Wrong color match | Extensions look separate | Match color in natural lighting |
| Heavy side pieces | Hairline feels pulled | Use smaller side wefts |
| Sleeping with clip-ins | Natural hair may feel stressed | Remove them before bed |
| Poor storage | Tangling and dryness | Store flat, clean, and brushed |
For salons, this section can also be used as client education. Clip-ins are simple, but clients still need clear instructions.
Professional Notes for Salons and Hair Brands
Clip-ins are often the first hair extension product a client tries. That makes them important for trust.
If the client has a good clip-in experience, she may return later for tape-ins, wefts, keratin tips, or a full salon service. If the clip-ins feel heavy, shed, tangle, or fail to blend, the client may lose confidence in the whole extension category.
For salons, clip-ins can support bridal styling, event packages, photo styling, and consultation trials. For hair brands, clip-ins are easier to sell online because clients understand them quickly.
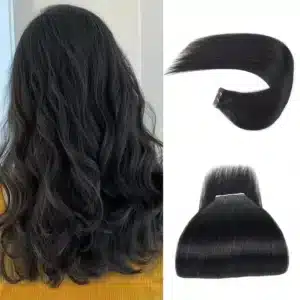
But the product still needs strong construction. Good clips, clean stitching, full cuticle hair, stable color, and natural density from top to ends all affect repeat orders.
Product Quality Notes for Wholesale Buyers
For wholesale buyers, clip-ins should not be judged only by how they look in the package.
The real test starts when the client clips them in, brushes them, curls them, removes them, and stores them. Weak clips, poor stitching, dry hair, thin ends, and unstable color can quickly create complaints.
| Quality Factor | Why It Matters | What Buyers Should Test |
|---|---|---|
| Full cuticle hair | Helps softness and reuse after washing | Wash, brush, and heat style samples |
| Clip strength | Affects security and comfort | Open and close clips many times |
| Weft stitching | Affects shedding and durability | Check seams after brushing |
| Color stability | Affects online reviews and salon matching | Compare before and after washing |
| End fullness | Affects premium look | Check density from top to ends |
| Packaging | Affects online and retail presentation | Test storage and client unboxing |
Professional buyers can compare our clip in hair extensions when checking clip strength, hair quality, color matching, and private label options.
Buyers who care about long-term softness can also read our guide to full cuticle hair.
Frequently Asked Questions
How long does it take to put in clip-in hair extensions?
Most people can apply clip-in hair extensions in 10–15 minutes with practice. First-time users may need more time to section and blend the hair correctly.
Can I wear clip-ins every day?
Yes, but clip-ins should be removed before sleeping. Daily wear is possible when the clips are not too tight and the natural hair is not fragile.
Can I curl or straighten clip-in extensions?
Yes, if they are made from 100% human hair. Always use heat protectant and keep the heat moderate to protect softness and lifespan.
How do I keep clip-ins secure?
Start with dry hair, section cleanly, place the clips close to the roots, and gently tease fine hair if needed. The clips should feel secure, not painful.
Are clip-in extensions good for thin hair?
They can work for thin hair when the set is lightweight and the clips are placed carefully. Heavy pieces near the hairline can feel uncomfortable or look visible.
What should wholesale buyers test before ordering clip-ins?
Buyers should test clip strength, weft stitching, shedding, color stability, hair softness after washing, heat styling performance, and packaging quality.
Why Stylists and Brands Still Need Good Clip-Ins
Clip-ins are not only easy to use. They are also a useful entry product for salons and hair extension brands.
For salons, they help clients try length or volume before choosing semi-permanent methods. For brands, they are easier to sell online because clients can understand the product without a salon appointment.
The risk is quality. If the hair tangles, clips feel weak, or the set looks thin at the ends, the client will not see it as a “temporary product problem.” She will see it as a brand problem.
Conclusion
Putting in clip-in hair extensions is simple, but a natural result depends on clean sectioning, secure placement, balanced weight, color match, and good blending.
For salon owners, hair extension brands, and wholesale buyers, clip-ins are also a product quality test. Good clip-ins should feel comfortable, hold securely, blend naturally, and stay soft after washing, brushing, styling, and storage.
You can contact Hibiscus Hair to request clip-in hair extension samples, color matching support, or wholesale price guidance before placing a larger order.