To install micro bead hair extensions, create clean sections, thread a compatible bead onto a controlled section of natural hair, insert the extension tip, position the bead slightly away from the scalp, and clamp it securely.
For most standard micro bead systems, the attachment should sit about 1/4–1/2 inch from the scalp so the strand can move naturally without pulling or pressing against the root area. The exact placement should also follow the extension system and bead specifications used in your salon.
A clean installation depends on section size, strand weight, bead and tip compatibility, clamp pressure, row spacing, and perimeter coverage. This guide breaks the process into seven professional steps and explains the mistakes that cause slipping, discomfort, or visible beads.
What Are Micro Bead Hair Extensions?
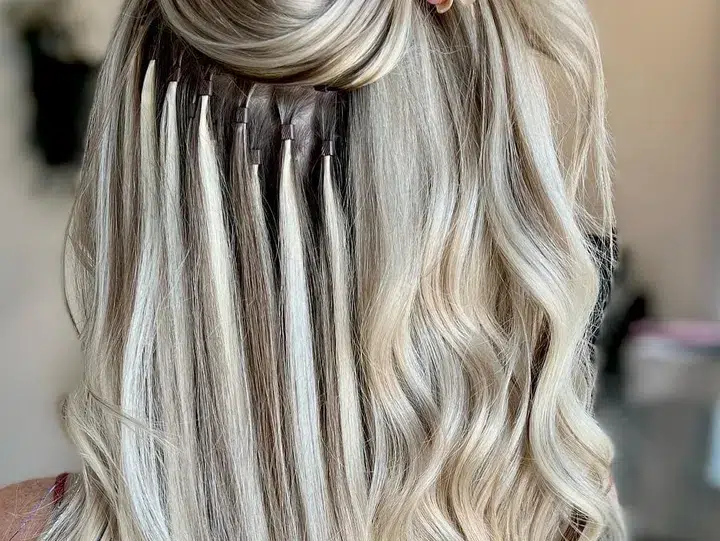
Micro bead hair extensions are strand-by-strand extensions attached with small beads or rings. A stylist threads a controlled section of natural hair through the bead, inserts a compatible extension tip, and clamps the bead to create a secure mechanical connection.
Standard micro bead systems are commonly used with I-tip or similar pre-tipped strands. Nano ring systems follow the same basic attachment principle but use much smaller beads and tips, so they should not automatically be treated as the same installation specification.
Micro bead installation does not require melted keratin or adhesive. The result depends on how well the bead size, extension tip, natural hair section, strand weight, and clamp pressure work together.

What Tools Do You Need for a Micro Bead Installation?
Prepare the complete installation system before sectioning the client’s hair.
You will typically need:
- Pre-tipped extension strands
- Compatible micro beads
- Loop or pulling tool
- Micro bead extension pliers
- Rat-tail comb
- Sectioning clips
- Extension brush
- Color and strand weight reference
The bead, extension tip, and pliers should be tested as one system. A bead that is too large, too small, or incompatible with the tip can cause slipping, poor closure, or unnecessary pressure.
How to Install Micro Bead Hair Extensions in 7 Steps
Step 1: Assess and Prepare the Hair
Start with clean, completely dry hair and assess the client’s density, scalp condition, growth pattern, haircut, and target result.
Avoid installing heavy extension strands on weak or fragile natural hair sections. The amount of supporting natural hair must be appropriate for the weight of each extension strand.
Step 2: Map the Rows
Create a row plan before attaching the first strand.
Leave enough natural hair around the nape, sides, crown, parting, and hairline to conceal the beads when the client moves or styles the hair.
Do not use exactly the same row height on every client. Density, head shape, haircut, and normal styling habits should guide the final placement.
Step 3: Create a Clean Natural Hair Section
Select a clean section of natural hair that can support the extension strand without overloading the roots.
Too little natural hair concentrates the extension weight on a weak section. Too much natural hair can prevent the bead from closing correctly or create an uneven attachment.
Keep the section clean and follow the natural growth direction.
Step 4: Load and Position the Bead
Load the compatible micro bead onto the loop tool and pull the selected natural hair section through it.
Slide the bead toward the root and position it about 1/4–1/2 inch from the scalp. The bead should not press directly against the scalp.

Step 5: Insert the Extension Tip
Insert the extension tip into the bead alongside the natural hair.
Keep the tip, bead, and natural hair aligned with the direction of growth. Most of the extension tip should remain securely inside the bead rather than extending upward toward the scalp.
Step 6: Clamp the Bead Securely
Hold the bead in position and close it with the correct extension pliers.
Use firm, controlled pressure. The bead should grip the natural hair and extension tip securely without being crushed into sharp edges.
If an attachment does not close correctly, reopen it and reinstall it rather than repeatedly over-compressing the same bead.
Step 7: Repeat, Check Spacing, and Blend
Continue across the row with balanced spacing, then offset the next row so the attachments do not form one obvious vertical line.
Before blending, check each area for comfort, movement, visibility, and even weight distribution.
Finish by blending the extension hair into the client’s haircut and explaining brushing, washing, sleeping, and move-up maintenance.
Micro Bead Placement and Row Spacing
Good micro bead placement is not only about the distance from the scalp.
The stylist also needs enough perimeter hair to cover the beads, balanced spacing between strands, and enough room for each attachment to move without pulling neighboring sections.
Around the nape, temples, crown, and parting, test visibility before completing the row. Ask the client to move the hair, change the part, and lift it into the styles they normally wear.
If the beads become visible before the installation is finished, move the row rather than relying on styling to hide poor placement.

4 Common Micro Bead Installation Mistakes
Mistake 1: Placing the Bead Too Close to the Scalp
A bead placed directly against the scalp can restrict movement and create pulling, pressure, or discomfort.
Leave enough space for the attachment to move naturally.
Mistake 2: Using the Wrong Amount of Natural Hair
A section that is too small may carry more weight than the natural hair can comfortably support.
A section that is too large can prevent the bead from gripping and closing correctly.
Mistake 3: Using an Incompatible Bead and Tip
Micro beads are not one-size-fits-all.
The bead diameter, inner lining, extension tip size, and natural hair section must work together. A poor match can cause slipping, bulky attachments, or uneven closure.
Mistake 4: Over-Clamping or Under-Clamping
Under-clamping can allow the extension tip or bead to slide.
Over-clamping can deform the bead or create sharp pressure points. Use consistent, controlled closure rather than simply squeezing harder.
Micro Bead Aftercare and Move-Up
Clients should brush gently while supporting the hair below the attachment points, keep heavy oils and conditioners away from the bead area, dry the roots thoroughly after washing, and avoid aggressive pulling around the bonds.
Move-up timing depends on natural hair growth, attachment movement, shedding, and the condition of the root area. Many professional bead systems require regular maintenance rather than being left untouched for several months.
At each maintenance appointment, check bead movement, root matting, strand loss, tip condition, scalp comfort, and whether the natural hair can still support the attachment safely.
What Salons Should Check Before Ordering a Micro Bead System
A professional micro bead system should be tested as a complete set, not as hair alone.
Before bulk ordering, salons and hair brands should check:
- Extension tip consistency
- Strand weight consistency
- Bead and tip compatibility
- Bead lining and grip
- Clamp performance
- Color consistency
- After-wash softness
- Shedding
- Removal and reuse performance
A strand may feel soft before installation but still create problems if the tip diameter varies or the bead does not close consistently.
We recommend testing installation, washing, brushing, removal, and reinstallation before approving a micro bead product for repeat salon use.
Hibiscus Hair can prepare full cuticle I-tip and bead-based extension samples in different lengths, colors, strand weights, tip specifications, and private label packaging for salon testing.
FAQ
1.How Do You Install Micro Bead Hair Extensions?
Micro bead hair extensions are installed by threading a controlled section of natural hair through a compatible bead, inserting the extension tip, positioning the bead slightly away from the scalp, and clamping it securely with extension pliers.
2.How Far From the Scalp Should Micro Beads Be Placed?
Many standard micro bead systems are placed about 1/4–1/2 inch from the scalp. The bead should have enough space to move naturally without pressing against the scalp or pulling the root section.
3.How Much Natural Hair Should Go Inside a Micro Bead?
The natural hair section should be large enough to support the extension strand but small enough for the bead to close correctly. The correct amount depends on strand weight, bead size, and the client’s natural hair density.
4.Why Do Micro Bead Extensions Slip?
Common causes include incorrect section size, incompatible bead and tip sizes, weak clamping, oily or coated roots, and delayed maintenance.
5.Can Micro Bead Extensions Be Installed on Fine Hair?
They can work for some fine-haired clients, but strand weight, bead size, placement, and natural hair strength need careful assessment. Smaller attachment systems may be better when standard micro beads are difficult to conceal.
6.Can Micro Bead Hair Extensions Be Reused?
The extension hair may be reusable when the hair quality and tip remain in good condition. During move-up, the stylist normally opens or replaces the bead and repositions the strand closer to the root.
Conclusion
A clean micro bead installation depends on more than clamping a bead around an extension strand.
The stylist needs to control section size, strand weight, bead and tip compatibility, scalp distance, clamp pressure, row spacing, and perimeter coverage.
For most standard systems, keep the bead slightly away from the scalp and confirm that each attachment moves naturally without pulling or showing through the client’s normal hairstyle.
For salons and hair brands, test the complete system before bulk ordering. Consistent hair quality, tip dimensions, bead grip, and reuse performance all affect long-term service results.