
I see a lot of people stuck with grown-out bonds. You want them off without a salon visit, and you want to protect your own hair. Grown-out keratin bonds don’t need a panic appointment. With the right remover, pliers, and patience, you can take fusion extensions off at home safely. This guide gives clear steps, red-flag checks, and aftercare so your own hair stays intact.
Yes—you can remove fusion (keratin) extensions at home: saturate each bond with keratin remover, crack it with flat-jaw pliers, slide the strand out while supporting the root, then comb out shed hairs and clarify. Work dry, in small sections; never pull. Condition after.
The full walkthrough covers tool choices, alcohol vs. acetone removers, tricky tangle rescue, a post-removal repair plan, and when to stop and call a pro. Follow the row-by-row method to keep length and shine.
what are fusion Hair Extensions?
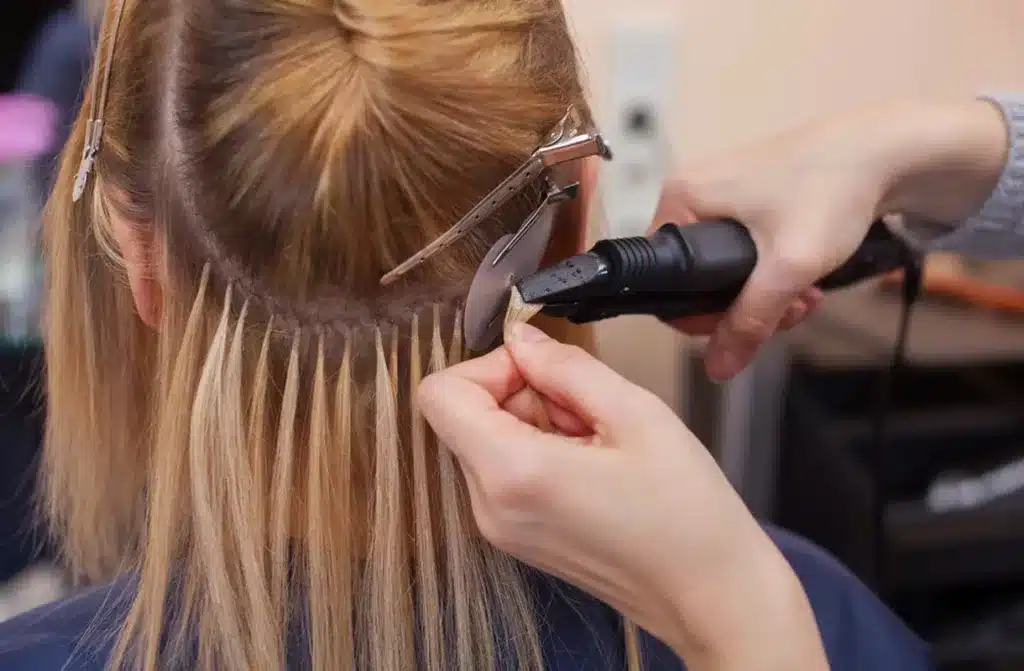
You see many names for the same family: keratin tips, U-tips, V-tips, flat tips, nail tips, hot fusion. These are small strands of human hair that carry a solid keratin bond at the top. A stylist melts that bond with a heat connector and fuses it to a tiny section of your hair. When installed well, bonds sit 5–8 mm away from the scalp and are shaped into a neat rice-grain. The attachment is strong and light. The hair moves naturally. This method suits most hair types when sections are matched in size to the bond.

How fusion bonds behave over time
Keratin is firm at first. It softens with heat, oils, and friction. As your hair grows, each bond slides down. The gap between bond and scalp grows. The gap collects shed hairs. If you wait too long, small knots form under the bond. This is normal, but it needs care during removal. Most quality bonds release with a remover based on cosmetic alcohols or a salon-grade acetone formula. After release, your hair will show shed hairs that would have fallen out normally. Do not confuse shed hairs with “breakage.” They are different.
can i remove Fusion Hair Extensions at Home
Yes, you can, if the bonds are keratin-based and if you follow a method. You must also accept that it takes time. A full head can take 1.5–3 hours for a first-timer. Rushing causes damage. If bonds were installed with adhesive not meant for hair, or if you have severe matting, home removal may not be safe.
Safety rules before you start
- Test one bond behind the ear first. Learn the feel and force.
- Work on dry hair. Wet hair stretches and snaps.
- Use a remover designed for keratin. Do not use nail glue or lash glue products.
- Use flat-jaw pliers with a smooth or lightly ridged surface. No teeth.
- Never rip a bond off. If it resists, add remover, wait 60 seconds, and re-crack.
- If you feel a tight bird’s-nest under a bond, stop and detangle with an oil + conditioner soak before continuing.
- If you have scalp irritation, open wounds, or active hair loss, do not proceed. Get help.
How to take out fusion hair extensions at home?
Safety first: quick checklist
- Work on dry hair only.
- Never yank a bond. If it resists, re-saturate and crack again.
- Support the root with your fingers during every slide-out.
- Ventilate the room when using alcohol/acetone removers.
- Skip removal if you have scalp cuts, infections, or heavy matting at the roots.
Tools you will need
- Fusion bond remover: alcohol-based (gentler) or acetone-based (stronger).
- Flat-jaw or duckbill bond-cracking pliers (smooth inner surface).
- Rat-tail comb and a wide-tooth detangling comb.
- Sectioning clips, hair elastic, and a cape or old towel.
- Nitrile gloves, cotton pads, and a small nozzle bottle for precision.
- Clarifying shampoo and a light silicone-free conditioner.
- Optional: oil blend (coconut + olive), chelating shampoo (for hard-water residue).
Know your bond before you start
- U-tip / nail-tip keratin: small, rice-grain sized tips. Standard removal: remover + crack + slide.
- Flat-tip keratin: larger contact surface; needs slower saturation.
- Micro fusion (mini-tips): tiny bonds; use minimal remover and extra care on fine hair.
- Heat-fused resin (older installs): feels plastic-hard; usually needs acetone and more cracking passes.
If you are unsure, test one bond at the back first.

Step-by-step removal workflow (row by row)
1) Prep and mapping
- Brush ends to remove surface tangles. Keep strokes light near the roots.
- Create a clean center part, then horizontal partings to expose the lowest row first.
- Clip away the rest. Always work bottom to top, back to front.
2) Saturate the bond
- Put on gloves.
- Hold the bond between two fingers. Protect the root with your fingertip at the scalp.
- Apply 3–6 drops of remover directly onto the bond. Avoid flooding the natural hair.
- Wait 10–20 seconds so the remover penetrates. Massage the surface of the bond gently with the plier tips (closed) to help it soak in.
3) Crack the bond (the key move)
- Place the flat jaws of the pliers across the bond parallel to the strand.
- Squeeze firmly, then rotate the pliers 90° and squeeze again.
- You should feel the bond fracture into crumbs/flakes rather than smear.
- If the bond feels gummy, add one more drop, wait, and repeat the cross-crack. Do not pull yet.
4) Slide the extension out
- Pinch the hair above the bond with your non-dominant hand to protect the root.
- With the other hand, hold the extension tip and slide downward in a straight line.
- If it does not glide, stop. Re-saturate and crack again.
5) Detangle the shed-hair “cone”
- After each bond comes off, you will see a small cone of shed hairs trapped where the bond sat.
- Mist that spot with a bit of remover or oil.
- Use your rat-tail to lift the cone from the tip toward the scalp in tiny strokes.
- Comb through with the wide-tooth comb until the root moves freely.
- Move to the next bond and repeat across the row.
6) Row management for speed and control
Reclip sections every few minutes so you always see the scalp and the exact bond you are working on.
Keep a small tray or paper towel to collect bond crumbs.
Work in groups of 5–10 bonds per row to stay organized.
Alternative acetone “fast” method (experienced hands only)
Acetone removers work fast on stubborn bonds. They are more drying. Ventilate your room. Wear gloves. Keep acetone away from open flames. The steps are the same, but contact time is shorter (10–20 seconds). Follow with deep conditioning.
Detangling plan for tricky spots
If you hit a bond with a mat under it, coat the area with detangle oil and a little conditioner. Let it sit for 10–20 minutes. Gently pick the knot apart with a tail comb starting at the very end of the tangle. When the tangle opens, resume the normal bond release. Patience here saves length.
Cleanse and reset after all bonds are off
- Do one pass of clarifying shampoo to remove remover residue.
- Follow with a hydrating mask for 10 minutes. Rinse cool.
- Air-dry or blow-dry on low. Apply a light leave-in.
- Wait 48 hours before any chemical service.
Caring for your hair after removal
What your hair needs now
Your hair carried weight and friction at each bond. After removal, the cuticle needs slip and moisture. The scalp may feel tender in areas that supported weight. A simple plan works best.
- Moisture and slip
Use a silicone-friendly leave-in or serum on mids and ends for the first week. This reduces friction and protects the lifted cuticle plates. - Protein in moderation
If your hair feels stretchy when wet, add a light protein conditioner once in the first two weeks. Do not overload. Too much protein makes hair stiff and dull. - Scalp reset
Do a mild scalp exfoliation with a gentle scrub or a soft brush on shampoo day. This clears remover residue and dead skin around old bond sites. - Heat control
Keep heat tools at 160–180°C (320–356°F) for the first week. Use a heat protectant. Avoid tight ponytails for 3–5 days.
Signs to watch
- Persistent sticky patches after two washes mean you have leftover keratin crumbs. Use a small dab of oil + a fine comb to lift them out.
- If you see wide areas of scalp or unusual shedding, stop all tension styles and seek a stylist or dermatologist.
Common removal mistakes and how to avoid them
The “top five” errors
- Pulling bonds off dry. This snaps hair at the attachment point. Always crack and saturate first.
- Working on wet hair. Wet hair stretches and weakens. Remove on dry hair only.
- Using the wrong solvent. Nail glue remover and lash remover can contain harsh agents not meant for scalp contact. Use a keratin-specific formula.
- Crushing too hard with serrated pliers. Teeth on pliers can cut your hair. Use smooth jaws and controlled pressure.
- Skipping the detangle step. Shed hairs collect under bonds. You must comb them out section by section to prevent a larger tangle later.
Troubleshooting quick guide
| Problem | Likely Cause | Fix |
|---|---|---|
| Bond will not budge | Not enough remover or dwell time | Add 2–3 drops, wait 60 s, re-crack in two directions |
| Sticky residue on strands | Half-melted keratin | Rub with a drop of remover between fingers, wipe, then shampoo |
| White flakes after drying | Crushed keratin crumbs left in hair | Fine-tooth comb from ends up; clarify once |
| Tangled mass under bond | Built-up shed hairs | Oil + conditioner soak; pick from ends with tail comb |
| Scalp stings | Remover on skin or micro cuts | Use less product; protect skin with a paper towel; pause if irritation lasts |
Tools and products I recommend for home users
Simple kit, strong results
- Remover: alcohol-based keratin bond remover for most heads; salon acetone remover for very hard Italian keratin.
- Pliers: flat-jaw “bond breaker” pliers or smooth-jaw electrician’s pliers.
- Combs: tail comb for parting; wide-tooth comb for detangling; fine comb for final pass.
- Care: lightweight serum with dimethicone + natural oil; balanced conditioner; one clarifying shampoo.
- Extras: nitrile gloves, hair clips, cape, mirror, good lamp.
I work with full-cuticle human hair every day. The bond quality varies by brand. Hard, clear Italian keratin needs more pressure and often an acetone remover. Softer, opaque bonds release with alcohol-based removers. If you do not know your bond type, test, then choose the least aggressive option that works.
When you should not remove at home
Call a pro if you have:
- Severe matting at the root that feels like a pad.
- Bonds installed with unknown adhesive or DIY glue.
- Scalp conditions like eczema flare, open cuts, or active hair loss.
- A previous chemical service in the last 7 days (color or perm).
- Very fine hair with breakage lines right at the bonds.
A good stylist will charge for time, but they also protect your length. If a single section worries you, book a short “assist removal” for that area and finish the rest at home.
My opinion
I make and supply keratin-tip extensions for salons and brands, so I see how bond chemistry and tip shape affect removal. A clean, medical-grade keratin with proper pigment and no fillers always releases more predictably. Tips that look glassy and uniform usually crack cleanly. Tips that look chalky, gummy, or uneven can smear and leave residue. For home users, the safest plan is to start gentle and increase strength only where needed. Work in micro-sections. Respect dwell time. Protect your cuticle with slip after each row. If you plan to reinstall extensions later, give your scalp one full week of rest and two deep conditioning sessions. Healthy foundation gives longer wear next time.
FAQ
Can I use coconut oil alone to remove bonds?
Oil helps soften edges and detangle shed hairs, but oil alone rarely breaks a quality keratin bond. Use a remover first, then oil for comb-out.
Will acetone ruin my hair?
Short contact on the bond is fine, but acetone is drying. Ventilate, protect skin, and follow with a hydrating mask. Do not soak your whole head.
Why do so many hairs come out when I comb after removal?
Those are shed hairs that were trapped under each bond. We normally shed 50–100 hairs daily. Over months, they collect. This is expected.
How long should I wait before reinstalling extensions?
Give your scalp at least 5–7 days. Do two deep conditioning treatments. If the scalp feels tender, wait longer.
What if a few bonds are still sticky after two shampoos?
Rub a tiny amount of remover on the sticky spot, pinch between fingers, wipe, and shampoo the area again. Do not use high heat until all residue is gone.
Are fusion bonds the same as tape or nano rings?
No. Fusion uses heat-melted keratin on single strands. Tape uses pressure-sensitive adhesive on wefts. Nano rings are metal rings with tiny tips crimped in place.
Conclusion
Home removal is possible with the right remover, gentle cracking, and patient detangling. Work small, never pull, clarify once, and restore slip. Protect your scalp, then enjoy light, clean hair again.


