As a premier hair extension manufacturer, we know that flawless hair requires flawless execution. To properly install nano ring extensions, create clean sections and use perfectly matched nano rings. Thread a calibrated strand of natural hair, insert the durable nano-tip, and clamp firmly.
Longevity and comfort depend on placement: the ring must sit slightly away from the scalp, allowing the extension to flow naturally without causing tension or traction alopecia. Build the look using a balanced brick-row layout, ensuring attachments remain completely undetectable along the hairline.

This expert manual provides your stylists with everything they need: from professional sectioning and perfect ring-tip compatibility to row mapping, flawless blending, and critical aftercare protocols for maximum client retention.
What are nano hair extensions?
Nano ring hair extensions are individual extension strands attached to small sections of natural hair with tiny rings. The nano tip and natural hair are placed inside the ring, which is then clamped to secure the attachment.
The method does not require heat, glue, or tape during installation. However, the result still depends on correct strand weight, section size, ring compatibility, placement, clamp pressure, and maintenance.
Nano hair extensions use a tiny metal ring and a nano-sized tip. The tip is usually a fine wire or plastic filament bonded to a small strand bundle. The ring grips the natural hair without heat.
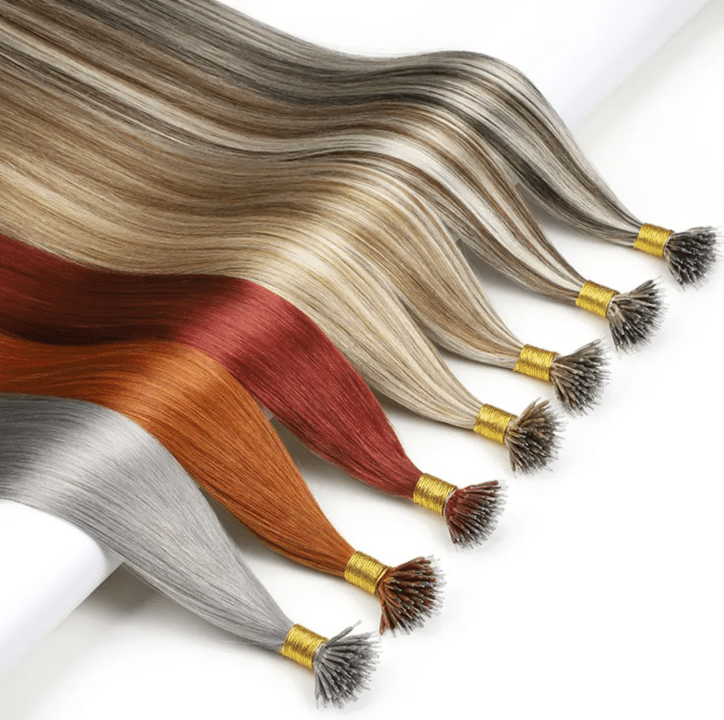
What “nano” means in the chair: The ring inner diameter is very small, so the bond is discreet. A proper nano system pairs the correct ring size with the right tip core. Some brands use a metal wire core; others use a soft polymer. I match ring type to the tip core to prevent slippage and to keep pressure even. I also match strand weight to the client’s hair density. Fine clients need light strands, often 0.5–0.8 g. Medium clients can carry 0.8–1.0 g. I never overload a fragile perimeter.
Hair quality matters: I use full cuticle, single-donor hair for wear time, color accuracy, and reusability. This hair resists matting, holds tone, and survives multiple move-ups. It blends cleanly after a dry cut. It also saves my clients money over the year because I can reinstall the same hair.
Where nanos shine vs. other methods: Nanos sit flatter than most micro-rings and avoid adhesive like tape. They are great for parting versatility and ponytails. They are slower than tape for bulk volume days, but nanos win where micro invisibility and flexible styling matter.
| Feature | Nano rings | Tape-ins | Keratin (U tip) |
|---|---|---|---|
| Bond size & visibility | Ultra small, very discreet | Flat, may show in high movement | Small but fused, needs removal heat |
| Install speed | Moderate | Fast | Slower |
| Reuse & move-up | High (8–10 weeks) | High (6–8 weeks, adhesive care) | Moderate (re-tip if needed) |
| Heat/Glue used | No heat, no glue | Adhesive | Heat bonds |
| Ideal clients | Fine to medium density | Volume/length quickly | Long wear, precise strand control |
How to Install Nano Ring Hair Extensions Step by Step
Nano ring extensions should be installed by a trained professional. Before beginning, check the client’s scalp condition, natural hair density, growth pattern, target length, desired volume, and maintenance history.
Tools You Need
- Nano tip hair extensions
- Compatible nano rings
- Loop or threading tool
- Tail comb
- Sectioning clips
- Nano ring pliers
- Extension brush
- Color and strand weight chart
Step 1: Assess the Client’s Hair
Check the natural hair density, strength, scalp condition, hairline, crown growth, and areas of weakness.
Do not place heavy strands on fine or fragile sections. The extension weight must be supported by enough natural hair.
Step 2: Prepare the Hair
Wash the hair to remove oil and product buildup. Avoid applying conditioner or heavy treatment products close to the roots before installation.
Dry and smooth the hair completely so the section sizes and growth direction remain visible.
Step 3: Map the Rows
Create clean horizontal sections, starting in the lower back area and working upward.
Leave enough natural hair around the nape, sides, crown, parting, and hairline to conceal the attachments. Plan the rows around the client’s haircut and normal styling habits rather than following one fixed row count for every client.
Step 4: Load the Nano Ring
Place the compatible nano ring onto the loop or threading tool.
The ring size and inner construction must match the nano tip system. Do not assume that every metal, plastic, or polymer tip uses the same ring.
Step 5: Select the Natural Hair Section
Take a clean section of natural hair that can safely support the extension strand.
Sections that are too small can create tension or breakage. Sections that are too large may prevent the ring from gripping correctly and can lead to slipping.
Step 6: Insert the Nano Tip
Pull the natural hair through the nano ring, then insert the extension tip into the same ring.
Keep the natural hair and extension aligned with the direction of growth. Avoid twisting the section before clamping.
Step 7: Position and Clamp the Ring
Position the ring slightly away from the scalp. It should feel secure but should not pull, press into the scalp, or prevent natural movement.
Clamp the ring with firm, controlled pressure using the correct plier position for the ring system. If the attachment slips or rotates excessively, reopen it and reinstall it instead of repeatedly crushing the ring.
Step 8: Continue in Brick Rows
Continue across the row with balanced spacing.
Offset the attachments in the next row so the upper strands cover the gaps below. This brick pattern helps distribute the extensions and reduces visible attachment lines.
Step 9: Check the Perimeter and Tension
Before continuing to the next area, check that the rings remain hidden when the hair moves, parts, or is tied back.
Ask the client whether any attachment feels sharp, tight, or uncomfortable. Reposition problem attachments immediately.
Step 10: Blend and Finish
After completing the installation, check the overall balance from the back, sides, and front.
Blend the extension hair into the client’s haircut without thinning the extension ends excessively. Finish by explaining brushing, washing, drying, sleeping, product use, and the move-up schedule.
Nano ring hair extensions before and after


How to put nano hair extensions in yourself?
People want a DIY shortcut. I respect that desire, but I also protect their hair.
Self-install is risky because section sizes and tension control are hard without training. I do not recommend full DIY. If a client must, I suggest a small, temporary filler and a pro check-in.
Why I advise pro installs: Nanos look simple, but consistency matters. Uneven section size creates slip or stress. Mis-matched ring and tip compressions cut cores or break natural hair. Poor mapping causes visible bonds in ponytails. A stylist sees crown whorls, perimeter weaknesses, and density changes that a mirror misses.
If someone insists on limited self-work: I set clear rules. Only place a few filler strands behind the ears for a one-night event. Use pre-bonded nano tips from a reputable source with identical diameter. Use a silicone-lined nano ring for cushion. Never place near the hairline or crown. Keep tension low. Crimp once only. Remove within one week using a proper opener plier. Do not wash aggressively. Avoid oils at the root. Book a salon for full installation and mapping.
Safer alternatives for home: I steer clients to clip-ins or halos for temporary wear. Those give volume without root pressure. For long projects like bridal season, I tell clients to plan a pro nano install early and maintain it with scheduled move-ups. Hair health first; revenue follows when clients trust our guidance.
How Many Nano Ring Extensions Are Needed for a Full Head?
| Natural Hair and Goal | Typical Starting Range |
|---|---|
| Fine hair or light volume | 100–150 strands |
| Medium-density hair | 150–200 strands |
| Thick hair or major length and volume | 200+ strands |
These figures are planning ranges rather than fixed installation rules. The final strand count depends on natural hair density, head size, target length, desired volume, haircut, strand weight, and the client’s ability to support the attachments.
A client may need fewer heavier strands or more lightweight strands, so strand count should never be assessed without checking the weight of each extension.

Nano Ring Maintenance and Move-Up Schedule
Nano ring extensions need consistent home care and scheduled salon maintenance.
Clients should brush gently from the ends upward, support the hair below the attachments while detangling, keep heavy oils and conditioners away from the rings, dry the roots completely after washing, and secure the hair loosely before sleeping.
Most clients should return every 6–8 weeks for a professional check and move-up. During maintenance, the stylist should inspect strand loss, ring movement, matting, natural shedding, tip condition, and scalp comfort before reinstalling the hair with fresh rings.
Daily care: I recommend a soft detangling brush and a loop brush near bonds. I tell clients to detangle morning and night, starting at the ends and moving upward with the other hand supporting just below the bonds. They must dry the root after washing; sleeping on wet bonds invites tangling. I allow light, leave-in conditioner from mid-lengths down and a touch of serum on the ends.
Wash routine: I use sulfate-aware shampoo at the root with gentle finger pads. No circular scrubbing. I rinse thoroughly, then condition from mid-lengths. I avoid heavy oils near the bonds. If the client has hard water, I plan a gentle chelating wash monthly and a moisture mask mid-lengths down. Minerals can dull color and increase friction; chelation resets slip and shine.
Move-up schedule: I schedule 8–10 weeks for most clients. Fast growers may need 6–8. At move-up, I open the ring, slide out the strand, comb out shed, clarify, and reinstall with a fresh ring. I inspect the nano tip core; if crushed or bent, I replace or re-tip. I track strand losses; more than 5–10% between appointments means I adjust section sizes or ring type.
Common Nano Ring Installation Mistakes
Most problems come from three things: bad mapping, wrong ring/tip match, and over-tension.
I avoid these by planning rows, sizing sections to density, matching ring to tip core, crimping once with the right groove, and teaching aftercare clearly with written steps.
1. Placing Rings Too Close to the Scalp
Attachments placed flush against the scalp can restrict movement and create pulling or discomfort. Leave enough space for the strand to move naturally.
2. Using Too Little Natural Hair
A heavy extension strand attached to a weak natural hair section can create tension or breakage. Match the section size to the extension weight.
3. Using an Incompatible Ring and Tip
A ring that is too loose may slip. A ring that is too tight may damage the tip or create excessive pressure. Test the complete system before using it on clients.
4. Over-Clamping the Ring
Excessive pressure can crush the ring, damage the tip, or place unnecessary stress on the natural hair. Use controlled pressure and reinstall a poor attachment instead of repeatedly compressing it.
5. Poor Row and Perimeter Placement
Attachments placed too close to the nape, hairline, crown, or parting may become visible when the client moves or styles the hair. Leave sufficient natural coverage around the perimeter.
6. Ignoring Aftercare and Late Maintenance
Oil buildup, wet sleeping, rough brushing, tangling around the rings, and missed move-up appointments can lead to slipping, matting, or tension. Provide written aftercare and book the next appointment before the client leaves.
Our Factory View
A successful nano ring service depends on more than small attachments.
The stylist must control strand weight, section size, ring compatibility, placement, clamp pressure, row balance, and maintenance timing. The product must also remain consistent in tip diameter, strand weight, color, hair quality, and reuse performance.
For salons and hair brands, a sample should not be approved only because it feels soft before washing. Test the hair after installation, washing, brushing, heat styling, removal, and reinstallation.
A system that installs neatly but tangles, slips, changes color, or becomes difficult to reuse will create callbacks and reduce long-term client value.choose premium.
FAQ
Are nano hair extensions good for fine hair?
Yes, when I use lighter strands and gentle spacing. I avoid heavy grams on fragile areas.
How often should clients move up nanos?
Every 8–10 weeks for most clients; 6–8 for fast growth or very fine hair.
Do nano rings damage hair?
Not when installed with correct section size, ring choice, and tension, plus proper home care.
Can clients color with nanos installed?
I color away from the bonds. I protect bonds and avoid oxidative chemicals at the ring area.
How many strands do I need?
Most full heads need 120–180. I test with a mini row to confirm.
What about swimming and workouts?
Clients should rinse after salt/chlorine, dry the root, and braid before intense activity.
What Salons and Brands Should Check Before Ordering
| Product Check | Why It Matters |
|---|---|
| Nano tip diameter | Inconsistent tips may not fit the same ring securely |
| Ring compatibility | Poor matching can cause slipping or excess compression |
| Strand weight consistency | Helps stylists create balanced sections and pricing |
| Hair after washing | Reveals tangling, dryness, coating, and cuticle problems |
| Color consistency | Protects repeat orders and shade matching |
| Tip durability | Affects removal and reuse |
| Ring opening and reclamping | Affects move-up efficiency |
| Shedding performance | Reduces complaints and service loss |
Before placing a bulk order, salons and hair brands should test a complete system rather than testing the hair alone. The nano tip, ring, pliers, strand weight, hair quality, and removal process must work together.
We can prepare full cuticle nano tip samples in different lengths, colors, strand weights, tip materials, and private label packaging for salon testing.
Conclusion
Nano ring hair extensions can create small, discreet attachments when the strand weight, natural hair section, ring compatibility, placement, and clamp pressure are controlled correctly.
The rings should sit slightly away from the scalp, follow the natural growth direction, and remain hidden around the perimeter. Clients also need written aftercare and move-up appointments every 6–8 weeks.
For salons and hair brands, test the complete nano system before bulk ordering. Hair quality, tip consistency, ring grip, color stability, removal, and reuse all affect long-term service results.