When it comes to hand-tied extensions placement, precision is everything. As a stylist or salon owner, you understand that a flawless installation determines the final outcome. But where exactly should you place those delicate wefts to maximize volume, length, and achieve that perfect, natural look? Let’s break it down step by step.
Hand-tied extensions are sewn onto a beaded track, and their placement depends on factors such as hair type, desired style, and the number of rows needed. Proper placement ensures a flat, comfortable installation with minimal tension on the natural hair, preventing damage and ensuring longevity.
If you’re looking to master hand tied weft installation or customize the placement technique for each client, keep reading. This guide will walk you through the best strategies for achieving a flawless result.

What Are Hand-Tied Extensions?
Hand-tied extensions are a type of weft hair extension that provides a natural, seamless look by being sewn onto a beaded track. Unlike machine-tied wefts, hand-tied wefts are thinner and more flexible, making them ideal for creating a lightweight, undetectable result.
Benefits of Hand-Tied Extensions:
Natural Look: The thin, flexible wefts blend seamlessly with natural hair.
Lightweight & Comfortable: Less bulky than machine wefts, reducing strain on the scalp.
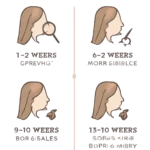
Long-Lasting: When properly installed and maintained, they can last 6-8 weeks before needing a move-up.
Versatile Styling: Can be styled just like natural hair, including curling and straightening.
Less Damage: No glue or tape, reducing the risk of hair breakage.
How to Place Hand Tied Extensions for Optimal Results
The beauty of hand-tied extensions lies in their ability to provide a seamless, natural look, but achieving that requires a careful approach to placement. This isn’t just about sticking wefts anywhere; it’s about creating a cohesive, balanced look that will last.
1. Assessing the Client’s Hair Type and Goals
Before diving into placement, you need to consider a few key factors. Every client’s hair is different, so the placement strategy should always be personalized. Here are a few things to keep in mind:
Hair Type: Thicker, denser hair may require more rows and careful layering to prevent any visible lines, while finer hair may need fewer rows or different placement techniques to avoid overwhelming the hair.
Desired Look: Are they looking for volume, length, or both? Your placement will vary based on whether they want a subtle enhancement or a dramatic transformation.
Head Shape and Natural Hair Growth Pattern: Understanding the client’s head shape and how their natural hair grows will help you determine the best placement points to avoid any bulkiness or unnatural lines.
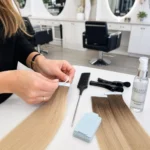
2. Tools Required for Hand-Tied Extensions Installation
The right tools make a significant difference in ensuring a secure, long-lasting hand tied weft installation:
Microbeads – for creating the foundation.
Loop tool – for threading the beads onto natural hair.
Clamp pliers – for securing beads in place.
Curved needle & strong thread – for sewing the wefts securely.
Sectioning clips & tail comb – for precise parting and control.
3. Creating the Beaded Track (Foundation)
The foundation is everything when installing hand-tied extensions. Here’s how to approach it:
Section the Hair: Start by sectioning off the hair to ensure you can work in layers. Make sure each section is even and clean, as uneven sections can affect the final result.
Place Beads: After sectioning the hair, beads are placed along the natural hairline to create the foundation for the hand-tied wefts. The beads should be placed closely together but not too tightly. Make sure there’s enough room between beads for the weft to be sewn in securely.
4. Determining the Row Placement
The number of rows needed for hand tied extensions placement depends on hair density and the desired level of volume. Here’s a general guide:
One or Two Rows – Ideal for subtle volume or slight length enhancement.
Three Rows – A balanced approach for noticeable volume and length.
Four or More Rows – Recommended for clients seeking significant length and fullness. Rows should be layered from the nape upwards towards the crown.
Placement Tips:
The first row should sit near the nape, blending with the natural density.
Additional rows should be placed strategically to avoid bulkiness.
Leave enough space between rows to allow for natural movement.
5. Sewing the Wefts to the Track
With the foundation set, it’s time to attach the wefts securely. Proper hand tied extension placement ensures longevity and comfort.
Begin at the Nape – Start sewing from the lowest row to create a seamless blend.
Follow the Natural Growth Pattern – This ensures the extensions lay flat and blend naturally.
Ensure Even Spacing – Wefts should not be too far apart to avoid gaps or uneven volume.
Check for Tension – Avoid pulling too tightly, as excessive tension can lead to discomfort and hair damage.
6. Layering for a Seamless Blend
Layering is a crucial step to make the extensions look natural. Here’s how to refine the final look:
Blend the Extensions with Natural Hair: Trim and layer the extensions according to the client’s haircut.
Use Texturizing Techniques: Soft layers create a more natural transition between the extens ions and natural hair.
Adjust Based on Style Preference: Clients wanting volume may need internal layering, while those seeking length may prefer subtle layers.
7.More tips
Achieving a flawless hand-tied extension installation doesn’t just come down to technical skill—it’s about mastering the art of placement. Here are a few tips to help you perfect your technique:
a. Use the Right Tools
The right tools can make all the difference when it comes to placement. Make sure you have high-quality beads, thread, and needles to ensure the wefts stay secure throughout the client’s wear.
b Take Your Time
When it comes to hand-tied extensions, patience is key. Take your time to ensure each weft is placed carefully, and don’t rush the sewing process. Quality over speed will always result in a better final look.
c. Customize the Placement for Each Client
Every client’s hair is unique, and so is their desired look. Don’t be afraid to customize the placement for each individual, adjusting the number of rows, sections, and layering to achieve the best results.
d. Avoid Overcrowding
While it’s tempting to add as many rows as possible, remember that overcrowding can lead to bulkiness or discomfort. Less is often more when it comes to placement.

What Happens If Hand-Tied Extensions Are Not Installed Correctly?
Incorrect placement of hand-tied extensions can cause several issues, including:
Visible Wefts: If the wefts are placed too high or not properly layered, they can become visible, ruining the seamless effect.
Discomfort or Pain: Placing beads too tightly or using too many rows can create unnecessary tension on the scalp, leading to headaches and hair damage.
Uneven Blending: Poor placement can cause uneven blending, making the extensions look unnatural.
Hair Breakage: Incorrect beading or sewing techniques can put stress on natural hair, leading to breakage over time.
Shortened Lifespan: Extensions that are not properly installed or cared for will not last as long, leading to more frequent replacements and increased costs for the client.
FAQ: Hand-Tied Extensions Placement
1. How long do hand-tied extensions last?
Hand-tied extensions typically last 12-16 weeks before needing to be moved up. With proper care, the hair itself can last up to a year or longer.
2. Can I style my hair with heat after installing hand-tied extensions?
Yes! Hand-tied extensions can be curled, straightened, and styled like natural hair. However, always use a heat protectant to maintain the hair’s integrity.
3. Can I wash my hair with hand-tied extensions?
Yes, but avoid harsh shampoos containing sulfates or alcohol. Use a gentle, sulfate-free shampoo and focus on cleansing the scalp while being gentle on the extensions.
4. Will hand-tied extensions damage my natural hair?
When properly installed and maintained, hand-tied extensions are one of the least damaging methods. Avoid excessive tension and always have them installed by a professional.
5. Can I wear my hair in a ponytail with hand-tied extensions?
Yes! Hand-tied extensions are designed for versatility, allowing for updos, ponytails, and other styles without exposing the wefts.

Conclusion
Hand-tied extensions placement is a delicate art that requires skill, attention to detail, and a deep understanding of your client’s needs. By carefully assessing their hair type, desired look, and using a personalized approach, you can create a seamless and natural look that will leave them loving their new hair.
Remember, perfect placement isn’t just about technique—it’s about adapting the method to suit each individual client. Whether you’re adding subtle volume or dramatic length, the right placement ensures the extensions will blend beautifully with the natural hair, providing a flawless, long-lasting result.
where to buy wholesaleHANDTIED WEFT hair
Hibiscus Hair Manufacturer has been dedicated to producing high-quality handtied weft hair extensions for 25 years and is a recognized leader in the industry. If you are interested in finding a reliable hair extensions supplier and wholesale for your brand, please visit our website for more information: