
Worried about thinning edges or sticky residue? Do tapes feel heavy after week four? Let’s talk honestly. What causes damage, what prevents it, and how to keep hair healthy.
Does tape hair extensions damage hair? Tape-in hair extensions do not damage hair by default. Damage comes from excess tension, too much weight, overdue move-ups, harsh removal, and oils or heat at the adhesive. Correct mapping, light grams, oil-free routines, and on-time maintenance keep hair safe and reusable.

This guide keeps the focus on practice. It explains mechanisms, shows safe rules for installation and care, and gives fast responses to warning signs. The recommendations work for salons, distributors, and informed wearers.
do tape extensions ruin your hair?
Fear comes from traction, slip, and sticky removals. Clear rules reduce risk and protect growth.
Tape-ins are safe when tension is light, section size matches tape width, products stay off the base, and move-ups happen every 6–8 weeks. Most problems start when rows migrate or oils touch the adhesive.
Dive deeper
Damage with tape-ins has three main paths: traction at the roots, chemical slip at the adhesive, and rough removal that breaks fibers. Traction happens when a tape holds too much hair or sits too tight. As natural hair grows, leverage increases. This creates soreness and small pulls on the same follicles. Slip happens when oils, heavy conditioners, or silicone serums touch the PU strip. The bond softens. Tapes slide and catch during brushing or washing. Rough removal happens when remover has not penetrated the adhesive, or when the tape is peeled fast without supporting the section.
Think like an engineer. Spread load, control chemistry, and respect timing. Spread load by matching grams per sandwich to the client’s density. Control chemistry by keeping anything oily or hot away from the base. Respect timing by rebooking before growth creates extra leverage. Use the table to anchor habits.
| Risk source | Early sign | Fix now | Rule next time |
|---|---|---|---|
| Traction | Tenderness at day 2–3 | Loosen or refit | Lighter tension, correct section |
| Slip | Tape edges feel tacky | Clarify base; replace tapes | Oil-free base care |
| Overdue move-up | Row sits far from scalp | Rebook now | 6–8 week cadence |
| Rough removal | Snapping strands | More remover + slow peel | Soak, sandwich split, support |
What causes damage with tape-ins?
Most damage is not random. It is the sum of small loads plus chemistry.
High tension, heavy stacks, late maintenance, base oils, high heat, and poor removal technique are the main triggers. A clear checklist prevents each one.
Dive deeper
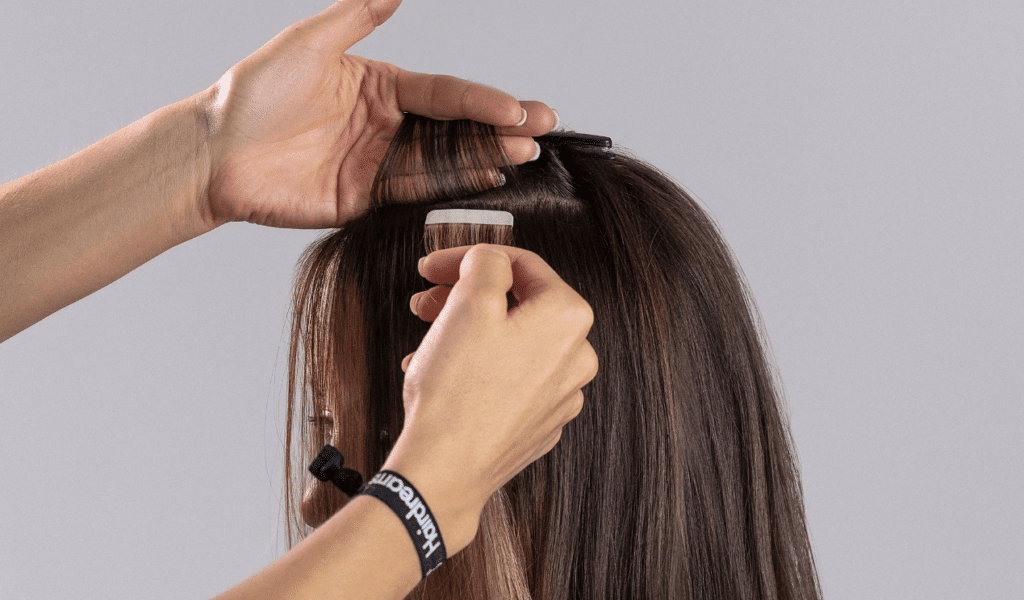
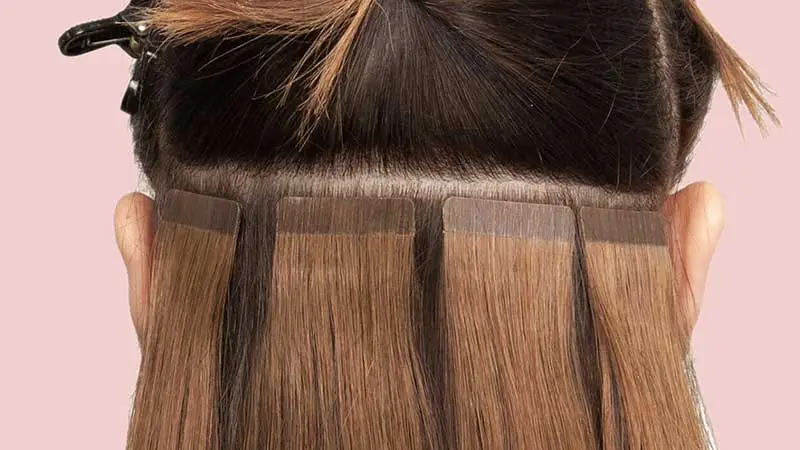
1) Tension and section size
Each tape should hold a balanced slice of hair. Too little hair and the section tears. Too much hair and the adhesive fails. The sweet spot matches tape width to section width, with even distribution from edge to edge. Tension should feel secure but comfortable on day one. Pain that lasts beyond 48 hours is a red flag.
2) Weight and stacking
Stacking multiple sandwiches at the same point overloads a small area. This creates pressure and visible edges on fine hair. Distribute grams across more placements instead. Keep edges, widows peaks, and cowlicks light.
3) Products at the base
Conditioners, masks, oils, and some sunscreens soften PU adhesive. Alcohol-heavy sprays can also weaken bonds. Apply hydration on mid-lengths to ends only. Map a “no-product zone” within 2–3 cm of the base.

4) Heat at the base
Flat irons and high heat blow-dry on the PU melt, warp, or pre-age the adhesive. Keep tools away from tapes. Dry the base with low to medium heat and airflow.
5) Late move-ups
Growth increases leverage. A tape that sits far from the scalp behaves like a long lever. Traction rises, and edges snag during brushing. Shorten the cadence for fast growers or athletes.
| Trigger | Mechanism | Prevention | Repair path |
|---|---|---|---|
| Tight map | Traction | Light tension, correct slice | Refit lighter |
| Heavy stack | Pressure | Spread grams, avoid edges | Remove extras |
| Base oils | Slip | Mid→ends only | Clarify, re-tape |
| Heat on PU | Adhesive fatigue | Low heat near base | Replace tapes |
| Overdue | Leverage pull | 6–8 week cadence | Early rebook |
How to prevent tape-in damage from day one?
Prevention is design plus discipline. Small choices compound into safety.
Design light, distribute load, protect the base from oils and heat, and set a non-negotiable maintenance cadence. Document grams, placements, and client care rules.
Dive deeper
Mapping and sectioning
Match tape width to section width. The slice must be flat, even, and free of flyaways. Place tapes at least 1 cm from the scalp to allow natural movement. Keep tension light. On fine hair, use fewer sandwiches and leave more space between placements.
Weight control
Start with conservative grams. Add density in safe zones, not along fragile edges or whorls. For thin hair types, consider invisible tape designs that hide better and require fewer sandwiches.
Base protection
Declare a base care rule set: no oils, masks, or heavy silicones near tapes. Keep dry shampoos and texture powders away from the bond line. When washing, direct shampoo to the scalp with vertical motions. Rinse thoroughly. Dry the base completely after each wash.
Timing
Book maintenance at install time. Standard is 6–8 weeks. Fast growers, swimmers, and heavy exercisers often need 5–7 weeks. Late move-ups raise traction.
Documentation
Record shade, grams, tape size, placements, and care rules. For salons and distributors, attach a QR code to the client card or box for fast reference. Consistency prevents guesswork later.
| Prevention pillar | Action | Why it works |
|---|---|---|
| Map | Flat, even sections | Low traction |
| Weight | Conservative grams | Comfort + concealment |
| Base | Oil-free zone | Stable adhesive |
| Timing | 6–8 week rebook | No leverage build-up |
| Records | Grams + placements | Repeatable success |
How should clients care for tape-ins at home?
Home care makes or breaks outcomes. Simple habits keep tapes secure and hair smooth.
Support the base when brushing, wash 2–3× weekly with sulfate-free shampoo, keep conditioner on mid-to-ends, dry the base fully, and sleep with a braid on silk or satin.
Dive deeper
Brushing
Use a loop brush or soft paddle. Hold above the tape with one hand to support the section. Start at the ends and work upward in short strokes. Do this morning and night to prevent micro-matting.
Washing
Wet the hair, then apply shampoo to the scalp line. Use the pads of the fingers with vertical motions. Let suds glide through the lengths. Rinse thoroughly. Apply conditioner from mid-lengths to ends with praying-hands motions. Keep product off the tapes. Rinse cool.
Drying and heat
Towel blot, then dry the base completely with low to medium heat. Point airflow down the hair shaft. Keep flat irons and curling irons several inches away from tapes. Always use heat protectant on lengths.
Sleep and sport
Before bed, braid loosely or tie a low ponytail. Use a silk or satin pillowcase. For workouts, secure hair off the face. Sweat is fine, but dry the base after heavy activity.
| Care area | Do | Don’t |
|---|---|---|
| Brushing | Ends→roots, support base | Yank at tapes |
| Washing | Scalp focus, thorough rinse | Scrub across tapes |
| Products | Mid→ends only | Oils at base |
| Heat | Low–medium at base | Hot tools on PU |
| Sleep | Loose braid + silk pillow | Sleep on wet base |
How should removals and reapplications be done safely?
Removal is where many break hairs. Slow chemistry wins over force.
Saturate with approved remover, split the sandwich gently, support the section, comb residue from the mid-lengths, and cleanse the base before reapplication with fresh tape.
Dive deeper
Saturation
Start with dry hair. Apply remover along the seam. Wait long enough for the adhesive to soften. Patience matters more than pulling. Test an edge with a tail comb.
Separation
Slide the top tape forward while supporting the section. Do not peel upward. Keep the angle shallow to avoid lifting natural hairs. If you feel resistance, add remover and wait again.
Residue control
After both tapes are off, mist remover on any residue along the section. Use a fine-tooth comb with gentle, short strokes from mid-lengths downward. Avoid combing near new growth too aggressively.
Pre-reinstall cleanse
Clarify the base area to remove remover film. Dry completely. Replace with new tape tabs. Re-map placements if any area looks tender or sparse. Reduce grams where needed.
| Stage | Tool | Key rule | Risk if rushed |
|---|---|---|---|
| Soften | Adhesive remover | Wait, re-apply | Broken hairs |
| Split | Tail comb | Slide forward, shallow angle | Root lift |
| Clean | Fine comb | Short strokes, mid→ends | Friction snaps |
| Prep | Clarifying shampoo | Dry base 100% | Poor re-adhesion |

Who should avoid or modify tape-ins?
Not every scalp or schedule fits tape-ins. Adjust the plan to protect long-term growth.
Avoid or modify tape-ins during active scalp disease, postpartum peak shed, telogen effluvium after illness, or when hairline density is very low. Choose lighter methods or temporary options.
Dive deeper
Situations to pause
Active seborrheic dermatitis or psoriasis increases irritation at adhesive points. Postpartum sheds often peak at months 3–4; wait for stabilization. Recent illness, crash dieting, or high stress can cause diffuse shedding. Tape-ins add management stress during these windows.
Situations to modify
Very fine edges or sparse temples need fewer sandwiches and more distance from the hairline. Use narrower tapes or invisible tape designs. Shorten maintenance to reduce leverage. Rotate placements to avoid loading the same follicles every cycle.
Temporary alternatives
Clip-ins or halo pieces deliver volume without adhesives. They work well while density recovers. For ultra-fine hair needing longer wear, consider V-light or micro-bond methods placed with extreme restraint.
| Scenario | Better choice |
|---|---|
| Active scalp inflammation | Treat first, then reassess |
| Postpartum months 3–6 | Delay or ultra-light plan |
| Diffuse stress shed | Pause until shedding calms |
| Sparse hairline | Fewer, narrower tapes; back from edge |
| Short-term glam | Clip-ins or halo pieces |
What are the early warning signs, and how should you respond?
Early action saves hair and extensions. Wait, and small issues grow fast.
Watch for soreness beyond 48 hours, visible migration, tacky edges, or root tangles. Respond with early check-ins, clarifying the base, light refits, or partial removals.
%[tape in warning signs and responses(https://placehold.co/600×400 “See it early, fix it early”)]
Dive deeper
Soreness past 48 hours
Normal settling fades within two days. Ongoing pain suggests tight tension or an overloaded section. Loosen, refit lighter, or remove in that area. Do not wait for the next booking window.
Migration
If a tape sits far from the scalp or rotates, leverage increases and brushing snags. Shorten the cycle and refit now. Teach the wearer to support the base during brushing.
Tacky edges or odor
Sticky edges or a faint odor signal product at the base or a damp bond line. Clarify the base, dry thoroughly, and replace tapes that feel gummy. Review oil-free rules.
Root tangles
Micro-matting between tapes grows quickly. Separate sections gently with fingers, add slip, and detangle from the ends upward. Late action turns a small knot into a removal problem.
| Sign | Likely cause | Immediate action | Next-step rule |
|---|---|---|---|
| Pain day 3+ | Tension/overload | Refit lighter | Lower grams |
| Tape far from scalp | Overdue move-up | Rebook now | Shorten cadence |
| Sticky edges | Oils/conditioner | Clarify + replace | Product mapping |
| Root matting | Brushing habits | Separate + detangle | Support base, nightly braid |
My opinion
Small, repeatable rules beat big promises. Light tension, matched sections, clean bases, on-time move-ups, and patient removals protect natural hair and lift reuse rates. When in doubt, I reduce grams, shorten cadence, and keep anything oily away from the PU. That simple triad prevents most tape-in trouble.
FAQ
How often should tape-ins be moved up?
Every 6–8 weeks for most people. Fast growers or heavy exercisers may need 5–7 weeks.
Can I use oils with tape-ins?
Use light products only on mid-lengths to ends. Keep oils, masks, and heavy silicones off the tapes.
Why do tapes slip?
Base oils, conditioners at the bond, or high heat near PU soften the adhesive. Clarify the base and replace tapes.
Do tape-ins work on fine hair?
Yes, with light grams, careful mapping, and more space from fragile edges. Invisible tape designs help concealment.
Is soreness normal?
Mild pressure is normal for 24–48 hours. Pain after that means tension is too high or weight is too heavy.
How do I wash tape-ins safely?
Shampoo the scalp with vertical motions, rinse well, condition from mid to ends, then dry the base completely.
Can I swim with tape-ins?
Chlorine and salt water reduce bond life. Wear a swim cap when possible, rinse after, and dry the base promptly.
How should removal be done?
Saturate with remover, wait, split the sandwich gently, support the section, and cleanse the base before reapplication.
Are tape-ins reusable?
Yes. Quality hair can be reused through several cycles if adhesive is replaced and care is correct.
What if a tape feels itchy or sticky?
Check for product at the base or partial lift. Clarify, replace, and review care rules.
Do tapes cause permanent hair loss?
Permanent loss is rare and linked to chronic traction and missed maintenance. Early adjustments prevent escalation.
What heat settings are safe?
Low to medium heat near the base; higher heat only on lengths with protectant. Keep irons away from PU.
Can I use dry shampoo?
Use sparingly and avoid spraying directly on the tapes. Build-up weakens bonds.
How many sandwiches are ideal?
It depends on density and goals. Start light, then add only where coverage allows.
Conclusion
Tape-ins do not damage hair when design is light, bases stay clean, heat stays off PU, and move-ups are on time. Fix warning signs early, and both hair and extensions last longer.


