Beaded weft extensions are a popular choice for adding volume and length, but the placement process is key to achieving a flawless, long-lasting result. Let’s break down the essentials of proper placement, so you can ensure your clients get the best results.
Beaded weft extension placement involves securing the weft using small beads that clamp around natural hair. The beads are strategically placed about 1–2 inches from the scalp, ensuring a secure fit without damaging the natural hair. Proper placement ensures natural movement, comfort, and longevity.
If you’re looking to perfect your placement technique or just want to learn the finer details, keep reading. We’ve got everything you need to know to get those beaded wefts looking their best!

How Do Beaded Weft Extensions Work?
Before diving into placement techniques, let’s make sure you understand how beaded wefts work. These extensions are applied by sewing a horizontal weft of hair onto natural hair strands. Small, silicone-lined beads are threaded through the natural hair and the weft, then clamped tightly to secure the extension in place. This no-heat, no-glue method is gentle on the natural hair and offers a seamless look.
The Ideal Placement for Beaded Wefts
Proper placement is crucial for both the look and longevity of beaded weft extensions. Here’s how to get it just right:
Sectioning the Hair:
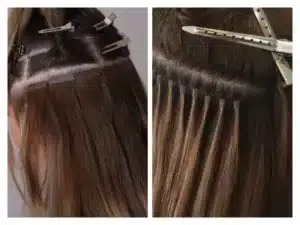
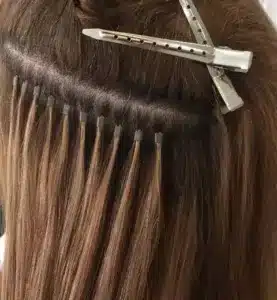
Start by sectioning the natural hair. You want to create thin, horizontal sections about 1–2 inches apart, depending on the thickness of the client’s hair. Using clips, secure the hair above each section to keep everything neat.
Choosing the Right Position for the Beads:
Beads should be placed about 1–2 inches away from the scalp, ensuring there’s enough natural hair for the beads to grip. Too close to the scalp, and the beads could be uncomfortable. Too far down, and the weft may not stay secure.
Threading the Beads:
Using a loop tool, thread small sections of the client’s natural hair through the silicone beads. Carefully insert the weft into the bead alongside the natural hair. You don’t want the bead to be too tight, as this can cause discomfort or breakage.
Clamping the Beads:
Once the hair and weft are in place, use a bead crimping tool to securely clamp the beads. The bead should fit snugly around the hair without causing too much pressure. Make sure the weft lies flat against the scalp for a natural, seamless appearance.
Check for Comfort:
After applying the beads and securing the weft, gently run your fingers through the client’s hair to check for any discomfort. The beads should be secure but not so tight that they cause tension or pull on the hair.
Common Mistakes to Avoid During Beaded Weft Placement
While beaded wefts are a relatively simple technique, there are a few common pitfalls you’ll want to avoid:
Placing Beads Too Close to the Scalp:
This can cause irritation and discomfort. Always leave about 1–2 inches of natural hair between the bead and the scalp.
Overcrowding Sections:
Trying to fit too many extensions in a small section of hair can cause the beads to slide or shift. Stick to smaller, thinner sections for a more secure fit.
Not Checking for Slippage:
After applying the beads, always double-check for slippage. It’s essential to ensure that each bead is holding the natural hair and weft firmly.
Using the Wrong Bead Size:
Different types of beaded weft extensions require different bead sizes. Make sure to use the correct size beads for your client’s hair thickness to ensure a secure attachment.

How Long Do Beaded Wefts Last?
When applied correctly, beaded wefts can last 6–8 weeks, depending on hair growth and maintenance. During this time, clients will need to return for maintenance appointments to reposition the beads as their natural hair grows. This prevents any tension on the roots, keeping the extensions in place without causing damage.
Maintenance and Aftercare for Beaded Weft Extensions
Maintaining beaded wefts is relatively easy, but there are a few things clients should be mindful of to ensure their extensions stay looking great:
Avoid Excessive Heat:
Since beaded wefts don’t require heat during installation, it’s important not to use excessive heat when styling the extensions. Use a heat protectant before styling.
Gentle Washing and Brushing:
Encourage clients to wash their hair gently and avoid brushing too roughly around the beads. Use a loop brush or a wide-tooth comb to prevent tangling.
Regular Touch-ups:
Beaded weft extensions typically require touch-ups every 6–8 weeks. During this appointment, the stylist will move the beads up closer to the scalp to keep the extensions secure.

Conclusion: Perfecting Beaded Weft Placement
The key to perfect beaded weft extension placement lies in understanding the importance of correct bead positioning, applying them securely, and ensuring comfort for your client. With proper placement, beaded wefts provide a durable, natural look that lasts. By mastering this technique, you can offer your clients a seamless, no-damage extension option that they’ll love!
Hibiscus Hair Manufacturer has been dedicated to producing high-quality beaded weft extensions for 25 years and is a recognized leader in the industry. If you are interested in finding a reliable hair extensions supplier and wholesale for your brand, please visit our website for more information:


