Flat crowns. Thin ends. Slow styling. These problems push many clients to fast, no-damage options. Halo hair extensions solve this with one piece, one wire, and zero commitment.
Halo hair extensions are a single weft attached to a thin, clear wire that sits like a headband. They add length and volume in 30–60 seconds with no glue, no tape, and no beads. They suit busy clients, trial looks, and event styling.

This guide explains halo structure, fit, blending, visibility, and care. It includes pro tips for thin hair, expected lifespan, and realistic before-and-after results. Use it to educate clients and train junior stylists.
What are halo hair extensions?
Fast change usually means stress on the root. Halo breaks that rule. It rests on the head, not on the follicles.
Halo hair extensions are a removable, one-piece system. The hair is sewn to a lace or mesh base. A clear nylon or elastic wire spans ear to ear. The client places it below the crown. Their own hair covers the base.
Construction and materials
- Base: lace, mesh, or slim fabric track. Weft can be machine, hand-tied, or hybrid.
- Wire: clear nylon filament or elastic monofilament. Some halos add side stabilizer clips (optional).
- Hair: synthetic, human, Remy, or full cuticle single-donor. Lengths 12–24 inches are most common. Weights range 80–200 g depending on density and head size.
| Spec | Typical options | Impact |
|---|---|---|
| Length | 12″, 14″, 16″, 18″, 20″, 22″, 24″ | Longer needs more grams to look full |
| Weight (grams) | 80–120 g, 140–180 g, 200 g | Higher grams = more density and coverage |
| Base width | 9–11 inches | Must span occipital width for stability |
| Wire type | Nylon or elastic | Elastic improves comfort; nylon holds shape |
| Hair grade | Synthetic, Human Remy, Full Cuticle | Higher grade = better blending and lifespan |
Why clients choose halo
- No damage at the root. The wire carries weight. Follicles rest.
- Very fast install. One piece on, one piece off.
- Ideal for events, photos, travel, and beginners.
- Easy retail add-on for salons and e-commerce.
Limitations to note
- High, tight ponytails expose the wire.
- Very short base hair (above jawline) needs expert blending or is not ideal.
- Wind and vigorous movement need extra security and proper fit.
Are halo extensions good?
Many clients ask for length without maintenance. Halos deliver that. They are good for quick transformation and low risk.
Halo extensions are good for speed, comfort, and zero-commitment wear. They protect the scalp. They are not ideal for high athletic use or strict updos.
Advantages
- No installation chair time after initial fit.
- No adhesives, solvents, or removers.
- Minimal traction. Good option for sensitive scalps.
- Easy to color-match, root-smudge, and layer.
- Great retail margin for salons. Low aftercare load.
Disadvantages
- Limited styling at the crown and high pony.
- Potential wire visibility if fit or placement is wrong.
- Not sweat-proof like sewn rows; not swim-proof.
- Requires client training on blending and wire adjustment.
| Area | Halo strength | Halo weakness | Salon note |
|---|---|---|---|
| Speed | 30–60s install | None | Great for event menus |
| Comfort | No tug at roots | Wire can press if tight | Adjust bead/loop |
| Styles | Down, half-up, low pony | High pony, top knot | Suggest mix with clip-ins |
| Care | Off-head washing | Easy to lose if mishandled | Provide storage case |
| Longevity | 3–12+ months human hair(depends on different grades) | Shorter on synthetic | Offer upgrade paths |
How do halo extensions work?
The system is simple. Fit the wire to the head. Park the base under the crown. Cover with the client’s hair. Blend and go.
Halo extensions work by balancing a lightweight wire around the parietal ridge. The client’s top layer hides the base. The wire carries the weight, so the natural hair has no tension.

Fitting steps for salons and at-home users
1) Measure: place the wire about 1–1.5 inches behind the hairline, resting above the ears.
2) Adjust: tighten or loosen the micro-beads or hook loops so the base sits on the occipital bone. It should feel secure but not squeeze.
3) Place: set the halo and check that the front wire seats under the top veil of hair.
4) Cover: use a tail comb to pull a clean horseshoe section of natural hair over the base.
5) Blend: curl or smooth both halo and natural hair together. Add a micro-layer cut on the halo ends if needed.
6) Secure (optional): add two small, pressure-free clips near the temple area if the client needs extra stability for dance or wind.
Placement map
- Front: 1–1.5 inches behind hairline.
- Sides: above the ear tops, not touching them.
- Back: resting in the occipital groove so it “locks” in place.
Production notes (manufacturer view)
We recommend thin, matte lace, a soft edge stitch, and replaceable wires. Full cuticle, single-donor hair blends the best and tolerates heat. We sew weight toward the sides to fill the “front volume gap,” which helps thin temples.

Can you see halo hair extensions?
Visibility depends on three things: fit, coverage, and finish. When these are right, you cannot see the wire or base in normal wear.
With correct wire tension, a proper top veil, and a matte base, the halo is not visible. Wire shows when the parting is too thin, the color is off, or the wire sits too close to the hairline.
Avoid visibility with simple checks
- Veil thickness: at least a finger’s thickness of natural hair covering the base all around.
- Wire line: keep it 1–1.5 inches back from the hairline; closer risks flash.
- Finish: choose a root-smudged color or shadow root on the halo. It hides the seam in wind.
- Texture match: match curl pattern or wave to client’s texture; mismatched shine or texture exposes seams.
Troubleshooting visibility
- Wire line shows in bright light: move wire back 0.5 inches and thicken the veil.
- Base peeks near temples: add light face-framing on the halo and reduce weight at corners.
- Shine mismatch: select a halo with similar luster. Full cuticle blends with natural gloss best.
| Visibility issue | Likely cause | Quick fix |
|---|---|---|
| Wire glints | Wire too close to hairline | Move back; use matte-coated wire |
| Base ridge | Veil too thin | Drop more hair or reduce halo grams |
| Color seam | Flat color choice | Add root smudge/lowlight to halo |
| Texture seam | Wrong texture | Order body wave or curl-set halo |
Best halo hair extensions for thin hair
Thin hair needs lift with low stress. A halo is ideal when density is light at the crown or temples.
The best halo for thin hair uses lighter grams, wider base distribution, a shadow root, and soft perimeters. It should balance density without collapsing the veil.
Build for thin hair
- Weight: 80–120 g for short-to-medium lengths; 140 g max for long but fine hair.
- Base: scalloped lace edge that lays flat; hand-tied corners reduce bulk at temples.
- Root: 1–2 level darker root smudge for realism and veil depth.
- Texture: subtle body wave reduces the shine seam and adds grip under the veil.
Client handling tips
- Keep placement slightly farther back to protect the weak front hairline.
- Teach gentle detangling and storage. Thin hair clients often over-brush at the top; they should brush the lengths and avoid scraping the veil.
- Recommend low-tension styles: down, half-up, low pony. Skip top knots.
| Feature | Thin-hair friendly choice | Why it helps |
|---|---|---|
| Grams | 100–120 g | Enough bulk without flattening veil |
| Length | 14″–18″ | Shorter length = less weight on crown |
| Base edge | Soft, hand-tied | Reduces ridge at temple |
| Root color | Shadowed | Hides seam in partings |
| Texture | Body wave | Blends and adds grip |
How long do halo extensions last?
Lifespan depends on hair quality, heat use, and wash routine. The base and wire also matter.
Hair material tiers
- Non-Remy (mixed cuticles, silicone topcoat): about 1–2 months; avoid heavy heat; expect more tangling after coating wears.
- Remy (cuticles in same direction): about 3–6 months with careful heat use; better slip and shine.
- Full cuticle, single-donor (no acid bath, no silicone coat): about 1year with proper care; best heat tolerance and color stability.

Care factors
- Wash cadence: every 3–6 wears off-head. Condition mid-ends only. Never soak the wire knots.
- Heat: use protectant; keep tools 160–180°C / 320–356°F for most styles.
- Storage: fully dry; store flat or hanging in a breathable sleeve.
- Sunscreen: keep avobenzone and octocrylene off blonde halos to avoid pink/orange staining.
| Factor | Shortens life | Extends life |
|---|---|---|
| Heat | Daily 400°F passes | Low heat with protectant |
| Water | Soaking seams | Spot-clean base; rinse lengths |
| Products | Heavy oils/silicones | Light serums on ends only |
| Wear pattern | Sleep in halo | Remove nightly; store flat |
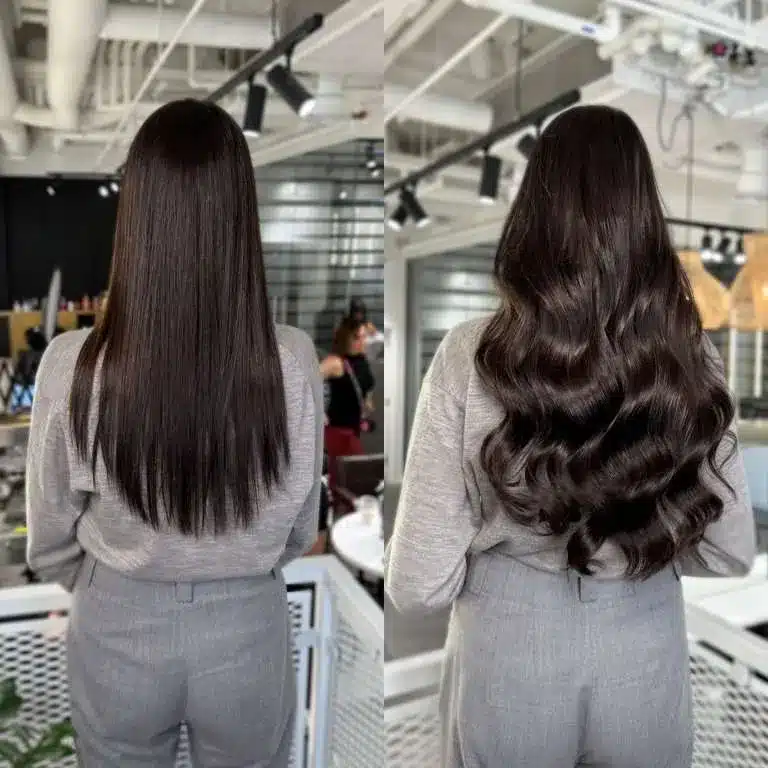
Halo hair extensions before and after


My opinion
From a manufacturing angle, halo excels as a safe, retail-friendly system. We recommend full cuticle, single-donor hair, matte lace, replaceable wire hardware, and balanced density across the width. For thin hair, we build lighter grams with hand-tied corners and a soft root shadow. For long glam looks, we increase grams and support with optional temple clips. Clear fitting and blending steps matter more than any single feature.
FAQ
1) Can you wear a halo with very short hair?
You can, if the natural hair reaches at least jawline. Add a micro-face frame on the halo and a deeper veil to hide the base.
2) Can clients exercise in a halo?
Light movement is fine. For intense workouts, remove the halo or add optional temple clips and a cap. Sweat can shift the wire.
3) Can you swim with a halo?
Do not. Water lifts the wire and saturates the base. Remove before swimming.
4) Can you sleep in a halo?
No. Remove before bed to avoid tangling and wire distortion.
5) Can you curl and straighten halo hair?
Yes, for human hair. Use heat protectant and moderate temperatures. Test one strand first.
6) Can you color a halo?
Deposit-only toner and root smudge are common on human hair halos. Avoid harsh lightening. Synthetic halos cannot be colored.
7) How do you clean a halo?
Wash off-head every 3–6 wears. Dilute shampoo in cool-lukewarm water. Condition mid-ends only. Keep the wire knots and lace low-product. Air-dry flat.
8) How do you measure head size for a halo?
Place a tape measure from 1–1.5 inches behind the hairline over the ears to the occipital bone. Choose S/M/L or adjust micro-beads to match.
9) Will the wire break?
High-quality wires last many months. They are replaceable. Keep spares at the salon.
10) Are halo extensions good for thin hair?
Yes. Use lighter grams, body-wave texture, shadow root, and a soft base edge. Fit slightly farther back for stability.
11) Can people see halo hair extensions?
Not when fitted well. Keep a thick veil, correct wire position, and proper color/texture match. Avoid high, tight ponytails.
12) How long do halo extensions last?
Human hair: 6–12 months. Full cuticle, single-donor: up to 24 months with care. Synthetic: 1–3 months.
13) Do halos cause headaches?
They should not. If they do, the wire is too tight or grams are too high. Loosen or drop weight.
14) Can I combine a halo with clip-ins?
Yes. Many stylists add two small clip-ins at the sides for big events to boost temple density.
15) What textures are available?
Straight, body wave, loose wave, and deep wave. Match the client’s natural pattern to avoid a texture seam.
Conclusion
Halo extensions are fast, gentle, and effective. Fit the wire well, keep a good veil, match color and texture, and choose grams by goal and hair density. Results then look full, secure, and natural.


