A messy removal can ruin a client’s natural hair day. It can also ruin trust fast. Many salons lose repeat business because removal felt painful or chaotic.
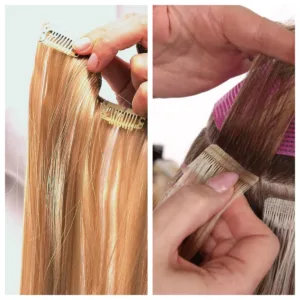
To take out hand tied extensions, a professional stylist should follow a safe order: assess the row and scalp, open beads fully, release wefts without pulling, detangle trapped shed hair, then cleanse and reset. I share a clear removal system that protects hair and protects your time.

If you want consistent removals that feel premium, keep going. I will break down the exact decisions that reduce breakage, speed up the service, and keep wefts reusable.
What Should A Stylist Check Before Removing Hand Tied Extensions?
A removal can go wrong before it even starts. Most issues come from skipping a quick assessment. Then a stylist meets matting, irritation, and trapped shed hair with no plan.
A stylist should check grow-out, bead position, tension points, scalp condition, and matting risk before starting hand tied extensions removal. This check sets the pace, the section size, and the safest order of release.
Dive deeper
What I tell stylists to look at first
A stylist should confirm three things before touching a bead:
1) How far is the grow-out?
2) Is the scalp calm or reactive?
3) Is there matting under the row?
Grow-out matters because it changes control. A row with heavy grow-out moves more. That means more trapped shed hair, and more chance of tangling during release. Scalp condition matters because it changes handling. A tender scalp needs smaller sections and slower work. Matting matters because it can turn a normal removal into a rescue job.
What I ask salons to document
If a salon wants consistent quality, a simple note helps. A team can track the client’s maintenance timing and product habits. This improves future installs and future removals.
| Check item | What it tells you | Why it matters |
|---|---|---|
| grow-out distance | row movement level | sets section size and pace |
| bead visibility | row position and coverage | predicts client comfort and timing |
| scalp redness or bumps | sensitivity risk | reduces pulling and avoids pain |
| matting under seam | trapped shed hair level | changes removal order and time |
| product buildup | coating and slip | affects detangle and cleanse plan |
A stylist who does this check looks more professional. The client also feels safer. That feeling often drives rebook decisions.
What Tools Make Hand Tied Extensions Removal Safer And Faster?
Bad tools create force. Force creates breakage. A pro removal needs tools that open beads cleanly and keep sections controlled.
A stylist should use bead-opening pliers with smooth inner surfaces, a tail comb, strong clips, small sharp scissors for thread only, and an extension-safe detangling brush. I suggest a fixed kit so every chair in your salon delivers the same removal quality.
Dive deeper
I see two types of salons. One salon uses whatever is nearby. Another salon standardizes tools. The second salon has fewer complaints and fewer “surprise” rescues. Standard tools also make training easier.
Core removal kit I recommend for teams
- smooth bead opener pliers that do not slip
- rat-tail comb for clean partings
- duckbill clips that hold thick sections
- small sharp scissors to cut thread only
- soft detangling brush for extensions
- good lighting, because visibility reduces mistakes
Why smooth pliers matter
Many beads are flattened during install. Opening them needs controlled pressure. If pliers have rough inner teeth, they can crush beads. Then beads trap hair. Then a stylist pulls. This is where damage happens.
Why small scissors matter
Thread cutting needs precision. A large scissor can catch natural hair. A sharp small scissor limits the cut zone. This protects wefts too, because seam damage often starts with sloppy cutting.
| Tool choice | What it improves | What fails when wrong |
|---|---|---|
| smooth bead opener | clean bead release | crushed bead traps hair |
| tail comb | clear bead access | blind work causes pulling |
| strong clips | stable sections | loose sections tangle fast |
| small sharp scissors | thread-only cutting | accidental natural hair cuts |
| extension-safe brush | gentle detangle | ripping creates shedding and knots |
If you sell premium services, your tools should look premium too. Clients notice the difference even when they do not know the tool names.

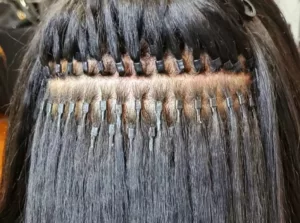
How Should A Stylist Open Beads And Release The Row Without Pulling?
The biggest removal damage comes from pulling a half-open bead through hair. This happens when a stylist rushes or cannot see the bead axis.
A stylist should fully open each bead first, confirm low resistance, then slide the bead down gently. The row should be released in a controlled order. The rule is simple: if it drags, it is not ready.
Dive deeper
I prefer to teach a single principle to salon teams: low resistance equals safe. High resistance equals stop. This principle reduces errors even when methods vary.
Step logic I suggest for bead release
1) isolate one short segment of the row
2) part cleanly so the bead axis is visible
3) open the bead in the correct direction
4) test slide with minimal force
5) slide down only when hair is free
A stylist should avoid “wiggling” the bead aggressively. That motion wraps hair and increases friction. Instead, a stylist should re-open the bead and free any caught strands with fingers.
What changes when thread is involved
Some hand tied systems use a thread stitch to secure the weft. A stylist should identify thread before cutting. A stylist should cut thread only after beads are opened and tension is reduced. Cutting thread while beads are tight can snap hair or cause sudden tangling.
| What you feel during release | What it means | Best adjustment |
|---|---|---|
| bead will not open | wrong axis or tool slip | change angle, use smooth pliers |
| bead opens but drags | hair is caught inside | re-open fully, tease hair out |
| client feels sharp pinch | tension is too high | reduce section size, re-part |
| hair wraps near bead | trapped shed hair | detangle locally, then slide |
If your team follows this system, your removal becomes calmer. Calm work is also faster because it prevents emergency fixes.
How Should A Stylist Manage Shed Hair And Matting During Removal?
Many clients see “a lot of hair” during removal and panic. This is often normal shed hair trapped for weeks. The real risk is letting that shed hair collapse into a knot.
A stylist should detangle trapped shed hair during removal, not after everything is off. Small sections, finger separation first, then gentle brushing reduces matting and protects the client’s natural hair.
Dive deeper
From a manufacturer view, I care about two outcomes: natural hair health and service experience. Shed hair management affects both. A client who feels safe during removal often becomes a long-term extension client.
Why shed hair becomes a problem
A client sheds daily. Extensions hold shed hair in place. If maintenance is delayed, shed hair collects near the row. When the weft support comes off, the base hair can drop and tangle fast. That is why timing matters and technique matters.
Method I suggest for safe detangling during removal
- keep the section supported while you open beads
- separate shed hair with fingers close to the scalp
- use a detangling spray only on the problem zone
- brush mid-lengths before you brush near the base
- stop if you feel tight matting and isolate it
A stylist should avoid washing before detangling. Water can tighten tangles. A stylist should also avoid ripping through a mat. This creates breakage and client pain.
| Tangling level | What it looks like | What a stylist should do |
|---|---|---|
| light | small knots near seam | finger separate, then gentle brush |
| medium | clumps under row | add slip, split into smaller zones |
| heavy | tight mat close to scalp | isolate, soften, tease slowly |
| extreme | felt-like mat | switch to a dedicated dematting plan |
This approach protects time too. It reduces the chance you will spend 45 minutes fixing one small section after the row is already removed.
What Is The Best Cleanse And Reset Plan After Removal?
Clients often want a wash right away. Many stylists wash first to “start fresh.” But if tangles exist, washing first can make things worse.
A stylist should cleanse after detangling. Start gentle, then clarify only if buildup is present. Condition mid-lengths to ends, not the roots. Dry the scalp fully before the client leaves.
Dive deeper
I support salons that sell high-end extensions. For these salons, the post-removal reset is not optional. It is part of a premium experience. It also affects the next install because clean, calm hair installs better.
How I suggest choosing the cleanse type
A stylist should decide based on what the hair shows:
- coated, sticky feel often means product film
- rough, stiff feel can mean hard water minerals
- dry, frizzy feel can mean dehydration and heat stress
- irritated scalp needs a gentle approach
A stylist should avoid heavy conditioner at the bead line right after removal. The scalp may already have buildup. Heavy product can create itch and reduce client comfort.
Drying is part of the reset
A damp scalp after removal can feel itchy. It can also make the client feel “unclean.” I suggest full drying with controlled heat and good airflow. This is a simple step that improves the client’s perception of quality.
| Post-removal condition | Cleanse focus | Conditioner placement |
|---|---|---|
| coated and heavy | clarify or chelate | mid-lengths to ends only |
| dry and fluffy | gentle wash + mask | lengths only, rinse well |
| sensitive scalp | mild shampoo | minimal product near roots |
| mineral signs | chelating step | long rinse, light hydration |
A good reset also supports hair longevity. If the client reuses hair, clean handling keeps texture consistent.
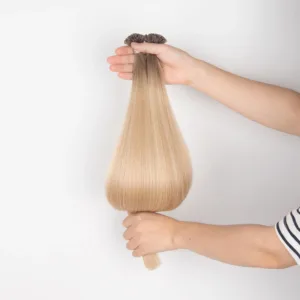
How Should A Salon Protect Hand Tied Wefts For Reuse?
Many premium salons reuse hand tied wefts. Reuse is profitable when wefts stay intact and organized. Reuse becomes expensive when seams fray or colors get mixed.
A salon should store wefts dry, flat, labeled, and separated by row and client. A stylist should protect the seam during removal and avoid cutting into the weft construction. This keeps hand tied wefts reusable and keeps results consistent.
Dive deeper
I manufacture premium hair. I know how much value sits in one well-made weft. When a salon handles wefts like inventory, the salon protects profit and protects client outcomes.
Handling rules I suggest for reuse
- keep wefts flat on a clean tray during service
- label by client name, row position, and date
- avoid soaking in harsh chemicals
- cleanse lightly only when needed
- dry fully before packaging
- store sealed to avoid dust and odor
Why seam protection matters
The seam is the structure. When the seam is damaged, shedding increases. When shedding increases, tangling increases. Then the next install looks worse, even if the hair fiber is good. This is why removal quality affects reusability.
| Weft handling step | Why it matters | What goes wrong if skipped |
|---|---|---|
| label and separate | prevents mix-ups | wrong color and length on reinstall |
| keep dry | prevents odor and tangling | damp storage causes smell and knots |
| protect seam | reduces shedding | frayed seam sheds and tangles fast |
| light cleaning only | preserves finish | harsh stripping dries hair and shortens life |
If your salon sells luxury, this is a luxury behavior. Clients who pay premium notice organization and care.
What Removal Mistakes Cause The Most Complaints, And How Can A Team Prevent Them?
Most complaints come from three things: pain, breakage, and messy results. These problems usually come from rushed steps and poor section control.
A team can prevent most removal issues with a clear SOP: assess first, open beads fully, never pull, detangle shed hair during release, then cleanse and reset. I suggest a checklist that every stylist follows.
Dive deeper
I work with salons that scale. Scaling means many stylists, many clients, and many different skill levels. A salon cannot rely on “one best stylist” for perfect removals. The salon needs a system.
Mistake 1: pulling to save time
Pulling feels fast in the moment. Then it creates 20 minutes of detangle rescue. It also creates client pain. A low-resistance rule prevents this.
Mistake 2: cutting without isolating thread
If a system uses thread, blind cutting can cut natural hair or the weft seam. This damages both the client and the inventory. Section control and visibility prevent this.
Mistake 3: washing before detangling
This is very common. Water tightens tangles and increases matting risk. A detangle-first policy reduces this issue.
Mistake 4: no plan for overdue maintenance
Clients who wait too long will have more shed hair trapped. If the salon treats every removal like a “normal” case, the service can fall apart. A pre-check identifies high-risk cases early.
| Common mistake | What it causes | Team prevention |
|---|---|---|
| pulling on half-open beads | breakage and pain | open fully, test low resistance |
| blind cutting near the scalp | accidental hair cuts | isolate thread, improve lighting |
| wash first | tighter matting | detangle first, then cleanse |
| large messy sections | time loss and tangles | smaller sections, strong clips |
A simple checklist can raise the whole team. It also makes your salon easier to manage. It reduces refunds and reduces negative reviews.
My opinion
I think removal is where premium salons prove their level. A perfect install matters, but a calm removal keeps clients loyal. I also think hair quality shows up on removal day. Full cuticle hair often detangles more smoothly when it was cared for well, so the service stays clean and controlled.

FAQ
How long should a professional hand tied removal take?
Time depends on row count, grow-out, and matting. A stylist should plan extra time when maintenance is overdue or buildup is heavy.
Should a stylist open beads first or cut thread first?
A stylist should reduce tension first. In most cases, that means opening beads first, then releasing thread or stitches with clear visibility.
What should a stylist do if a bead will not open?
A stylist should change the opening axis and confirm tool grip. If hair is caught, the stylist should re-open fully and free strands before sliding.
What should a salon do if a client has heavy matting under the row?
A salon should slow down, isolate the mat, add slip, and detangle in small zones. If matting is extreme, the salon should switch to a dedicated dematting plan.
Can hand tied wefts be reused after removal?
Yes, when the seam is protected and the wefts are handled dry, clean, and labeled. Storage and gentle cleaning matter.
Is it better to cleanse before removal?
A stylist should usually detangle first, then cleanse. Washing first can tighten knots and increase matting.
What should a stylist do if the client has scalp irritation?
A stylist should reduce tension, work in smaller sections, and avoid aggressive parting. If irritation is severe, the stylist should advise a rest period before reinstall.
What is a clear sign the client waited too long for maintenance?
You often see more bead visibility, more trapped shed hair, and more tangling near the seam area.
Conclusion
A stylist can remove hand tied extensions safely by planning first, opening beads fully, avoiding pulling, detangling shed hair early, then cleansing and organizing wefts for reuse.