Do your clients love the look of tape ins but hate the idea of buying new hair every move-up? Reuse is where salons protect profit and clients protect budget. The problem is that reuse can also go wrong fast.
You can reuse tape in hair extensions if the hair quality is strong, the removal is clean, the old adhesive is fully removed, and new tape is applied with correct spacing and pressure. Reuse fails when residue stays, tabs get damaged, or hair dries out.

If you want reuse to be smooth and repeatable, you need a system. The sections below break down what is reusable, how to re-tape correctly, how many reuses are realistic, and how to protect the client’s natural hair.
Can You Reuse Tape In Hair Extensions?
Many salons can reuse tape in hair extensions. The key is that the hair must still be healthy, and the tape area must be repaired correctly. Reuse is not only about putting the same hair back in. Reuse is about restoring the tab area so it holds like new.
You can reuse tape ins when the hair is not shedding, not tangling badly, and the ends are not thin. You should not reuse when the hair is overly dry, heavily matted, or the tape top is torn or delaminated.
Dive deeper
This is the first question salon owners and stylists ask because reuse changes your inventory plan and your client pricing. Still, the real question is not “can” but “when does reuse make sense.”
1) What makes tape in hair reusable
A reusable set usually has three signs:
- the hair still feels smooth when wet and when dry
- the cuticle still behaves in one direction and does not snag easily
- the ends still have enough density to blend
Hair quality decides reuse more than anything. Full cuticle hair usually keeps structure longer. That matters because tape hair is washed and heat-styled many times. If the hair quality is weak, the lengths break down fast. Then reuse becomes a complaint problem, not a profit win.
2) What makes tape hair not worth reusing
Some sets look fine on a hanger but fail in real life. You should avoid reuse when:
- shedding increases around the tape area
- ends look thin and see-through
- the hair tangles after one wash even with good products
- the tape top is damaged or stretched
- residue is baked into the top area and cannot be removed cleanly
That last point matters. Residue is not only messy. Residue also changes how the new tape bonds. Residue can cause slipping and gummy buildup. That creates redo work.
3) A simple “reuse decision” system for salons
Many salons use a quick grading system so every team member makes the same call:
| Check point | Pass looks like | Fail looks like | What to do |
|---|---|---|---|
| Hair feel | smooth, low snag | rough, sticky, snaggy | deep wash or replace |
| Shedding | minimal | heavy shedding | do not reuse |
| Ends density | still full | thin, see-through | trim or replace |
| Tape top | intact, flat | torn, stretched | do not reuse |
| Residue | removable | baked-in | do not reuse |
If you want consistent results, you should standardize this evaluation for every tape refit appointment.
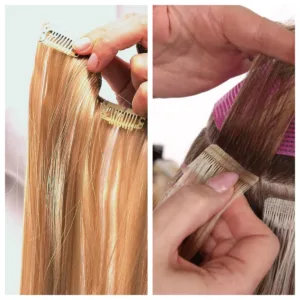
How to Reuse Tape In Extensions?
Reuse is a process. It is not one step. If any step is rushed, the next install will slip, look bulky, or cause tangling. A clean workflow protects both the client’s hair and your salon schedule.
To reuse tape in extensions, you remove the install safely, remove old adhesive completely, cleanse the tape top area, dry and align the hair, apply fresh replacement tape with correct spacing, then reinstall using clean sections and firm pressure.
Dive deeper
A good reuse workflow should be repeatable. It should also be teachable. This is the system I recommend when a salon wants fewer slip complaints and fewer “sticky tab” problems.
Step 1: Safe removal protects the client’s natural hair
You should treat removal as the first quality step. If the stylist pulls too soon, natural hair can break. If the remover is under-used, the tab rips hair. If the remover is over-used and not cleaned, residue spreads.
A safe removal habit includes:
- apply remover along the tape seam
- wait enough time for the adhesive to loosen
- separate tabs gently, do not force
- keep tabs from folding and sticking to hair lengths
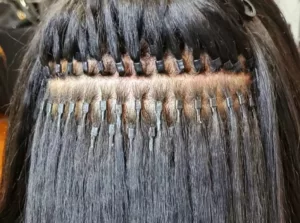
Step 2: Full adhesive removal is non-negotiable
This is where many reuse attempts fail. If even a thin film stays, the new tape does not bond evenly. That creates early slip and sticky buildup.
You should remove adhesive until:
- the tape top feels clean and dry
- the surface looks even
- the top edge does not feel tacky
Step 3: Cleanse and dry the top area correctly
Some stylists wash the hair and forget the top area. Then the tape top stays oily or coated. That reduces the new tape’s hold. You should clean the tape top area with a controlled method. Then you should dry it fully.
You should not apply new tape to damp hair. Damp tops create weak bonding and fast slip.
Step 4: Apply replacement tape with correct placement
The tape should be aligned with the original tab area. The tape should not be too wide beyond the tab. The tape should not overlap into the hair. The tape should be pressed firmly so it bonds flat.
If the tape is misaligned, the install can feel bulky. It can also cause edge lifting. Edge lifting causes sticky hair and tangling near tabs.
Step 5: Reinstall with clean sections and consistent pressure
Even perfect re-taping fails if the reinstall is messy. Sections should be clean and consistent. Hair between tabs should not be too thick and not too thin. The tab should be pressed firmly. Many salons use a press tool to keep pressure consistent.
Here is a simple workflow table you can add to your salon SOP:
| Stage | Goal | Common mistake | Result of mistake |
|---|---|---|---|
| Removal | protect natural hair | pulling too early | breakage, client pain |
| Adhesive cleanup | clean tab surface | leaving thin film | slipping, sticky tabs |
| Drying | dry top area | taping on damp hair | weak bond, early failure |
| Re-taping | flat alignment | crooked tape | bulky feel, edge lift |
| Reinstall | correct sectioning | too thick sections | poor hold, discomfort |
If your salon wants predictable reuse results, you should treat this as a controlled process, not a quick add-on.
How Many Times Can You Reuse Tape In Extensions?
This is the question every salon wants a clean answer for. Still, there is no one number that fits all hair. The real answer depends on hair quality, client care, and how clean the re-taping work is.
Many tape in extensions can be reused multiple times. High-end full cuticle tape hair can often support several refits when aftercare is strong. Lower quality hair may only look good for one or two cycles before the ends thin out or the texture breaks down.
Dive deeper
If you sell tape hair or manage salon pricing, you should think in “wear cycles,” not in “times.” Each wear cycle includes washing, heat styling, friction, and product buildup. That cycle wears down the hair.
1) What increases reuse cycles
Reuse count goes up when:
- hair is full cuticle and stable
- the client uses gentle products and avoids heavy oils near tabs
- heat tools are used with protection and moderate temperature
- the salon removes and cleans tape properly
- ends are maintained with trims and hydration
Hair quality is the biggest lever. Full cuticle hair tends to hold softness longer because the cuticle layer stays intact. That matters for tape hair because friction at the shoulder and collar area is constant.
2) What reduces reuse cycles
Reuse count drops when:
- the client uses oil or conditioner too close to the tape
- the client sleeps with wet hair often
- the client swims without rinsing and conditioning lengths
- the salon leaves residue at the tape top
- the hair is not full cuticle and tangles early
3) A practical range salons can use
Instead of promising a fixed number, many salons use ranges by hair grade. This keeps expectations realistic.
| Hair quality level | Typical reuse potential | Why it changes |
|---|---|---|
| Full cuticle, single donor | higher reuse potential | cuticle integrity stays longer |
| Standard Remy | medium reuse potential | cuticle alignment may weaken faster |
| Non-Remy or mixed hair | low reuse potential | tangling and dryness increase early |
4) A simple “reuse readiness” check before each refit
At each appointment, your stylist can check:
- does the hair detangle easily when wet?
- do the ends still blend without heavy styling?
- does the top area clean fully with no sticky feel?
If the answer is no, a replacement plan is safer than forcing one more reuse. Forcing reuse often creates a complaint, and complaints cost more than new hair.
Are Tape In Extensions Bad for Your Hair?
Tape in extensions are not automatically bad for your hair. Most damage comes from incorrect placement, rushed removal, heavy product buildup near tabs, or waiting too long between maintenance appointments.
Tape can be safe when installed with correct tension, removed with proper remover and patience, and maintained on schedule. Tape becomes risky when tabs are placed too close to the scalp, removed by pulling, or left to grow out too far.
Dive deeper
Clients often blame the method when the real issue is execution and maintenance. Tape is an adhesive system, so it has specific risk points. You can reduce almost all of them with clear rules.
1) The three real damage causes
Tape damage usually comes from:
- traction: tabs pull because placement is too tight or too heavy
- removal trauma: tabs are pulled before adhesive is fully dissolved
- matting and buildup: residue and product create knots that pull hair out
If any salon claims “zero damage no matter what,” that is not realistic. Safe results come from good technique and correct timelines.
2) Safe placement rules
A safe tape install usually needs:
- correct distance from scalp so hair can move
- correct section thickness so tabs grip evenly
- safe mapping near hairline so tabs do not show or pull
If tabs are too close to the scalp, clients feel tightness. Tightness often leads to soreness and breakage over time.
3) Safe removal rules
Safe removal takes time. If a stylist is rushing, damage risk increases. Remover must be applied correctly. Tabs should separate without force. The remaining adhesive should be cleaned, not scraped.
4) Maintenance timing reduces risk
When tape grows out, it sits lower. Then it flips and tangles more. Many problems start when maintenance is delayed. If clients push appointments too far, the hair around tabs experiences more friction and knotting.
This table helps salons explain safety clearly:
| Risk area | What causes damage | How you reduce it |
|---|---|---|
| Placement | too close, too heavy | correct mapping and sectioning |
| Removal | pulling, scraping | proper remover and patience |
| Buildup | oils, residue, poor cleansing | root-safe products and clean tabs |
| Overgrowth | delayed refit | schedule and client education |
Tape is not “bad.” Bad habits are bad.
How to Clean Tape In Extensions for Reuse?
Cleaning is the bridge between removal and re-taping. If you clean wrong, you waste time and you create slip problems. You want hair that is clean, light, and easy to bond.
To clean tape in extensions for reuse, you remove all adhesive residue, wash the hair lengths gently, keep conditioner away from the tape top area, rinse fully, then dry the tape top area completely before applying new tape.
Dive deeper
Cleaning sounds simple, but tape hair has a special area: the top. The top area must be free of oil and free of residue, or the new tape fails.
1) Separate “hair cleaning” and “tab cleaning”
You should treat them as two different tasks:
- hair cleaning focuses on softness and detangling
- tab cleaning focuses on bonding surface preparation
If you mix these steps and add conditioner everywhere, you often contaminate the top. Then re-taping becomes weak.
2) Wash method that keeps hair stable
A controlled wash helps:
- detangle before washing
- use gentle shampoo on lengths
- avoid rough scrubbing
- keep conditioner on mid-lengths and ends only
- rinse longer than you think you need
3) Drying method that protects bonding
The tape top should be dry. Many salons use blow drying for the top area because it prevents hidden moisture. If the top is damp, the new tape can lift.
4) Common cleaning mistakes
- leaving adhesive film at the top
- using heavy oil-based masks near the top
- not rinsing out conditioner fully
- air-drying the top until it feels “almost dry”
“Almost dry” is not enough for bonding surfaces.
Use this simple checklist:
| Cleaning step | Pass standard | Fail sign |
|---|---|---|
| Adhesive removal | no tacky feel | sticky touch remains |
| Rinsing | hair feels light | hair feels coated |
| Top area dryness | fully dry | cool or damp scalp feel |
| Detangling | smooth comb-through | snags near top |
If you hit the pass standard, your re-tape success rate goes up.
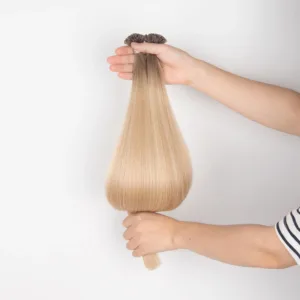
How to Store Tape In Extensions Between Appointments?
Storage decides how the hair behaves on refit day. Bad storage creates tangles, dryness, and wasted salon time. Good storage keeps hair aligned and ready.
You should store tape in extensions clean, dry, detangled, and aligned in one direction. You should keep them flat, avoid folding the top area sharply, and protect them from dust and humidity.
Dive deeper
Many salons lose reuse value not in the chair but between appointments. Tape hair can twist and tangle when it is thrown into a bag. That makes the next refit slower. It also stresses the hair.
1) The goal of storage
Storage should protect:
- cuticle direction alignment
- moisture balance in lengths
- flat integrity of the top area
If you store hair in a tight ball, you create friction points. Those friction points become tangles.
2) Simple salon storage options
Common good options:
- lay each piece flat on a clean tray
- group by length and color
- clip or band the mid-length area lightly, not the tape top
- place in a clean bag or box
You should avoid folding the tape top hard because it can crease and weaken.
3) Labeling for speed
If your salon does many refits, labeling saves time:
- client name
- color code
- length
- date of last install
This helps you reinstall faster and reduces mix-ups.
4) Storage mistakes that cause rework
- storing hair damp
- storing without detangling
- storing in high humidity
- storing with tape tops stuck together
If tape tops stick, you waste time separating them and you risk damage.
This table keeps it clear:
| Storage choice | Good outcome | Bad outcome |
|---|---|---|
| Flat and aligned | easy reinstall | fewer tangles |
| Damp storage | mildew smell risk | texture damage |
| Tight bundle | ends tangle | more shedding |
| Tape tops stuck | time loss | torn tabs |
If you protect storage, you protect reuse profit.
My opinion
I see reuse work best when salons treat tape hair like a system. Hair quality matters first, but process matters next. Clean removal, full adhesive cleanup, correct re-taping, and proper storage make tape reuse predictable. When any one step is rushed, the next install creates slipping and complaints.
Many salons struggle with tapes slipping after 2–3 weeks, sticky residue during removal, or tapes becoming bulky after move-ups. These issues almost always arise from low-quality adhesive and over-processed hair. Our Classical Tape-In system solves these problems with PU-stabilized medical tape, clean-cut cuticle strands, and low-acid processing to keep hair fibers strong. This reduces shedding, improves removals, and maintains smoothness across 2–4 reinstall cycles.
FAQ
Can you reuse tape in hair extensions at home?
You can try, but many steps are technical. Removal and adhesive cleanup are the risky parts. A salon refit often protects the client’s natural hair and prevents residue problems.
Do you need new tape every time?
Yes. Old tape should not be reused. New replacement tape creates a fresh bond surface.
What causes tape to slip after reuse?
Common causes are leftover residue, oily products near tabs, damp top area during re-taping, or sections that were too thick during reinstall.
Can you wash tape hair before re-taping?
Yes, and many salons do. You should keep conditioner away from the tape top area and dry the top area fully before applying new tape.
Is full cuticle hair better for reuse?
Yes. Full cuticle hair usually stays smooth longer and handles repeated washing and styling better, so reuse cycles are often higher.
Can you reuse tape hair if the ends are thin?
You can sometimes trim and reuse, but you should check blending. If the ends are too thin, the install looks weak and clients complain.
Does tape reuse cause more damage than new hair?
Reuse itself does not cause damage. Damage comes from poor removal, residue buildup, or delayed maintenance.
How often should tape ins be refit?
Many salons refit around 6–8 weeks, depending on growth, oil level, and lifestyle. Delaying increases tangling and visibility.
Conclusion
You can reuse tape in extensions when the hair stays healthy and the re-tape process is clean and controlled. Full adhesive removal, correct re-taping, and proper storage decide whether reuse saves time and money.

Hibiscus Hair Manufacturer has been dedicated to producing high-quality tape hair extensions for 25 years and is a recognized leader in the industry. If you are interested in finding a reliable hair extensions supplier and wholesale for your brand, please visit our website for more information: