
Many salons rush tape-ins and face slips, returns, and refunds. Clients feel tension, spot tabs, and lose trust. U want a clean, invisible result that holds and protects the scalp.
Clarify twice; dry 100%; map rows; take paper-thin slice; place lower tab 3–5 mm off scalp; seal (sandwich for support, single-side for visibility); press 5–7s; stagger rows; blend; give aftercare; schedule 6–8-week move-up.
If U want predictable hold and fewer reworks, the key is density match, zone logic, and even pressure. The full checklist standardizes quality across stylists and keeps clients comfortable from day one.
tape in hair extension application?
Below is a clean, repeatable install flow U can standardize for teams. It removes guesswork and cuts slips. It also shows new staff how to put in tape extensions without stress.

1) Consult and plan (5–10 min)
Confirm target length, volume zones, parting habit, and ponytail needs. Note hair density by zone. Choose sandwich for support zones and single-side for visibility zones.
2) Clarify twice
Wash with a strong clarifying shampoo two times. Rinse well. Do not use conditioner at the roots. Condition mid-lengths to ends only if needed.
3) Dry 100%
Blow-dry fully. Check behind ears and nape. Moisture blocks adhesion. The scalp and slice zone must be bone dry.
4) Scalp and strand prep
Wipe roots with alcohol-based prep on a lint-free pad. Remove oils and styling residue. Keep prep off mid-lengths.
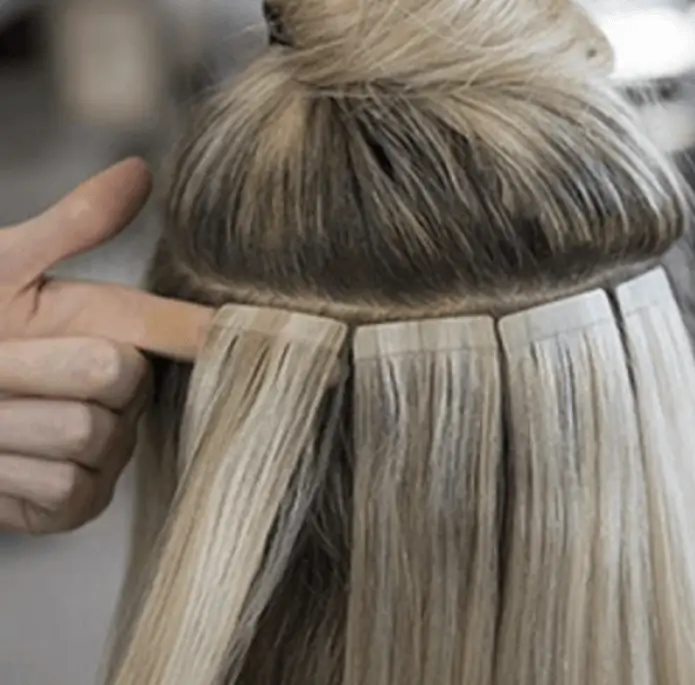
5) Head map
Plan four zones: nape, mid-occipital, parietal, temples/front. Follow natural fall. Stay 3–5 mm off the scalp. Keep 1 cm away from hairline breaks and crown whorl.
6) Row layout
Mark row order mentally or on a guide. Stagger tabs like bricks. Keep a finger-width between panels in the same row. Offset the next row by half a tab.
7) Slice density match
Lift a thin, even slice. Match slice density to panel density. Aim for “paper-thin.” Too thick won’t seal. Too thin will pinch and pull.
8) Lower tab placement
Place the lower tape 3–5 mm from the scalp. Align to natural fall. Do not touch the scalp. Keep edges parallel to the part.
9) Seal the panel
For sandwich: lay the upper tab over the slice. Press center → edge to remove air.
For single-side: pair the adhesive tab with a non-adhesive cover on top to balance weight.
10) Press to activate bond
Use a presser tool or a flat iron at low heat for a quick tap. No melting. Hold even pressure 5–7 s. Focus on edges. Clean edges mean longer wear.
11) Zone-specific choices
- Nape and mid-occipital: prefer sandwich for hold.
- Parietal and temples: reduce width; use single-side where visibility matters.
- Near part lines: angle panels slightly back to hide corners.
12) Check tension and swing
Ask the client to tilt, turn, and shake lightly. Panels must move with the hair. If a panel pinches, remove and reset now. Do not leave a “hot spot.”
13) Blend and refine
Dry-cut to connect layers. Point-cut ends for a soft fall. Run the “ponytail test.” Tabs must stay concealed in a low pony.
do you have to sandwich tape in extensions?
Some zones need the grip of a sandwich. Some zones need the softness of single-side. One method across the whole head is not ideal.U do not always have to sandwich. I suggest choosing by density, lifestyle, and visibility. Sandwich holds longest in mid and lower zones. Single-side stays lighter and flatter near the part and face frame.
When I recommend sandwich
Use sandwich for normal to thick hair, active clients, and longer rewear goals. Two adhesive films seal the slice and shield from sweat, hats, and frequent ponytails. In mid-occipital rows, sandwich keeps panels flat during daily brushing. It also supports heavier color blends without crowding rows. For salons selling premium rewear packages, sandwich helps hit the 6–8 week window with fewer slips.
When I recommend single-side
Use single-side at temples, along the part, and in fine zones where bulk must stay invisible. A single adhesive film under the slice, with a non-adhesive balance on top, reduces shadow and weight. This helps clients with thin frontal density wear a side part without tab show. The trade-off is a shorter rewear if the client is very active or uses heavy styling products near the root.
Smoothing the transition
I recommend a gradient: sandwich through mid rows, then taper to single-side as U approach the parietal ridge and temples. Shorten panel width in the last two rows. This gives a soft silhouette and hides corners without adding weight. Explain the mix during consult so clients know why different zones feel different and perform differently.
how long do tape in extensions take to install?
Time is money in a salon. Clients also read quality from pace. Slow and chaotic hurts trust.
Most partials finish in 30–60 minutes. Most full heads complete in 60–120 minutes, depending on rows, density, and color mapping. Add 10–20 minutes for blend cut and quick styling.
What drives the clock
I suggest tracking four inputs: number of panels, hair type, color mix, and tool discipline. More panels require more spacing and pressing. Finer hair needs cleaner, thinner slices. Multi-shade maps add sorting time. A prepped trolley can save 10–15 minutes per service. These levers are controllable, which means managers can standardize them in SOPs and hit predictable slots per stylist, per day.
Practical scheduling for teams
A clean schedule lowers stress. I recommend 10–15 minutes for consult and mapping, 15–25 minutes for clarify and dry, 30–90 minutes for placement and press, and 10–20 minutes for blend and style. Keep a five-minute aftercare talk. Offer a take-home care sheet and pre-book the move-up. This closes loops and cuts post-visit DMs about maintenance.
Speed, without risky shortcuts
Never cut time from cleansing, drying, or pressing. Shave minutes by pre-pairing panels, labeling shades by row, and staging tools. New stylists gain speed within two weeks if the station is standardized. Managers should audit stations weekly; the room setup is often the real bottleneck.
Do and don’ts for tape in extensions?
Returns often come from care mistakes, not the install. Clear rules protect the bond and the relationship.
Do use extension-safe shampoo, brush roots to ends twice daily, dry roots after sweat, and sleep in a loose braid. Do not apply oils at bonds, scratch tabs, use high heat on adhesive, or wear tight ponytails in week one.
The “Do” list that reduces callbacks
I recommend sulfate-free cleansers and light conditioners from mid-lengths down. A loop or boar-mix brush detangles without snagging anchors. Clients should dry roots after workouts and swims; moisture under tabs breaks adhesive slowly. A low braid or silk wrap reduces friction overnight. These habits extend comfort and help U hit promised rewear windows.
The “Don’t” list that actually matters
Keep oils, heavy silicone serums, and root conditioners away from bonds. Avoid direct high heat on tabs; it softens edges and invites dust. No tight, high ponytails in the first week; bonds need time to settle. No picking at edges; peel forces beat shear strength. Frame these as “protect your investment,” not strict rules. Clients listen when the benefit is clear.
Hand clients a one-page guide
I suggest a simple printed card or QR. Include brush technique, wash spacing, and emergency tips after gym or swim. Add a line about warranty: “Follow this guide for best hold.” It sets expectations and reduces claims.

placement for tape in hair extensions?
Great color and great hair still fail with poor placement. The map is the service.
I recommend rows that follow growth, 3–5 mm off the scalp, staggered like bricks. Lighten density near the top and front. Protect the crown whorl and hairline curves. This is the core of placement for tape in hair extensions.
Simple row logic
Nape rows should clear collars and stay slim. Mid-occipital carries most volume; use even spacing and, where suitable, sandwich panels for durability. As U reach the parietal, reduce panel width and consider single-side in visibility zones. At temples, angle panels slightly back to hide corners behind the hairline curve. This keeps silhouettes soft and avoids hard edges in bright light.
Angle and swing
I suggest placing to the client’s natural part. If the client always wears a left part, set top rows to that habit. Avoid lifting slices straight up; place in natural fall to prevent tension spikes. These micro-choices are what make clients say “it feels like my hair.”
Density match
Match slice density to panel density. Too thick prevents sealing; too thin creates a pinch and pulls. In fragile zones, split panel width lengthwise for a feather-light feel. These small adjustments reduce scalp stress and keep comfort high in the first 72 hours.
how does tape in extensions work?
Clients ask why a thin tab holds so well. The answer is simple and technical.
Tape-ins use pressure-sensitive adhesive that bonds to clean hair. Two panels can sandwich a slice, or a single adhesive panel can pair with a non-adhesive balance on top. Good prep and even pressure make the bond. That is how does tape in extensions work in practice.
Adhesive behavior that matters to salons
This film likes shear strength, not peel. Even pressure from center to edge closes micro-gaps. A brief, low-heat tap can help initial flow but is not mandatory; over-heat creates edge ooze that catches dust. Oils, dust, and conditioners at the root reduce bond life. This is why cleansing and full drying are non-negotiable. Positioning 3–5 mm off the scalp lets the tab flex naturally with growth and reduces pinch.
Hair quality changes the outcome
Full cuticle hair tangles less, brushes smoother, and adds less mechanical stress to anchors. Non-Remy swells, roughens, and increases friction, which raises tension at bonds. For luxury clients, I advise full cuticle, single-donor stock. It protects the client experience and helps U deliver reliable rewear over multiple cycles.
Removal and move-up
Salon-grade remover breaks the bond so the slice releases cleanly. Wait a moment for the solvent to work; do not rush with force. Clarify and dry before reapplying. This cycle keeps the scalp calm and the schedule predictable for staff and clients.
how to put in tape extensions?
New staff need a checklist that is complete but not bloated. Managers need it teachable.
I recommend a nine-point list: consult, clarify, dry, map, slice, place, seal, press, blend. Keep it short. Keep it consistent. This is how to put in tape extensions without confusion.
The nine points with team notes
- Consult: Confirm goals, lifestyle, and parting habits. Explain sandwich vs single-side by zone.
- Clarify x2: Remove residue; skip root conditioner on install day.
- Dry 100%: Moisture blocks adhesion; check behind ears and nape.
- Map rows: Follow growth; protect hairline breaks and crown whorl.
- Slice density: Paper-thin, even from root to tip; match panel density.
- Place lower tab: 3–5 mm off scalp; align to natural fall.
- Seal upper tab or balance: Center-to-edge contact without wrinkles.
- Press: Even pressure 5–7 seconds; low quick heat tap is optional.
- Blend: Dry-cut for effortless fall; confirm ponytail test.
Prevent the common errors
Avoid placing too close to the scalp, uneven slice density, lack of stagger, oil near bonds, or overheating tabs. These five mistakes cause the majority of callbacks. Train staff to spot them in real time. A 30-second self-audit per row saves an hour later.
Team scalability
Standardize the cart, label shades by row, and use a shared aftercare card. New hires hit speed and quality targets faster when the room is set the same way every time.
My opinion
I recommend investing in full cuticle hair, lean procedures, and simple care rules. Salons win when installs feel light, rows sit flat, and clients know exactly how to protect bonds. Predictable quality builds trust and repeat volume. This is the real luxury.
FAQ
How Long Do Tape-In Extensions Last?
Most clients wear one install for 6–8 weeks before a move-up. With full cuticle quality and proper care, the hair itself often lasts 6–12 months across several cycles.
Do tape-ins damage hair?
With correct density match, clean prep, and gentle care, they do not. Problems come from oil at bonds, picking, and tight styles too soon.
Can clients heat style?
Yes, mid-lengths to ends. Avoid direct high heat on tabs to protect edges.
What remover should salons use?
Use a salon-grade adhesive remover. Apply, wait, separate with a fine tail comb, clarify, and dry before reapplication.
What about workouts or swimming?
Rinse after, dry roots, and avoid oils at bonds. A loose braid reduces friction under a swim cap or helmet.
Who is not ideal for tape-ins?
Very oily scalps, uncontrolled shedding, or clients unwilling to follow care rules. Offer alternate systems for these cases.
Conclusion
Keep tape-ins simple: clean prep, smart zone choices, even pressure, and clear aftercare. That is how U deliver comfort, longevity, and fewer callbacks—consistently.
Hibiscus Hair Manufacturer has been dedicated to producing high-quality hair extensions for 25 years and is a recognized leader in the industry. If you are interested in finding a reliable hair extensions supplier and wholesale for your brand, please visit our website for more information:


