Nano ring hair extensions are a no-heat, no-glue method, but the installation still needs careful control. Small beads, fine sections, and clamp pressure all affect comfort and long-term wear.
Nano ring extensions are installed by placing a small section of natural hair and a nano tip extension into a silicone-lined bead, then clamping the bead to hold the extension in place. The result can look discreet and natural when the section size, bead position, and tension are correct.
This guide explains the basic nano ring installation process, key safety points, maintenance timing, and what salons should check before choosing nano ring extensions for clients.

What Are Nano Ring Hair Extensions?
Nano ring hair extensions are individual extension strands attached with very small silicone-lined beads. They do not need heat, glue, or tape during installation.
The extension tip is inserted into the bead together with a small section of the client’s natural hair. The bead is then clamped to hold the extension in place.
This method can be discreet and comfortable when installed correctly. However, it is not completely risk-free. Poor sectioning, over-clamping, heavy strand weight, or late maintenance can still cause tension or breakage.

Step-by-Step Guide: How to Apply Nano Ring Hair Extensions
| Step | What to Do | Why It Matters |
|---|---|---|
| Prepare the hair | Clarify, dry, and section the hair | Helps beads grip cleanly |
| Choose small sections | Match natural hair section to extension weight | Reduces tension and slipping |
| Thread the bead | Pull natural hair through the nano ring | Creates the attachment point |
| Insert the nano tip | Place the extension tip inside the bead | Secures the strand |
| Clamp the bead | Use controlled pressure with pliers | Prevents slipping or hair damage |
| Check movement | Leave enough space from the scalp | Improves comfort |
| Repeat evenly | Distribute strands naturally | Creates balanced volume |
1. Preparation
Before applying nano ring extensions, thorough preparation is essential for success.
Wash the Hair: Make sure your client’s hair is clean and free of oils or product buildup. Use a clarifying shampoo to ensure the beads grip the hair securely.
Dry and Section the Hair: After blow-drying, divide the hair into neat, small sections using sectioning clips. Smaller sections help with precision during installation.
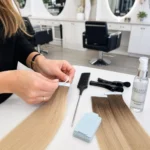
2. Installation Process
Prepare the Extension: Select a strand of nano ring hair extension. The extension will have a keratin tip with a small metal or plastic loop at the top (nano tip).
Thread the Natural Hair: Using a loop tool, thread a small section of the client’s natural hair through the nano ring (silicone-lined bead). The hair section should be thin enough to fit securely inside the ring.
Insert the Extension Tip: Place the metal or plastic tip of the extension into the bead, along with the natural hair. Make sure to position it close to the scalp, but not too close to cause tension or discomfort.
Clamp the Bead: Using pliers, gently clamp the bead to secure both the natural hair and the extension in place. Be sure to apply even pressure to avoid damaging the extension or the natural hair.
Repeat: Continue the process throughout the head, ensuring the extensions are distributed evenly for a balanced, natural look.
https://www.instagram.com/reel/DAaY6QlxJJq/?utm_source=ig_web_copy_link&igsh=MzRlODBiNWFlZA==
3.Key Points During Application
| Application Point | Better Practice | What to Avoid |
|---|---|---|
| Section size | Use enough natural hair to support the strand | Sections that are too thin |
| Bead position | Place around 5–10mm from the scalp | Beads too close to the skin |
| Clamp pressure | Firm but controlled pressure | Crushing the bead too hard |
| Strand direction | Follow natural hair growth direction | Twisted or angled placement |
| Scalp comfort | Check for pulling or poking | Ignoring irritation |
| Distribution | Keep even spacing | Overloading one area |
Nano rings should feel secure, not tight. If the client feels sharp pulling, soreness, or pressure, the placement should be adjusted.
Benefits and Drawbacks of Nano Ring Hair Extensions
| Benefits | Drawbacks |
|---|---|
| No heat or glue required | Installation takes time |
| Small, discreet beads | Not ideal for every fine-hair client |
| Reusable with proper removal | Needs move-ups every 6–8 weeks |
| Flexible strand-by-strand placement | Poor clamping can cause slipping |
| Good for customized density | Overloading can create tension |
Nano rings can be a good choice for clients who want a discreet strand method. But the client’s natural hair strength, scalp condition, and maintenance habits must be considered first.
Aftercare and Maintenance Tips
Providing proper aftercare advice will ensure that clients get the best from their extensions:
Gentle Shampooing: Advise clients to use sulfate-free shampoos and conditioners to keep the bonds strong. Oils or harsh chemicals can loosen the beads and cause slippage.
Proper Brushing: Teach your clients to use a wide-tooth comb or an extension-specific brush to detangle their hair without pulling on the beads.
Regular Maintenance: Remind clients to book move-up appointments every 6 to 8 weeks to adjust the extensions as their natural hair grows.
Professional Notes for Salons and Buyers
For salons, nano ring results depend on both installation skill and product quality.
| Product Check | Why It Matters |
|---|---|
| Nano tip size consistency | Helps beads grip evenly |
| Bead quality | Reduces slipping and scalp irritation |
| Hair cuticle condition | Helps reduce tangling and friction |
| Strand weight options | Allows better matching for fine or thick hair |
| Color consistency | Protects repeat salon orders |
| Reuse performance | Supports move-ups and long-term value |
Before ordering nano ring extensions wholesale, test the hair after washing, brushing, installing, removing, and reusing. A soft sample alone is not enough.
You can compare related keratin hair extensions, learn more about full cuticle hair, or contact Hibiscus Hair to request samples.
FAQs About Nano Ring Hair Extensions
How are nano ring hair extensions installed?
Nano ring extensions are installed by threading a small section of natural hair through a nano bead, inserting the nano tip extension, and clamping the bead securely.
Do nano ring extensions need heat or glue?
No. Nano rings are a no-heat, no-glue method. They use small beads to hold the extension strands in place.
Are nano ring extensions suitable for fine hair?
They can work for some fine-hair clients, but the strand weight, bead size, and placement must be carefully controlled.
How long do nano ring extensions last?
The installation usually needs move-ups every 6–8 weeks. The hair itself can last longer depending on hair quality and aftercare.
Can nano ring extensions damage natural hair?
They can cause stress if installed too tightly, placed incorrectly, or left without maintenance for too long.
How should clients care for nano ring extensions?
Clients should brush gently, avoid heavy oils near the beads, use sulfate-free shampoo, dry the roots properly, and book regular move-ups.

where to buy nano ring hair extensions
Hibiscus Hair Manufacturer has been dedicated to producing high-quality I tip hair extensions for 25 years and is a recognized leader in the industry. If you are interested in finding a reliable hair extensions supplier and wholesale for your brand, please visit our website for more information:
Conclusion
Nano ring hair extensions can create a discreet, natural result when installed with the right section size, bead position, and clamp pressure.
The method does not use heat or glue, but it still requires professional control. Poor placement, over-clamping, heavy strand weight, or late maintenance can cause slipping, discomfort, or tension.
For salons and hair brands, the safest approach is to test nano ring samples before bulk ordering. Check nano tip consistency, bead quality, hair softness after washing, color stability, and reuse performance.