You want lasting fullness without damage or bulky bonds. U-tip keratin strands deliver precise placement, flat bonds, and 3–4 months of dependable wear. With full-cuticle hair, you gain true reuse and a premium client finish.
U-tip extensions use heat-softened keratin to create small, sealed bonds.
Pros: precise placement, flat finish, 3–4-month wear, high reusability with full-cuticle hair.
Cons: heat install, longer application/removal, higher skill required.

Read on for pro application steps, risk controls, real longevity planning, and a clean U-tip vs I-tip comparison. Use the checklists to standardize installs, cut rework, and protect margins.
What are U tip extensions?
Clients want long-lasting volume without bulky attachment points. Many systems look good on day one but fail after heat or washing. U tip keratin bonds solve this with a neat, sealed point that wraps the strand.
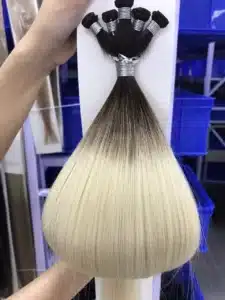
U tip extensions are pre-bonded strands with a U-shaped keratin tip. Heat softens the tip. You wrap and roll around a precise section. The result is a small, sealed bond that lies flat and holds for months.

What makes a U tip “salon-grade”
A salon-grade U tip uses clean, cosmetic-grade keratin that softens evenly and re-hardens with a tight seal. The fiber quality must match the bond. Full cuticle, single-donor hair resists tangling and keeps luster after heat and daily wear. Weight balance is essential: most teams stock 0.5–1.0 g per strand to match density by zone. Consistent bond size ensures smooth rolling, predictable sealing, and easier maintenance. Color integrity matters as well. Factory-level color lots prevent shade drift when you reorder for repeat clients. Finally, packaging should protect tips from humidity and dust so bonds melt clean and set strong.
Why many salons choose U tips for premium clients
U tips give surgical control. You place strands only where density is needed. You vary rotation, spacing, and weight per section. The sealed bond helps isolate product and perspiration from the attachment. That supports active clients who wash often, style with heat, or wear tight updos. The finish is discreet and comfortable, with minimal bulk at the base. With premium hair, you also unlock true reuse: remove, clean, and re-tip for multiple cycles. This reduces total cost per wear and strengthens client loyalty. Salons position U tips as the “long-wear, high-control” choice next to tapes and wefts, especially for brides, performers, and professionals on camera.
Typical specs you can standardize in your orders
| Spec | Common Choice | Notes for professional orders |
|---|---|---|
| Strand weight | 0.8–1.0 g | Use 0.5–0.8 g for fine hairlines; 1.0 g for back and crown. |
| Keratin type | Italian/Japanese cosmetic keratin | Even melt, strong set, clean removal with proper solvent. |
| Bond shape | U (nail) tip | Consistent width for predictable rolling and sealing. |
| Hair quality | Full cuticle, single donor | Reusable; holds color; low tangle; luxury client experience. |
| Lengths | 16″–24″+ | Keep a core range for fast fulfillment and color consistency. |
| Colors | Natural + rooted/balayage | Keep repeated pigment formulas to avoid subtle tone shift. |
Pros of U tip hair extensions?
Clients want styles that move, last, and handle heat. Many fear tape slip or bead visibility. U tips answer these pain points with secure, sealed bonds.
Main advantages: precise placement, long wear, flat bonds, strong heat tolerance, and predictable maintenance cycles. Reusability is high with full cuticle hair and proper removal.
Why placement control equals better client outcomes
Placement control changes outcomes. You map growth patterns, head shape, and hair density, then place weight where the head can carry it. You reduce stress by matching strand weight to section size, and by keeping bonds off high-friction zones. The result is a natural swing with fewer pressure points and fewer callbacks. In front and temple areas, lighter strands and wider spacing protect fragile hair. At the back, you concentrate weight for volume and movement, while staying under the crown line to keep bonds hidden. That combination improves comfort on day one and maintains it across the full wear window.
Styling freedom and heat
Once keratin sets, the seal helps resist slip from sweat, light oils, and daily brushing. Clients can curl, straighten, and blow-dry with fewer bond issues when spacing and sectioning are correct. Updos remain clean because bonds sit small and flat. Education still matters: keep hot tools away from the bond, use heat protectant, and avoid heavy conditioners at the roots. When you standardize these rules, you extend appearance, safety, and client satisfaction.
Business benefits for salons and wholesalers
U tips lock in repeatable schedules. The maintenance window lands at 12–16 weeks for most clients, which simplifies booking and inventory planning. With full cuticle hair, you remove, clean, and re-tip to reuse fiber across 1–2 years, depending on care and desired length. This lowers cost per wear for clients and increases margin for salons. Wholesalers benefit from predictable reorders: core colors, mainstream lengths, and popular strand weights move steadily when salons follow a consistent U-tip menu.

Cons of U tip hair extensions?
Clients worry about heat near the scalp and removal time. Salons worry about staff skill and longer installs. These are real constraints.
Main drawbacks: heat-based bonding, longer application than tapes, skill requirement for neat rolling, and careful removal with professional solvent.
Heat and learning curve
You must respect heat. Incorrect temperature, long dwell time, or uneven pressure creates bulky bonds or weak seals. Technicians need training on section size, angle, pinch pressure, and roll speed. Build a simple SOP: test melt on a spare tip, standardize temperature, and practice on mannequin heads before client work. Add gloves or finger protectors to prevent heat discomfort. When the team follows the SOP, installs stay consistent across stylists and locations.
Time and removal
Application time exceeds tapes and some beaded systems. Removal also takes patience. You apply solvent, break keratin, and comb out shed hair completely. If you rush, shed hair stays trapped and forms knot pockets that clients misread as damage. Plan realistic chair time in your booking flow, and always include a gentle clarifying wash after removal. Then dry 100% before re-application or re-tipping.

Inventory and planning
Strand systems need deeper SKU control: multiple weights, lengths, and blended shades. Without a plan, inventory balloons and cash gets stuck on the shelf. Create a tight core range that covers 80% of demand, then special-order the rest. Use standardized color charts, clear barcodes, and a re-tip station so hair recirculates efficiently. This keeps turns high and waste low.
U tip hair extensions application?
New clients fear messy bonds and scalp pull. You remove that fear with a calm, step-based process and clean tools.
The correct U tip application uses precise sectioning, controlled heat, quick roll, and cool set. Spacing and weight match the client’s density and lifestyle.
Tools and prep
Prepare like a surgical station. Clean scalp and hair 100%. Section by zones: nape, mid, crown, and temples. Use a temperature-stable heat tool and shields to protect the scalp. Keep finger protectors, a tail comb, clips, solvent for corrections, and a fine-tooth comb ready. Set a trolley layout so every tool stays in the same place for every service. This improves speed and consistency under pressure.
Steps you can standardize
- Map rows and desired density with the client seated upright.
- Take a clean, consistent section that matches strand weight.
- Place the U tip under the section and apply controlled heat.
- Roll quickly and evenly into a small “rice-grain” bond.
- Hold to cool; check comfort and rotation.
- Repeat with correct spacing to avoid bond stacking or friction.
- Blend ends and finish with bond-safe product.
Quality control checklist
| Checkpoint | Pass Criteria |
|---|---|
| Section size | Matches strand weight; no overloading |
| Bond shape | Small, smooth, sealed; no sharp edges |
| Rotation | Bonds align; no bond-on-bond friction |
| Comfort test | Client reports no pinch or pull |
| Line of sight | No visibility in usual partings and updos |
Add a final “clean down” step: sweep for stray hairs, photograph the finish, and book the move-up date before the client leaves. This small routine improves retail add-ons and retention.

Are U-tip hair extensions damaging?
Clients fear breakage. Most “damage” cases come from wrong section size, poor maintenance, or aggressive removal.
U tips are not inherently damaging. With correct sectioning, clean bonds, gentle daily care, and professional removal, clients maintain or improve hair condition over time.
Main risk factors you control
- Overweight strands on fine sections: reduce strand weight or widen spacing.
- Product at the bond: keep oils, silicone serums, and conditioners away from attachments.
- Heat abuse: use heat protectant; keep hot tools off bonds.
- Rough brushing: use a loop brush and support bonds with the other hand.
- Late maintenance: move up at 3–4 months to prevent matting at new growth.
Why hair quality matters
Full cuticle, single-donor hair behaves like healthy bio hair. It resists matting, holds color, and stays smooth across a full wear window. Inferior hair swells, tangles, and stresses bonds under daily heat and washing. Clients then blame the method, not the fiber. Protect outcomes by choosing full-cuticle hair from a consistent factory. Specify weight, color formula, and tip chemistry in every PO so results stay repeatable.
Client education that works
Clients protect bonds when you give simple rules. Offer a one-page care card: bond-safe shampoo, mid-length conditioner only, loop-brush method, gentle dry, and braid at night. Book the maintenance date at installation. Send a reminder 10–12 weeks in. These small nudges prevent overdue removals and keep the base hair healthy.

How long do U tip extensions last?
Salon teams need reliable cycles for staffing and cash flow. Clients want clear timelines for move-ups.
U tip installs typically last 3–4 months per wear. With full cuticle hair and correct removal, the same hair can be re-tipped and reused for 1–2 years.
What sets the timeline
- Growth rate: most clients reach 12–16 weeks before bonds sit too far from the scalp.
- Lifestyle: swimmers and heavy exercisers may need earlier checks.
- Care routine: bond-safe products and nightly braids extend comfort.
- Fiber quality: full cuticle hair stays aligned and glossy through many cycles.
Reuse plan you can present at consultation
Set expectations like a service contract. Explain the 12–16 week wear window. Explain removal with solvent, full comb-out of shed hair, and a clarifying cleanse before re-application. Re-tip when needed, then re-map rows to adjust density. Repeat until the ends show wear or length no longer meets the brief. This approach creates predictable revenue, tidy books, and happy clients who understand the journey.
U tip vs I tip hair extensions?
Teams debate between keratin and beads. Clients ask which is “better.” The use case decides.
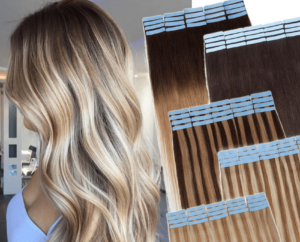
U tips offer sealed bonds and precise control. I tips offer no heat, faster removals, and micro-adjustability with beads. Both can be premium with full cuticle hair.
Quick comparison for consultations

| Feature | U Tip (Keratin) | I Tip (Beaded) |
|---|---|---|
| Bonding method | Heat-softened keratin, rolled and sealed | Metal/polymer bead crimped over strand |
| Install time | Moderate to long | Moderate |
| Maintenance interval | 3–4 months | 6–8 weeks micro-moves often recommended |
| Visibility in updos | Very discreet when done well | Discreet; beads can flash if spacing is off |
| Heat at install | Yes | No |
| Removal | Solvent + patient comb-out | Bead openers; usually faster clean-up |
| Best for | Long-wear, swimmers, hot-tool users | No-heat philosophy, frequent tune-ups |
| Reusability | High with re-tipping | High; strands reused with new beads |
Decision rule
Choose U tips when sealed bonds, fewer maintenance visits, and updo invisibility are priorities. Choose I tips when no-heat installation and quick micro-moves fit the client’s schedule. Carry both in a premium menu and guide the client by lifestyle, density, and styling habits. This consultative approach raises trust and conversion.

Who are U tip extensions best for?
Clients have different lifestyles. The wrong match creates friction. The right match creates loyalty.
U tips fit active clients who want sealed bonds, clean updos, and longer intervals. They also fit bridal and editorial looks that need hidden attachments and strong hold.
Profiles that love U tips
- Active professionals: daily workouts, frequent washing, and hot tools.
- Fine-to-medium density: needs precise weight control per section.
- Updo lovers: dancers, brides, performers who need invisible bonds.
- Color-sensitive clients: reuse premium hair and limit chemical stress.
How wholesalers position U tips
Create a “long-wear keratin” bundle with core natural shades, key rooted blends, and 0.8–1.0 g weights. Add a starter kit: heat tool, shields, solvent, loop brush, and a laminated SOP. Provide a care card template and a booking script for move-ups. This system helps salons launch U tips in one week, deliver consistent results, and reorder the same SKUs with confidence.
My opinion
You win when the method matches the client. U tips shine when sealed bonds, weight control, and updo invisibility matter. You protect outcomes with strict section sizes, premium full cuticle hair, bond-safe aftercare, and on-time removals. Your margin improves because true reuse is real with quality fiber and a disciplined re-tip workflow.
FAQ
Do U tips work on fine hair?
Yes, when you downsize strand weight, widen spacing, and avoid hairlines. Use 0.5–0.8 g strands and soft tension.
Can clients curl and straighten?
Yes. Keep hot tools a finger-width from bonds. Always use heat protectant.
Will bonds feel bulky?
No, when section size, roll, and pressure are correct. Bonds should be smooth, small, and comfortable from day one.
How many strands for a full head?
Average 125–175 strands depending on density, length, and desired volume.
Can you color them?
Tone and gloss are fine. For major color shifts, color before bonding or order the correct shade.
How do you remove them?
Use salon-grade solvent, break keratin gently, and comb out shed hair fully before re-application.
Conclusion
Choose U tips for sealed bonds, long wear, and precise control. Pair full-cuticle hair with strict sectioning and on-time removal to deliver salon-proof results every cycle.
Hibiscus Hair Manufacturer has been dedicated to producing high-quality hair extensions for 25 years and is a recognized leader in the industry. If you are interested in finding a reliable hair extensions supplier and wholesale for your brand, please visit our website for more information: