
Clients want volume. Stylists want efficiency. But should U go with tape-ins or sew-ins? Choosing the right method can make or break the entire client experience.
Tape-ins offer quick, non-damaging installs with less tension. Sew-ins provide secure wear for thicker hair and long-term volume.

Both methods have their place in the salon. Let’s break down the differences so U can decide what works best for your services or wholesale product line.
What Is Tape-In Hair?
Clients love transformations. Stylists love time-saving. Tape-in extensions give both.
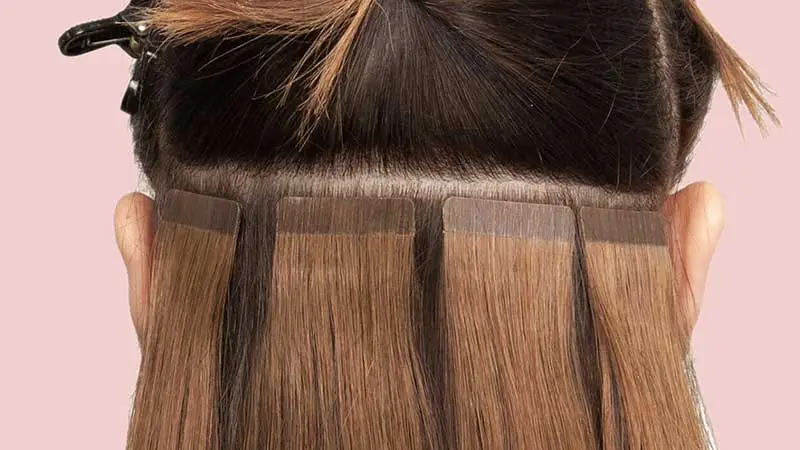
Tape-in extensions are pre-taped wefts that “sandwich” a section of natural hair, using medical-grade adhesive to stay in place.
Dive Deeper: How to Install Tape-In Extensions
Step-by-Step Installation:
- Prep the Hair
Wash hair with a clarifying shampoo. No conditioner. Blow dry straight. - Section Precisely
Divide hair into neat, horizontal sections. Start from the nape. - Peel and Stick
Remove the backing of the tape. Place one tape under a thin slice of natural hair. - Sandwich the Hair
Press a second tape over the top. Align evenly. Press firmly. - Flat Iron (Optional)
Some stylists lightly tap a flat iron over the tape for extra seal—but only briefly. - Style As Desired
Hair can be cut, blended, and styled immediately.
Advantages of Tape-Ins:
- Fast installation (30–60 mins)
- Comfortable and lightweight
- Ideal for fine or medium hair
- Reusable (2–3 times)
- No heat or braiding required
Drawbacks:
- Not ideal for very oily scalps
- Tapes can slip if not applied cleanly
- Cannot use heavy oils or conditioners at roots
- Lasts 6–8 weeks per install
What Are Sew In Extensions?
Sew-ins have been a salon staple for decades. When clients want secure, long-term fullness, they deliver.
Sew-in extensions (also called weaves) are hair wefts sewn onto tightly braided cornrows using needle and thread.

Dive Deeper: How to Install Sew-In Extensions
Step-by-Step Installation:
- Clean and Blow-Dry
Clarify the hair, dry fully, and detangle. - Create Anchor Braids
Braid the natural hair into cornrows horizontally. Create a solid anchor base. - Thread the Needle
Use a curved sewing needle and matching thread. - Sew the Weft
Begin at the bottom row. Sew the weft onto the braid securely using the “lock stitch” method. - Cut and Blend
Once all wefts are attached, cut and blend for a natural finish.
Pros of Sew-Ins:
- Extremely secure
- Great for thick, coarse hair
- Can last 8–10 weeks
- With proper install, causes no damage
- No adhesive—safe for sensitive skin
Cons:
- Installation takes 2–3 hours
- Not suitable for thin or fragile hair
- Braids can feel tight at first
- Not easy to remove without professional help
Tape Ins vs Sew Ins: What’s the Difference?
Knowing the difference between tape in extensions vs sew in is key for offering the right solution to each client type.
Dive Deeper: Technical Breakdown
| Factor | Tape-In Extensions | Sew-In Extensions |
|---|---|---|
| Installation | 30–60 minutes | 2–3 hours |
| Removal | Quick with solvent | Requires scissors and time |
| Durability | 6–8 weeks | 8–10 weeks |
| Best for | Fine to medium hair | Medium to thick, coarse hair |
| Maintenance | Move up every 6–8 weeks | Touch up every 8–10 weeks |
| Reusability | 2–3 times with fresh tape | Reusable if weft is full cuticle |
| Styling Limits | Avoid oils at root | Can use oils freely |
| Comfort Level | Very light, flat | Heavier, tension on scalp if braided tight |
Are Tape-In Extensions Better Than Sew-Ins?
Both methods serve a purpose. The better one depends on U.
Tape-ins are better for comfort, time-saving, and thin hair. Sew-ins offer stronger hold, ideal for thick hair and active clients.
Dive Deeper: Use Case Scenarios
- Client has fine hair and needs lightweight volume → Go for tape-ins
- Client has thick or textured hair and wants durability → Choose sew-ins
- Salon needs fast turnover for back-to-back clients → Use tape-ins
- Stylist specializes in long-wear installs → Master sew-ins
Stylists must assess scalp health, client expectations, hair type, and lifestyle before choosing.
My Opinion
In my experience, salons that target premium clientele should offer both methods. Tape-ins are perfect for first-timers or retail clients. Sew-ins are a powerful tool for stylists dealing with volume lovers or textured hair clients.
At Hibiscus Hair, we manufacture both tape-in and sew-in extensions using 100% full cuticle, single donor hair. This ensures both methods stay soft, natural, and tangle-free—even after months of wear.

FAQ
1. Can I reuse tape-ins?
Yes, 2–3 times with new tape tabs.
2. Are sew-ins damaging to natural hair?
Not if installed with proper tension and removed carefully.
3. How long do sew-ins last?
Usually 8–10 weeks, depending on hair growth.
4. Can I swim with tape-ins?
Yes, but tie hair and avoid soaking the roots repeatedly.
5. Which costs more?
Sew-ins cost more for labor. Tape-ins cost more long-term due to adhesive replacement.
6. Do tape-ins cause allergic reactions?
Rarely. But some clients with sensitive scalps may react to tape adhesives.
7. Are sew-ins good for thin hair?
No. Braids may stress the scalp if the hair isn’t dense enough.
8. How to wash sew-in extensions?
Gently cleanse between tracks. Dry scalp completely to avoid mildew.
9. Can I color tape-ins or sew-ins?
Only if they are made with full cuticle Remy or virgin hair—like Hibiscus Hair.
10. Do tape-ins blend better?
Yes. They lay flat and blend seamlessly into natural hair.
11. What type of hair is best for sew-ins?
Full cuticle wefts—hand-tied or machine—are ideal.
Conclusion
Both tape-ins and sew-ins bring value. Choose tape-ins for speed and subtlety. Choose sew-ins for strength and staying power. Or offer both for maximum flexibility.


