
You install tape-ins for a seamless, flat finish. Then real life starts. You need a ponytail for work. You need a bun for the gym. You need a quick updo for a client meeting. At that moment, one fear shows up fast: will the tape tabs peek out?
You can tie your hair up with tape extensions, but the tie-up has to follow one rule: your ponytail base must not sit on a tape row, and your style must not “lift” the cover hair off the tabs. Low and mid tie-ups are usually safe. High sleek styles need a smarter setup.

This article is built for salon owners, wholesalers, and pro stylists. It gives a different angle than a normal “ponytail tips” post. It focuses on layout logic, tension mechanics, and long-wear habits that protect adhesive.
Can you tie your hair up with tape extensions?
A client asks a simple question. The stylist knows the answer is not just “yes.” The answer depends on where the tapes are and how the hair is pulled.
Yes, you can tie your hair up with tape extensions when the tie-up avoids the perimeter and avoids direct pressure on tape tabs. A style is safest when it uses low tension, keeps the base below high tape rows, and hides corners with cover hair and texture.
Dive deeper
Tape-ins behave differently from clip-ins and keratin tips in one key way. They are wide. A wide tab is easy to hide under hair that lies down. A wide tab is easier to spot when hair is pulled tight and lifted.
So the real question becomes: what makes a tape tab visible in an upstyle?
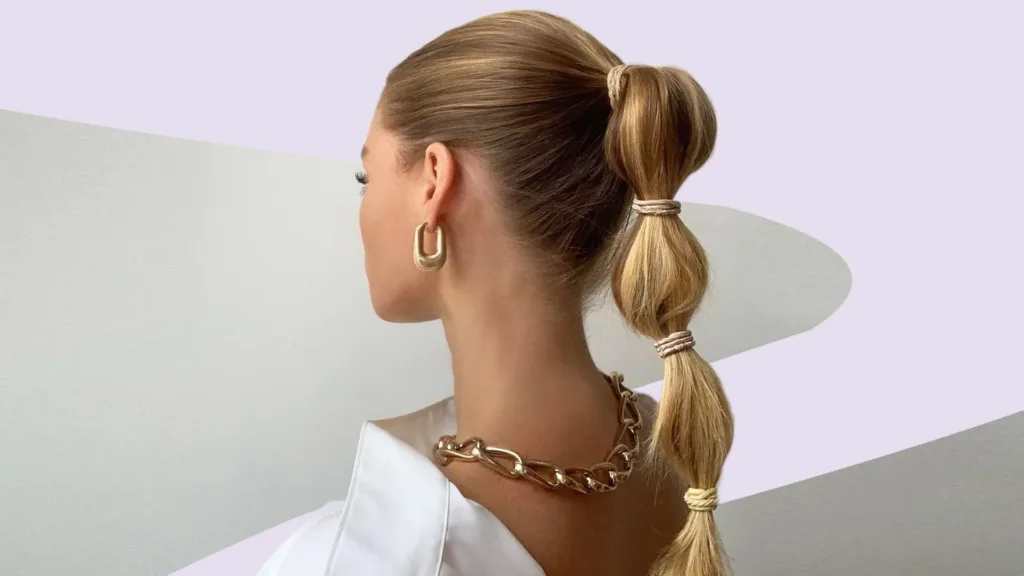
The first cause is the “lift line.” A ponytail creates a lift line from the hairline toward the ponytail base. That lift line pulls the top layer away from the scalp. When the top layer moves, it can uncover a corner. This is why sleek high ponytails are the hardest style for tape-ins. They create the strongest lift line and the cleanest surface.
The second cause is “base collision.” A base collision happens when the elastic sits right on top of a tape row. The elastic presses the tab and then tension pulls around it. This can make a tab edge pop up, and it can also stress the adhesive. A ponytail can look fine at first and then show tabs after one hour because the elastic shifts and pressure changes.
The third cause is “perimeter risk.” Tape tabs placed too close to the edges of the head are the first ones to show. Side perimeter tabs show in side ponytails. Temple area tabs show in high ponytails. Nape tabs show when the client looks down or when the bun sits low.
The last cause is “time.” Grow-out changes everything. At early wear, hair covers tabs better. At later wear, the root space increases, and tabs are easier to feel and easier to reveal. Many “sudden” visibility problems are actually timing problems.
To keep the answer practical for salons, use a simple risk view:
| Factor | What increases risk | What lowers risk |
|---|---|---|
| Lift line | High, tight, sleek styles | Low or textured styles |
| Base collision | Elastic on tape row | Elastic between rows |
| Perimeter risk | Tabs near hairline edges | Tabs placed inside safe zones |
| Wear time | Late maintenance stage | Fresh install or on-time move-up |
This is why the best answer to clients is: yes, but choose the style that matches the tape layout and the wear stage.
How to tie your hair up with tape extensions?
Clients want a method they can repeat in 2 minutes. Stylists want a method that looks polished and does not stress tapes.
Tie hair up with tape-ins by building the ponytail from the bottom first, then using a top “shield layer” to cover tabs. Keep the elastic off tape rows, and finish with a base wrap or twist so the join looks clean.
Dive deeper
This method is different from the usual advice because it starts with structure.
Step 1: Decide the tie-up height by checking tape position. If the client has tapes near the crown, avoid a high ponytail. A mid or low ponytail will look cleaner and will feel better. If the client has a clean perimeter and tapes are lower, a mid ponytail can work.
Step 2: Create a “shield layer.” Take a thin layer of hair from the top and crown and clip it out of the way. This layer is not part of the ponytail yet. This layer is the coverage layer that hides any tape corners later.
Step 3: Build the ponytail with the remaining hair. Use hands first, not a brush at the tape line. Hands reduce snagging and reduce corner lifting. Place the elastic at a point where it does not press on a tape row. If the elastic presses on tabs, the client will feel it and the style will not last.
Step 4: Lay the shield layer over the top and smooth it lightly. This creates a clean surface without pulling the whole head tight. Tightness is what causes lift line exposure.
Step 5: Finish the base. Use one of two finishes:
- A wrap finish: wrap a small section around the elastic and pin under.
- A twist finish: twist a small section and pin into the base to disguise the join.
Step 6: Add “micro texture” if needed. A perfectly sleek finish is the hardest to keep hidden. Micro texture means a soft bend or light wave in the ponytail or a slightly relaxed top. This hides tiny imperfections without looking messy.
A salon can teach this in one checklist:
| Part of the method | Why it works | Common mistake it avoids |
|---|---|---|
| Shield layer | Creates cover without tight pull | Exposing corners by pulling all hair tight |
| Hands-first gathering | Less snagging at tabs | Lifting corners with a brush |
| Elastic off rows | Avoids pressure + stress | Adhesive stress and tab popping |
| Wrap/twist finish | Hides base and looks premium | “Cheap ponytail” look |
| Micro texture | Camouflage for edges | Sleek surface that reveals everything |
A personal story can sit here later about a client who insisted on a very tight ponytail. The story can explain how a shield layer plus twist finish kept tabs hidden in event photos.
How should I sleep with my tape in extensions?
A client can do everything right during the day and still wake up with tangles, sticky roots, or tape edges that feel rough. Sleep can make or break the wear experience.
You should sleep with tape-ins on completely dry hair, with the hair controlled in a low, loose containment style, and with low-friction fabric. The goal is to reduce pulling and reduce rubbing at the tape area.
Dive deeper
This section takes a different approach. It focuses on what sleep does to tape-ins, not just what to “wear.”
During sleep, hair experiences two forces: friction and torque.
- Friction comes from rubbing against fabric.
- Torque comes from turning the head and pulling hair in different directions.
Tape-ins sit close to the scalp. When hair rubs and twists, the area near the tapes can knot faster, especially at the nape. That knotting can lead to aggressive morning brushing. Aggressive brushing can stress tabs and can cause early lifting.
So a good sleep plan targets friction and torque.
Dryness is the first control point. Damp hair tangles faster and holds moisture near adhesive. Moisture can soften the adhesive over time. It can also trap residue at the tape line. So the hair should be fully dry before sleep.
Containment is the second control point. A loose low braid reduces torque. Two loose braids reduce it even more for very long hair. A low loose ponytail can work, but a braid usually prevents tangles better because it keeps strands aligned.
Fabric is the third control point. Satin or silk reduces friction. It also helps the hair stay smoother. Many clients choose a satin pillowcase because it is easy. Some clients prefer a bonnet because they move a lot in sleep.
The last control point is pressure. High buns can press tabs into the scalp and create soreness. Low containment styles avoid that pressure.
| Sleep goal | Best choice | What to avoid |
|---|---|---|
| Reduce tangles | Loose braid | Sleeping with hair loose |
| Protect adhesive | Fully dry hair | Going to bed with damp roots |
| Reduce friction | Satin pillowcase | Rough cotton fabric |
| Reduce scalp pressure | Low style | Tight bun at crown |
If a salon teaches this clearly, the client wakes up with hair that behaves, and the tape line stays calmer.

How to sleep with tape in hair extensions
Clients often want a simple routine they can follow every night without thinking. This is a different step-by-step than the section above, so it is easy to hand to a client.
Sleep with tape-ins by detangling gently, drying the root area, using a low braid or two braids, and protecting hair with satin. In the morning, detangle from ends first and support near the tape line.
Dive deeper
A simple routine should be consistent. The routine should not feel like work. It should feel like brushing your teeth.
Start with detangling. Use an extension-friendly brush. Hold the hair near the root with one hand. Brush the ends first. Then brush the mid-length. Then brush near the root lightly. This method reduces pulling on tape tabs.
Next, check the root area for moisture. If the client washed hair late, the client should dry the tape area first. A quick blow-dry at the roots makes a big difference. Air-drying can leave moisture around tabs, and moisture plus friction is what creates sticky, rough-feeling roots.
Then choose the containment style:
- For average length: one loose low braid.
- For long hair: two loose braids.
Both options reduce twisting and keep the strands aligned.
Use a soft tie. A soft scrunchie is often better than a thin elastic. Thin elastics create pressure points. Pressure points can lead to breakage and discomfort.
Finish with satin protection. A satin pillowcase is the simplest. A satin bonnet adds more control if the client moves a lot.
Morning care is part of the routine. Morning detangling should start at ends. Many clients start at the roots and rip downward. That can stress tabs and pull on natural hair. A slow ends-first approach avoids that.
| Routine step | Time needed | Why it matters |
|---|---|---|
| Gentle detangle | 60–90 seconds | Prevents knotting and root pulling |
| Dry tape area | 1–3 minutes | Reduces adhesive stress |
| Loose braid | 30 seconds | Reduces torque during sleep |
| Satin protection | 0 seconds | Reduces friction automatically |
| Morning ends-first brush | 60 seconds | Prevents pulling at the tape line |
This routine reduces matting and helps the tape line stay clean between appointments.
How to wash tape in hair extensions
Washing is where many clients unintentionally shorten wear time. The hair can still look clean, but the tape line can collect residue or get oily faster.
Wash tape-ins by cleaning the scalp carefully, keeping conditioning products off the tape line, rinsing longer than usual, and drying the tape area fully. Clean roots and controlled product use keep tabs flat and less visible in upstyles.
Dive deeper
This washing section focuses on mistakes that cause upstyle problems. Tabs showing in ponytails often links to buildup and separation at the roots.
Start with shampoo placement. Shampoo belongs on the scalp. The fingertips should massage the scalp. The hands should not scrub the tape line aggressively. Aggressive scrubbing can lift corners and can roughen the attachment area. The goal is removing oil and sweat from the scalp.
Rinsing is the big lever. Many clients rinse too quickly. Tape-ins need extra rinse time because residue likes to sit near the root area. If residue stays, the tape line can feel sticky and the hair can separate more when tied up.
Conditioner placement is the second lever. Conditioner should stay from mid-length to ends. Conditioner near the roots can weaken adhesive and can make tabs feel slippery. This can lead to early movement and early visibility in ponytails.
After washing, drying should focus on the tape area first. Many clients dry the lengths first and leave the roots damp. Damp roots can cause tangling near the tape line and can also soften adhesive. Root-first drying protects the attachment area.
If a client uses a mask, keep it on ends. If a client uses oil, keep it off the tape line. Oils travel. Oils can reduce grip. If grip drops, upstyles show tabs faster.
| Wash action | Helps | Hurts |
|---|---|---|
| Scalp-focused shampoo | Clean roots and stable grip | Scrubbing tabs hard |
| Long rinse time | Less residue near tape line | Quick rinse that leaves film |
| Conditioner mid-to-ends | Soft hair without slip | Conditioner at roots |
| Root-first drying | Protects adhesive | Leaving tape area damp |
| Light styling products | Clean upstyles | Heavy oils near tape line |
This routine improves wear time and also improves the look of ponytails and buns.
How to style a bun with tape extensions without showing tabs?
Many clients do not want a ponytail. They want a bun that looks neat, fast, and safe for tapes.
A bun hides tape-ins best when it sits low, uses moderate tension, and uses a top cover layer to hide corners. A textured bun is usually safer than a sleek bun.
Dive deeper
A bun is often easier than a ponytail for tape-ins because the bun adds shape and texture. Shape hides joins. Texture hides corners. Sleek buns are the hard version because sleek surfaces show edges.
Start with placement. A low bun is the safest. It reduces lift at the crown. It also keeps the base away from higher tape rows. If a client tries a high top-knot, the lift line becomes strong and perimeter exposure increases.
Use a cover-first plan. Leave a thin top layer out. Gather the rest. Secure the base with an elastic. Then lay the top layer over and pin it. This creates coverage without pulling the entire head tight.
Use pins smartly. Pins should go into the bun base, not into tape tabs. Pins should catch natural hair and the bun hair. If pins catch a tape tab, the client will feel discomfort and the tab can shift.
Choose texture based on the client’s goal. For daily life, a soft textured bun hides best. For formal looks, a low sleek bun can work when the cover layer is used and tension is controlled.
| Bun type | Best for | Visibility risk |
|---|---|---|
| Low textured bun | Daily wear, workouts | Low |
| Low polished bun | Office, events | Medium |
| High bun/top-knot | Fashion looks | High |
This bun method gives salons a reliable option that avoids stress and avoids tab exposure.

How to keep upstyles looking premium with tape-ins?
Many clients can hide the tabs, but the style still looks “unfinished.” Salons need the upstyle to look expensive and clean.
A premium upstyle with tape-ins uses clean partings, a smooth surface layer, and a finished base detail like a wrap or twist. The style should look intentional, not like it was “fixed.”
Dive deeper
A premium look is not only about hiding tabs. It is also about surface control and balance.
Start with the surface. Many upstyles look cheap because flyaways explode and the top becomes uneven. A light smoothing product on the surface hair helps. The product should be applied to the outer layer, not directly into the tape line. This keeps the finish clean without risking adhesive.
Next, use a base detail. A wrapped base makes a ponytail look like a salon service. A twist base makes a bun look designed. A simple base detail hides the elastic and it also draws the eye away from the attachment area.
Then use balance. If the ponytail is thick and heavy, the base can pull and create stress. If the bun is placed too high, it increases lift and exposure. A balanced placement keeps the style stable.
Finally, use a “photo check” habit. Bright light and phone cameras reveal corners and bumps. A quick back photo catches issues fast. This is a salon habit that protects reputation.
| Premium detail | Why it matters | Quick execution |
|---|---|---|
| Wrapped base | Hides elastic and looks polished | 15–30 seconds |
| Smooth shield layer | Hides corners without tight pull | 30 seconds |
| Controlled tension | Protects adhesive and comfort | Immediate |
| Light surface finish | Reduces flyaways | 10 seconds |
| Photo check | Prevents surprises | 5 seconds |
This section helps salons upsell because it explains how to turn a safe upstyle into a premium service result.
My opinion
A lot of people think tape-ins are “down hair only.” That belief comes from the wrong styling habits, not from the method itself. Upstyles work when the style respects tension and the base avoids tape rows. The biggest difference is this: tape-ins do not like tight lift lines. Low or textured styles solve that fast.
Sleep and wash habits also show up in upstyles. Clean roots and low friction nights keep the tape line flatter. A flatter tape line makes ponytails look better and makes buns feel better.
FAQ
Can you tie your hair up with tape extensions in a high ponytail?
Some clients can, but the layout and grow-out stage decide it. A mid ponytail or textured ponytail is safer for many clients.
What is the easiest daily upstyle with tape-ins?
A low ponytail or low bun is usually the easiest. Both create less lift and less perimeter exposure.
How should I sleep with my tape in extensions to prevent tangling?
Hair should be dry. Hair should be secured in a loose braid. A satin pillowcase reduces friction and matting.
How to sleep with tape in hair extensions if hair is very long?
Two loose braids often work better than one. Two braids reduce twisting and reduce nape tangles.
How to wash tape in hair extensions without ruining adhesive?
Shampoo the scalp, keep conditioner away from the tape line, rinse longer, and dry the tape area first.
Conclusion
Tape-ins can be tied up safely when the style avoids tape rows, keeps tension moderate, and uses a shield layer to hide corners.


