
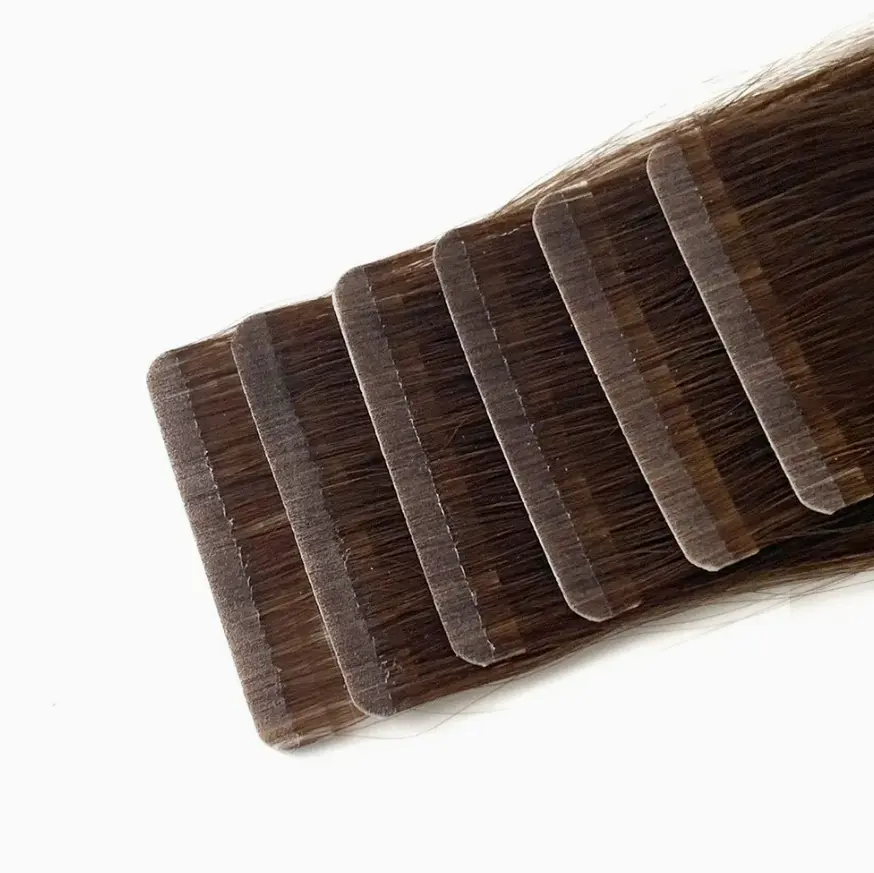
Tape-ins look simple, so removal feels simple too. Many people reach for conditioner at home. A bad removal can pull hair, break ends, and ruin the tapes in minutes.
You can remove tape in extensions with conditioner in limited situations, but it is not the safest method. A tape remover is still the best choice. If conditioner is used, it must be paired with slow separation, low tension, and a clear plan to clean residue after.
If you are nervous about pain, shedding, or sticky residue, this guide walks you through what is realistic at home, how to reduce risk, and when you should stop and book a professional removal.
Can you remove tape in extensions yourself?
Many clients want to save time and money. Many clients also want to avoid a salon visit. Self-removal is possible, but it is also the step where most damage happens.
You can remove tape in extensions yourself if the install is clean, the tapes are not heavily grown out, and you use the right slip and separation method. You should stop if you feel strong pulling, if the tape is bonded to shed hair, or if the adhesive turns into sticky strings.
Dive deeper
Self-removal fails for two reasons. The first reason is speed. The second reason is tension. Tape adhesive is designed to hold through washing and brushing. That means the bond will fight you if you rush.
When self-removal is usually OK
Self-removal works better when the tapes are still in the correct zone. A clean install leaves clear tabs and clean partings. The client can find each tape pair and support the root area with one hand. The client can then separate with the other hand.
Self-removal also works better when the client has:
- low scalp oil build-up
- minimal product build-up near the tape
- no major tangles at the root
- a helper at home for the back sections
When self-removal becomes risky
Self-removal becomes risky when the tapes are too grown out or when the hair has matting at the root. Shed hair gets trapped between the tape pair. When a client pulls, that shed hair turns into a knot. That is when breakage starts.
Stop at home if any of these happen:
- the tape does not split with gentle pressure
- the natural hair feels stuck inside the adhesive
- the adhesive stretches like gum
- you see short broken hairs at the root line
A simple home decision table
| Situation | What you see | Best move |
|---|---|---|
| clean tape pairs | neat tabs, easy to find | home removal is possible |
| heavy grow-out | tape sits far from scalp | book a pro removal |
| sticky residue | glue smears on hair | switch to remover plan |
| matting near root | clumps and tangles | stop and get help |
| pain or pulling | scalp feels tight | stop immediately |
A safe mindset matters. Slow removal protects natural hair. Fast removal creates repair work later.
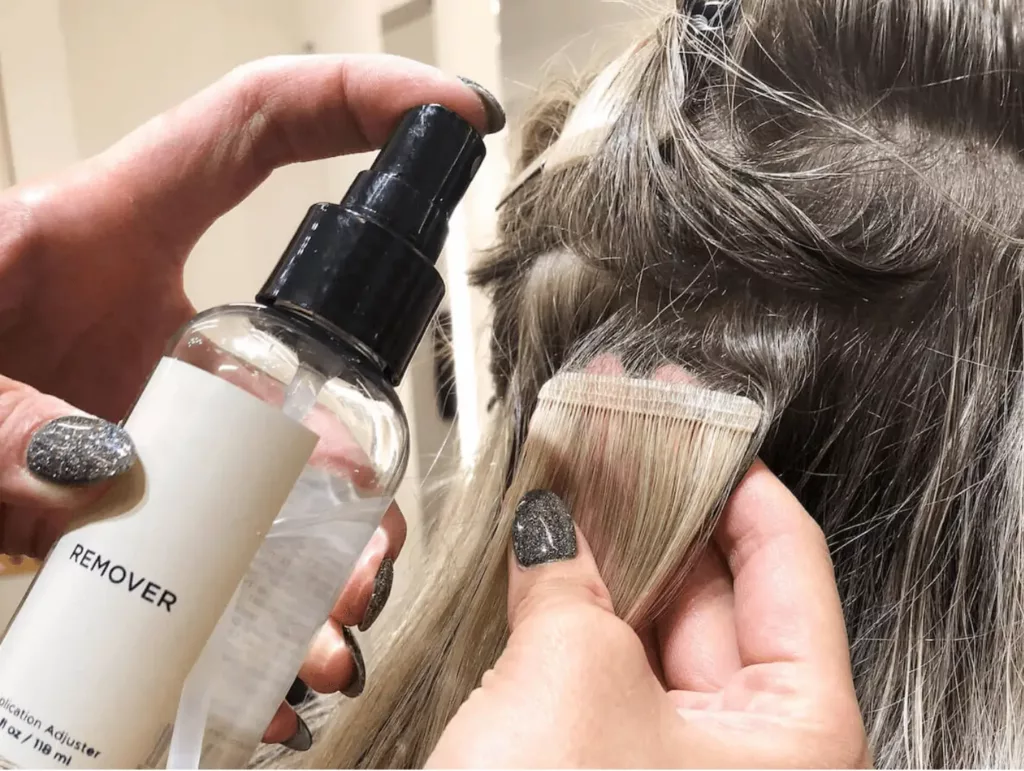
How to remove tape in extensions with conditioner?
Many people try conditioner because it feels slippery. Conditioner can reduce friction, but it does not dissolve tape adhesive the way a proper remover does. Conditioner is a “slip tool,” not a true adhesive solution.
The safest way to use conditioner is as a backup method for loosening the hair around the tape. It works best when the tape adhesive is already weakened by time, oil, or prior washing. It works worst when the tape is fresh, strong, or installed with high-hold tape.
Dive deeper
This method must focus on two goals:
1) protect natural hair from pulling
2) limit sticky residue that causes tangles later
Step-by-step: conditioner-assisted removal
- Create a clean work space. Use clips to section hair into 4 zones. The head must stay organized.
- Work on dry hair first. Wet hair stretches and breaks easier. Conditioner can be applied without fully wetting.
- Find one tape pair. Hold the base of the natural hair above the tape with one hand. This step reduces tension.
- Apply a thick, silicone-rich conditioner around the tape area. Keep it mostly on the hair near the tape, not only on the tape surface.
- Wait 3–5 minutes. The conditioner needs time to coat the hair and reduce friction.
- Start separation from the corner. Use fingernails or a tail comb tip. Use micro-movements. Do not pry fast.
- Peel slowly while supporting the root area. Pulling down is the highest risk. Peeling apart is safer than pulling away.
- If the tape does not split, stop. Add more slip and wait again. A second round is safer than force.
- Once split, slide the extension off with a gentle roll motion. Keep the motion flat and controlled.
- Repeat, one tape pair at a time. Do not jump around the head. A messy sequence creates tangles.
A helpful “do / do not” table
| Do | Why it helps | Do not | Why it hurts |
|---|---|---|---|
| support the root | reduces traction | pull down hard | breaks hair |
| work in sections | keeps control | remove randomly | creates knots |
| wait for slip | lowers friction | rush the peel | traps shed hair |
| stop when stuck | prevents damage | force the split | causes breakage |
After removal: residue clean-up is not optional
Conditioner can leave adhesive behind. That residue catches dust and shed hair. That leads to matting later. A clarifying wash alone may not remove it fully.
A safer clean-up plan:
- apply a gentle oil-based cleanser on residue
- use a fine-tooth comb and micro strokes
- wash twice with a mild shampoo
- dry the root area fully
If residue stays sticky after washing, a professional remover is still needed. Sticky residue is a warning sign, not a normal finish.
When should you avoid conditioner removal and use a tape remover?
Many clients ask this after a bad attempt. The real rule is simple: if adhesive feels strong, conditioner will not “break” it. Conditioner will only make it slippery and messy.
You should avoid conditioner-only removal if the tapes are fresh, if the client used strong-hold tape, or if there is visible product build-up. A real tape remover is designed to break down adhesive bonds with less pulling.
Dive deeper
Tape adhesive behaves like pressure-sensitive glue. It responds to oils, solvents, and time. Conditioner is not a solvent. Conditioner is a coating. That difference matters.
High-risk situations for conditioner removal
- new install within 1–2 weeks
- double-sided tape that is very tacky
- invisible tape with wide adhesive area
- clients who used oil near the roots
- clients who used heavy styling products at the tape zone
These situations create either stronger bonds or more residue. Both make conditioner removal harder.
Why a remover is safer in many cases
A good tape remover breaks down adhesive so the tape splits without pulling. That reduces traction on natural hair. That also reduces the amount of residue left behind.
Stop signs table
| Sign | What it means | Action |
|---|---|---|
| tape will not split | adhesive still strong | use remover or salon |
| sticky strings | adhesive is smearing | do not keep peeling |
| hair feels trapped | shed hair is glued | stop and detangle first |
| scalp pain | too much tension | stop immediately |
A client can still do removal at home with a remover if the process is slow and careful. Conditioner alone is a compromise method.
How to reduce pain and shedding during at-home tape removal?
Pain is a signal. It usually means the root is under traction. Shedding looks scary, but some shedding is normal because the tapes hold shed hair that would usually fall out daily.
You can reduce pain and shedding by controlling tension, working smaller sections, and detangling before removal. You should never remove tapes from tangled hair.
Dive deeper
Many clients panic when they see hair on the tape. That hair often includes normal shed strands from weeks of wear. The risk is not the shed hair. The risk is tearing healthy strands during removal.
A safer order of operations
- Detangle mid-length to ends first.
- Detangle near the tape zone last, with small strokes.
- Use a mirror setup or a helper for the back.
- Remove tapes from bottom rows first, then work upward.
- Take breaks every 15–20 minutes.
Tension control tips
- hold the hair above the tape like a “root shield”
- keep elbows close to the body to avoid sudden pulls
- peel apart, do not yank down
- keep the head position stable
Shedding expectations
If a client wore tape-ins for 6–8 weeks, shed hair will be trapped. That hair comes out during removal. That is normal. What is not normal is short broken hair. Short broken hair usually means force was used.
Pain and shedding table
| What you notice | Likely cause | What to do next |
|---|---|---|
| mild tenderness | normal tension + new install | slow down and support roots |
| sharp pain | traction or stuck hair | stop and reassess |
| lots of long shed hair | trapped shedding | normal, keep gentle |
| short broken hairs | pulling damage | stop and get pro help |
A calm removal process protects more hair than any product choice.
How to clean tape residue after conditioner removal?
This is the part most people skip. Residue is the reason hair tangles after removal. Residue also ruins re-taping later.
You should remove adhesive residue fully before washing and before reinstallation. Conditioner makes residue more spreadable, so cleaning must be more careful.
Dive deeper
Residue is not only sticky. Residue also acts like a magnet. It collects dust, lint, and product. That mix creates a rough surface on hair. Rough surface creates knots.
A practical clean-up routine
- Separate hair into small sections.
- Identify residue spots by touch. The hair will feel tacky.
- Apply a small amount of oil-based cleanser or a dedicated residue cleaner to that spot.
- Wait 2–3 minutes.
- Comb out with a fine-tooth comb using short strokes.
- Wash with a gentle shampoo.
- Wash again if the hair still feels coated.
- Dry fully and reassess.
Common clean-up mistakes
- using too much oil and spreading residue further
- using a harsh shampoo and drying hair out
- combing from roots with force
- skipping the second wash
Residue clean-up table
| Goal | Best approach | What to avoid |
|---|---|---|
| loosen glue | targeted oil-based cleaner | conditioner only again |
| remove glue | fine comb + small strokes | ripping through knots |
| reset hair | gentle double wash | harsh clarifying too often |
| prep for re-tape | fully dry and clean | installing on residue |
If residue remains after two clean cycles, a professional remover is the safer fix. That step protects both the natural hair and the extension hair.
When should you go to a salon for tape-in removal?
Some situations are not “DIY friendly.” A salon removal is not only about tools. It is also about speed with control and the ability to handle matting safely.
You should go to a salon if the tapes are matted, if the client has scalp pain, or if there is heavy residue. You should also go if the client is unsure about what is normal shedding vs breakage.
Dive deeper
A professional removal is a damage-control service. It protects long-term hair health. Clients often regret DIY removal when they need a haircut later to fix breakage.
Situations that need professional help
- tape pairs are stuck with knots
- client has very fine or fragile hair
- client delayed maintenance past 8–10 weeks
- client used strong oils at roots daily
- client has more than one row system and cannot see placement clearly
Why a salon can be safer
A stylist can:
- isolate each tape pair faster
- use the correct remover amount
- detangle with professional technique
- keep the scalp calm and reduce pulling
“DIY or salon” table
| Condition | DIY ok? | Why |
|---|---|---|
| clean install, low residue | yes | easier tape split |
| heavy grow-out | no | trapped shed hair risk |
| matting near roots | no | breakage risk |
| strong adhesive system | no | conditioner is not enough |
| back of head only | not ideal | visibility problem |
A client can still do parts at home, but the client should not treat removal as a race. Hair health is the priority.
My opinion
Conditioner can help with slip, but it is not a true tape remover. A careful client can use it in mild cases. A remover or a salon is still the safer path for most tape-in removals.
FAQ
Can conditioner dissolve tape adhesive?
Conditioner does not dissolve adhesive the same way a remover does. Conditioner mainly adds slip around the tape area.
What conditioner works best for tape removal?
A thicker conditioner with strong slip can help, but the method is still limited. The technique matters more than the brand.
Can you reuse tape-in extensions after conditioner removal?
You can reuse them if the hair stays clean and the tabs are not damaged. Residue must be fully removed before re-taping.
Why does removal hurt even with conditioner?
Removal hurts when there is tension, trapped shed hair, or matting. Conditioner cannot fix those issues by itself.
How long should you wait after applying conditioner?
A 3–5 minute wait is a practical start. If the tape does not split, wait longer and add more slip, or switch to a remover.
Is it normal to lose hair during tape removal?
Some long shed hair is normal because tapes hold shed strands. Short broken hairs are not normal and suggest pulling damage.
Conclusion
Conditioner can help remove tape-ins only in mild cases and with slow technique. If the tape feels strong or sticky, use a real remover or a salon to avoid damage.


