
You finished a set and it looks great in the chair. Then your client walks into daylight and the “line” shows. Have you seen that moment when confidence drops fast?
You can blend hair extensions by matching tone and density first, then planning placement, then refining the cut, then choosing a finish style that supports the shape. Most blending problems come from a big length gap, blunt natural ends, and uneven weight placement.

If you are a stylist or salon owner, blending is not a “nice extra.” Blending is the result that clients post, talk about, and pay for. Below is a practical blending system, then special notes for short hair, blunt hair, straight hair, medium hair, and thin hair.
How To Blend Hair Extensions?
Blending fails for simple reasons. The client’s natural hair has a shape and a density. The extension set adds a second shape and a second density. If those two do not connect, the eye sees a step.
You can blend hair extensions by controlling five areas: tone match, density match, placement map, cut strategy, and finish texture. If one part is off, the blend becomes obvious. If the five parts work together, the blend looks natural even under strong light and on video.
Dive deeper
You can treat blending like a workflow. This helps you train assistants, reduce re-dos, and protect your reputation. It also helps you explain decisions to clients in simple words.
1) Tone match before you talk about level
A “level match” is not enough. Your client can be level 6 and still look wrong if the extension is cooler or warmer. You should check tone in natural light. You should check root, mid, and ends. Many clients have a shadow root and lighter ends. A single flat shade can look like a block. If the natural hair is dimensional, you can often get a better blend with a multi-tone set or a rooted option.
2) Density match is what removes the end line
A lot of blend lines are not color lines. They are density lines. If the client has fine ends and the extension ends are thick, the eye sees a shelf. If the client has thick ends and the extension is light, the ends look see-through. You should compare the client’s perimeter density to the extension perimeter density. Then you choose a weight plan that matches reality, not a photo.
3) Placement should follow movement
Coverage is not the same as movement. If the set sits in one heavy band, the hair moves in layers. That creates a shelf effect. You should space weight and avoid stacking too much hair at one horizontal line. You should also map for how the client parts the hair and how the client wears it day to day.
4) The cut is the real blending tool
If the natural hair edge is blunt, the edge will show. If the natural hair has short layers, the layers will poke out. You need a cut plan that connects natural hair and extension hair into one shape. Many blends improve with a small perimeter softening and controlled internal movement. You do not need aggressive thinning. You need a clean connection.
5) Finish texture should match the blend goal
Straight flat ironing shows every line. Soft bends and waves hide small mismatch. If your client wants pin-straight every day, your cut and density plan must be extra clean. If your client loves waves, you have more forgiveness, but the base plan still matters.
Use this quick table when you diagnose the problem fast:
| What you see in daylight | What it usually means | What you adjust |
|---|---|---|
| Clear “step” at ends | length gap or blunt edge | blend cut + perimeter softening |
| Bulky band mid-head | weight stacked in one row | re-map spacing or reduce weight |
| Thin ends under thick hair | not enough grams | add weight or change density |
| Color looks “flat” | client has dimension | multi-tone, rooted, or custom blend |
| Shelf look when hair moves | movement mismatch | stagger placements + refine cut |
If you want one core rule, it is this: you blend best when you plan from the client’s ends upward, not from the client’s roots downward.
How To Blend Hair Extensions With Short Hair?
Short hair blending is not a normal case. The length gap creates a step. The sides and nape expose short pieces fast. Your client can love the length but hate the line.
You can blend hair extensions with short hair by reducing the length jump, keeping the perimeter weight light, raising the lowest placement when needed, and building a soft transition with cutting. Short hair blends best when you plan for the nape first, not last.
Dive deeper
Short hair is a transition project. Your client is not only adding length. Your client is asking for a bridge between two lengths. When the bridge is too steep, the blend line appears.
Control the length jump
A small jump blends easier. A big jump can still work, but it needs more technical work and more daily styling. If the client has very short layers, you should expect more “pop-out” risk around the crown and around the sides.
Protect the perimeter and the nape
Short hair often has a finer perimeter. If you place too low and too heavy, the short ends can sit on top like a shelf. A better approach is often lighter weight at the lowest zone and more support above it. The goal is to keep the nape from splitting into two visible layers.
Use a transition cut, not a “hide and pray”
Short hair needs a real blend cut. You can connect the natural hair into the extension hair with controlled layers. You should avoid cutting away too much natural hair, because short hair already has limited length to cover tracks. You should also avoid extreme thinning, because thin ends can create frizz and flyaways that expose the blend.
Choose finishing habits that match the case
Short hair blends easier when the client wears a bend or a wave. Straight styling can still work, but it increases precision demands. You can also guide the client on daily routine, because short pieces will show more when the client air-dries and does not smooth the cuticle.
Use this short-hair checklist:
| Short hair challenge | Why it happens | What you do |
|---|---|---|
| short ends stick out | big length gap | transition cut + soft wave finish |
| shelf at lower head | heavy weight low | raise low placement + lighten |
| sides separate | no side support | add side mapping or adjust density |
| crown pieces poke | short layers | refine top blending and styling plan |
Short hair blending is possible. It just needs a clear plan and clear client expectations.
How To Blend Extensions With Short Blunt Hair?
Short blunt hair is a strict shape. The edge is sharp. The edge will show if the extension density sits directly under it like a thick pad.
You can blend extensions with short blunt hair by avoiding heavy weight directly under the blunt edge, softening only the last part of the natural ends, and cutting the extensions to match the blunt haircut’s visual weight. The goal is “blunt look, soft join.”
Dive deeper
Blunt cuts look premium, but blunt cuts reveal structure. That is why your placement and end density must be disciplined. The blunt edge works like a ruler line. If the hair under that ruler line is too dense, the line becomes a shelf. If the hair under it is too light, the ends look split.
Avoid stacking dense hair under the edge
If the first extension layer is very dense, the client’s blunt edge sits on top and becomes visible. You can reduce this by using lighter density at the first join zone and spreading density upward. You can also stagger the join so the blunt edge does not sit on a single thick band.
Soften the edge without ruining the haircut
Your client may love the blunt look. You can keep it. You can soften only the last 1–2 cm with point cutting. This reduces the hard line but keeps the blunt shape. You should keep the cut controlled. Random thinning can create gaps and frizz.
Match the “blunt feel” in the extension ends
If the extension ends are too layered while the client’s hair is blunt, the blend looks off even when the color matches. You can refine the extension ends so the overall silhouette fits the haircut. You are matching visual weight, not only matching length.
Finish style matters more with blunt shapes
Pin-straight styling shows everything. If the client wants sleek hair daily, the blend must be precision-level. A soft bend makes the join less visible. You can choose finish options based on the client’s lifestyle.
Use this table for blunt hair decisions:
| Blunt case | What clients usually want | Your best focus |
|---|---|---|
| very short bob | seamless join | higher join + lighter first layer |
| blunt lob | clean ends | controlled softening + density match |
| sleek daily styling | no line at all | precision cut + tone accuracy |
| wave-friendly styling | easy blend | wave finish + softer join |
Blunt hair blending is not hard, but it is strict. Your plan must respect the blunt edge.
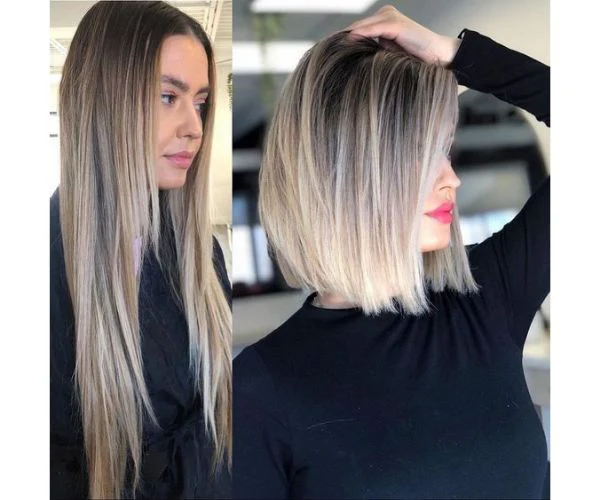
How To Blend Hair Extensions With Straight Hair?
Straight hair is honest. It shows tone mismatch and density steps fast. Waves hide small errors. Straight hair does not.
You can blend hair extensions with straight hair by matching undertone and end density very closely, avoiding shelf placement, and using a precise blend cut that connects the shapes. Straight-hair clients often need that refinement even when the install is clean.
Dive deeper
If you work with straight-hair clients, you already know the pain point. A blend can look perfect in the chair, then look obvious when the client films a slow pan video. Straight hair reflects light evenly, so every mismatch becomes visible.
End density is the main blending line
The most common straight-hair blend issue is a density shelf. The natural ends are fine, but the extension ends are thick. Or the natural hair is thick, but the extension set is too light. You should match the end density first, then refine the cut. A clean silhouette solves many “why does it look fake” complaints.
Tone mismatch is louder on straight hair
A warm natural base beside a cool extension can read as gray. A cool natural base beside a warm extension can read as brass. You should match tone under natural light. You can also use a professional gloss to align tone when the mismatch is small. This is often safer than heavy permanent color work on extension hair.
Placement must prevent the shelf effect
Straight hair makes shelves obvious. Too much hair in one row creates a visible horizontal line in movement. You should stagger placements and balance spacing. You should also plan around parting habits. Straight hair clients often tuck hair behind the ear, so side mapping matters.
Product and finish can either help or hurt
Heavy oils can separate straight hair into strings and expose track zones. Light smoothing and controlled heat are usually better. The goal is smooth, not greasy.
Use this straight-hair table:
| Straight hair problem | What causes it | What helps most |
|---|---|---|
| visible join line | density mismatch | adjust grams + blend trim |
| flat color mismatch | wrong tone | gloss tone correction |
| shelf in movement | stacked weight | stagger map + refine cut |
| stringy finish | heavy product | lighter finish products |
Straight hair blending is the best test of your system. When it works, your photos look expensive.
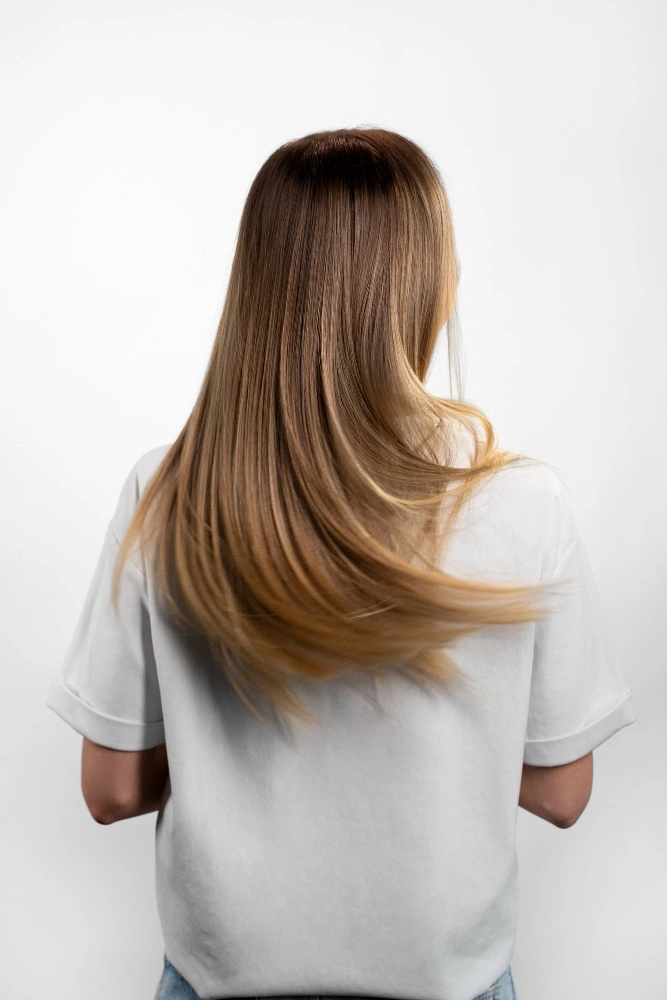
How To Blend Hair Extensions With Medium Hair?
Medium hair often blends easier than very short hair. It gives you more coverage and more room for transition. Still, medium hair can show a line if the ends do not match.
You can blend hair extensions with medium hair by matching end density, keeping the length jump controlled, and adding a small blend cut to connect the shape. Medium hair often needs less correction, but it still needs structure.
Dive deeper
Medium hair clients are common in salons. Many want “longer but still believable.” This is where your blend system can create repeat clients, because the result looks like a natural upgrade, not a clear add-on.
Watch the end density gap
A medium cut often has a stronger perimeter than clients think. If the extension ends are thicker, the join shows. If the extension ends are thinner, the ends look uneven. You can fix most of this by choosing the right density set and refining the ends with a small cut.
Keep the length increase realistic
Medium hair can go longer, but too big a jump can create a visible mid-layer sitting above the extension length. A controlled increase makes the hair move as one. This also reduces the amount of daily styling the client needs to do.
Placement should reflect real habits
Some clients switch partings. Some keep one part for years. Medium hair clients also clip hair back often. You should map for that reality. If your map ignores the client’s daily habits, the blend can fail even with good hair.
The finishing trim is what sells the result
Many medium hair blends look “fine” without trimming, but look “expensive” after trimming. A controlled blend cut removes the step, adds movement, and connects the haircut to the extension length. This is often the moment the client becomes a long-term client.
Use this medium hair guide:
| Medium hair pattern | Common blend risk | Best focus |
|---|---|---|
| one-length medium | step at ends | blend cut + density check |
| layered medium | uneven movement | connect layers to extension shape |
| thick medium hair | thin extension ends | increase grams or density |
| fine medium hair | overload | lighter plan + higher join |
Medium hair blending is where simple systems create strong results.
How To Blend Hair Extensions With Thin Hair?
Thin hair needs caution. Thin hair shows tracks faster and carries weight less comfortably. A heavy set can look obvious and feel painful.
You can blend hair extensions with thin hair by keeping density light, using smaller pieces, raising the lowest placement, and choosing conservative length increases. Thin hair blending should look natural and feel comfortable, not heavy.
Dive deeper
Thin hair clients often want volume and length, and they want it to look undetectable. That is possible, but only when you respect the base hair. Thin hair does not forgive overloaded grams or low bulky joins.
Keep the weight plan light and spread out
Thin hair prefers distributed weight. Instead of fewer heavy pieces, smaller sections can spread load. This reduces tension and reduces visible “bands.” Comfort matters because discomfort leads to poor aftercare, and poor aftercare leads to matting and early maintenance issues.
Raise the lowest join
The perimeter is usually the weakest area. If you place too low, the client’s hair may not cover the join. This becomes obvious in ponytails and in wind. A higher join helps coverage. It also reduces stress on the perimeter.
Match the client’s end density
Thin hair ends are often fine. If your extension ends are thick, the result can look like “thin top, thick bottom.” That contrast makes the blend look less natural. A more natural density match looks better and needs less aggressive cutting.
Plan for real-life styling
Thin hair clients often want sleek hair. Sleek hair can show joins. A soft bend can hide joins. You can guide the client toward styling that supports the blend, and you can set realistic expectations on how often styling is needed.
Use this thin-hair table:
| Thin hair challenge | What causes it | Better plan |
|---|---|---|
| visible tracks | low placement | raise join + reduce bulk |
| heavy feel | too many grams | lighter density plan |
| step at ends | thick extension ends | match end density |
| tension pain | large sections | smaller sections and spread |
| fake look | too much length | conservative length increase |
Thin hair blends best when you choose a plan that protects the client first and impresses the camera second.

How To Blend Hair Extensions When Color Match Is Not Perfect?
Even careful matching can be slightly off. Lighting changes. Hair oxidizes. Clients color their hair between visits. Then the blend looks different.
You can blend hair extensions when color match is not perfect by correcting tone with a professional gloss, using dimensional sets for highlighted hair, and choosing a finish texture that reduces contrast. It is often safer to correct tone than to use heavy lightening on extension hair.
Dive deeper
Color problems look like “hair problems,” but they are often planning problems. Many clients have multiple tones across the head. Many extension sets are one tone. If you treat the head like a single-color canvas, the blend will fail in daylight.
Tone correction is often the smartest first move
If the mismatch is small, a gloss can align tone. This helps when the extension is slightly warm or slightly cool. A tone correction is also easier to maintain than repeated permanent color. You should still patch test and strand test when needed, and you should explain risks to your client in clear words.
Dimension requires dimensional hair
If the client has balayage, highlights, or natural sun lift, a flat extension shade can look like a block. Multi-tone sets and rooted shades help. Another option is a custom blend using two close shades mixed in one set. This often produces a high-end look with less color processing.
Finish texture can hide small mismatch
Soft texture breaks up reflection. That reduces visible contrast. Sleek straight hair amplifies contrast. If the client demands sleek daily styling, then your tone match must be stricter and your density match must be cleaner.
Avoid using heavy lightening as a “quick fix”
Lightening extension hair can shorten lifespan and increase dryness. Many lighter shades were already processed in production, so extra lightening can push the hair past its comfort zone. If the client truly needs lighter, it can be better to order the correct shade set next time and protect the hair quality.
Use this quick decision table:
| What the mismatch looks like | What it usually is | Best fix path |
|---|---|---|
| looks brassy | extension too warm | cool gloss or better shade |
| looks gray | extension too cool | warm gloss or better shade |
| looks flat | no dimension | multi-tone or rooted |
| looks too dark | depth mismatch | change set or adjust finish texture |
When color is close but not perfect, you still have tools. You just need the safer tool first.
My opinion
A great blend is not luck. A great blend is a repeatable system. You match tone and density, you map for movement, and you refine the cut to connect shapes. Then your finish style supports the plan.
Short hair, blunt hair, straight hair, and thin hair all need special rules. When you follow those rules, your photos look clean, your clients feel confident, and your maintenance visits become easier.
FAQ
What is the fastest way to improve a visible blend line?
You can usually improve it with end density correction and a small blend trim. You should also check if weight is stacked in one row.
Why does the blend look fine inside but bad outside?
Indoor lighting can hide tone mismatch and shelf lines. Natural light shows undertone and shows density steps.
Do extensions always need to be cut to blend?
Many sets look better after a controlled trim. The goal is to connect shapes, not to thin everything out.
How do you blend extensions on a client with a blunt bob?
You should avoid heavy weight right under the blunt edge, soften the last part of the natural ends, and keep the join controlled.
Why is blending harder on straight hair clients?
Straight hair reflects light evenly. That makes tone and density mismatch more visible. Straight hair needs higher precision.
What is the safest approach for thin hair clients?
You should use a lighter weight plan, smaller sections, higher join placement, and a conservative length increase.
Conclusion
You blend hair extensions by matching tone and density first, then mapping placement for movement, then refining the cut and finish. Special cases like short, blunt, straight, and thin hair need lighter weight and cleaner transitions.


