
Thinking of applying fusion hair extensions at home? You’re not alone. Whether you’re on a budget or just love a DIY challenge, this guide breaks it all down — without skipping a single detail.
To apply fusion hair extensions yourself, section your clean, dry hair, melt a keratin-tipped extension strand with a fusion heat tool, and bond it to a small strand of your natural hair near the root. Repeat section by section, ensuring even spacing and consistent heat application.
Want pro-level results without stepping into a salon? Keep reading — we’ll cover every step, tool, and tip to help you install fusion extensions like a seasoned stylist.
What Is Fusion Hair Extension and How Does It Work?
Fusion hair extensions (also called keratin bond or U tip extensions) use heat to melt a keratin tip and bond each strand to small sections of your natural hair. The result? Long-lasting, natural-looking volume that can last up to 3 months or more.
You’re essentially fusing new hair onto your own — hence the name. It’s not as intimidating as it sounds, especially if you’ve got patience, a mirror, and a little practice.
What You Need Before You Start
Let’s not sugarcoat it — fusion extensions aren’t something you can just wing. Here’s what you’ll need:
Tools & Supplies Checklist
✔️ Fusion heat tool (aka keratin glue gun or flat fusion iron)
✔️ U tip or flat tip hair extensions (keratin bonded)
✔️ Heat protector for your natural hair
✔️ Sectioning clips (LOTS of them)
✔️ Tail comb for clean partings
✔️ Heat-resistant finger protectors (highly recommended)
✔️ Mirror setup (two mirrors so you can see the back of your head)
✔️ Patience and snacks (seriously)
Step-by-Step: How To Apply Fusion Hair Extensions at Home
Step 1: Wash & Prep Your Hair
Start with clean, dry hair. No conditioner or leave-in — you want your hair totally oil-free so the bonds can grip like a vice.
Pro tip: A clarifying shampoo is your best friend here.
Step 2: Section Your Hair Like a Pro
Use your tail comb to part your hair horizontally from ear to ear. Clip everything above this line out of the way. You’ll work from the bottom up in horizontal rows.
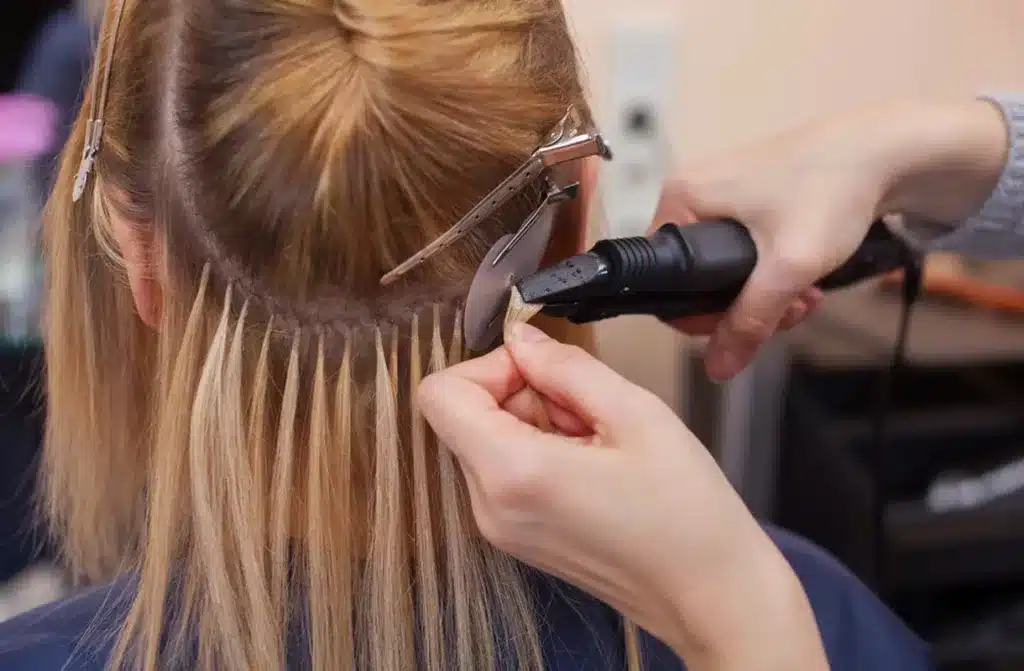
Step 3: Melt & Bond
Take a small section of your natural hair (about the size of a matchstick). Hold the keratin tip of the extension just below your roots and melt it with the heat tool. Quickly roll and press the bond between your fingers before it cools.
Important: Don’t place the bond too close to the scalp — leave about 1cm space so your hair can move naturally.
Step 4: Repeat Row by Row
Continue working upward in sections. Alternate where you place each strand to avoid visible rows. Think of it like bricklaying — stagger them slightly for a more natural fall.
Step 5: Style and Blend
Once you’ve done your full head (and possibly taken a few breaks), give your hair a gentle brush with a loop brush and lightly style it to blend everything together.

Things to Know Before You DIY Fusion
It’s Not a One-Hour Job
Expect to spend 3–5 hours for a full head, especially the first time you do it yourself. Plan accordingly.
You’ll Need to Remove and Reapply
Fusion extensions are semi-permanent, but they don’t last forever. You’ll need a keratin bond remover and pliers when it’s time to take them out (usually around the 8-12 week mark).
You Must Maintain Them
Brush daily, sleep in a braid or silk bonnet, and avoid oil-based products near the bonds. Treat your new hair like a designer handbag — with love and care.
Can You Do It on Short Hair?
Short answer: yes, but it’s tricky.
Fusion works best on medium to long hair, but with strategic placement and possibly some layering, you can pull it off. Just don’t expect miracles if your hair is above chin-length.
Who Shouldn’t Try This?
Fusion isn’t ideal for:
People with weak or damaged hair
Anyone with very oily scalps (bonds may slip)
Folks without patience — you’ll need loads of it
If that’s you, tape-ins or clip-ins might be better.

FAQ
Q: Can I do my own fusion hair extensions? by myself or do I need help?
A: Yes, you can install them yourself, especially if you’re only doing partial coverage or you’re experienced with hair tools. However, for a full head install, having a second pair of hands makes the process smoother — especially for the back of your head.
Q: How long does it take to install fusion extensions at home?
A: Expect it to take anywhere from 3 to 6 hours depending on the amount of hair, your experience level, and how comfortable you are using a fusion heat tool. The first time will likely take the longest.
Q: What type of fusion hair extensions are easiest to apply yourself?
A: U tip extensions are the most commonly used for DIY applications because the keratin bond is pre-tipped and easy to melt with a fusion iron. Flat tip extensions can also be DIY-friendly, but may require a slightly different bonding technique.
Q: Is it safe to apply fusion extensions using heat at home?
A: Yes, but only if you use a proper keratin fusion heat tool and follow safety precautions. Avoid using generic flat irons or high-temp tools not made for this purpose. Keep heat away from the scalp and always use finger protectors when handling melted keratin.
Q: What happens if I install the bond too close to my scalp?
A: Installing too close can cause tension, scalp irritation, and difficulty brushing. Always leave a 1 cm space between the bond and your scalp to allow natural hair movement and airflow.
Q: How many strands do I need for a full head?
A: Typically, you’ll need:
100 to 150 strands for volume only
150 to 200 strands for a full-head application
The exact number depends on the thickness of your natural hair and the look you’re going for.
Q: Can I reuse fusion extensions after removal?
A: Yes, if you’re using high-quality full cuticle hair like Hibiscus Hair, and the strands are in good condition after removal. You’ll need to reapply new keratin bonds before reinstalling them.
Q: What kind of shampoo should I use with fusion extensions?
A: Use a sulfate-free, alcohol-free shampoo. Avoid any products with oils or silicone near the bonds, as they can weaken the keratin and cause slippage.
Q: Can I color my hair after installing fusion extensions?
A: You can, but it’s safer to color your natural hair before installation. If you must dye your hair after installation, avoid applying color directly to the keratin bonds. Better yet, color your extensions before installing them for full control.
Q: Can I sleep with fusion hair extensions?
A: Absolutely — just make sure to tie your hair in a loose braid or use a silk/satin bonnet to minimize tangling and bond friction overnight.
Q: How often should I wash my hair with fusion extensions?
A: Aim for 2–3 times a week. Over-washing can weaken the bonds and dry out the extensions. Use dry shampoo in between washes to keep your scalp fresh.
Q: Will the bonds show if I put my hair in a ponytail?
A: If installed correctly with proper spacing and sectioning, the bonds should be well hidden. However, high ponytails or slick-back styles may expose some bonds unless you apply them more strategically along the head shape.
Q: Can fusion extensions damage my natural hair?
A: When installed and removed properly, no. The damage usually happens from poor technique, using too much heat, or yanking them out during removal. Always use a proper bond remover and avoid pulling on the strands.
Q: How do I remove fusion hair extensions at home?
A: You’ll need:
A professional keratin bond remover
Flat-tip pliers
Apply the bond remover, wait a few seconds, and gently crush the bond with the pliers to break it down. Then slide the extension off. Never pull!
Q: How long do fusion extensions last?
A: With proper care, fusion hair extensions typically last:
8–12 weeks before needing removal or repositioning
1–2 years if the hair is full cuticle and well-maintained (with re-bonding)
Q: Is it worth learning to apply fusion extensions at home?
A: If you wear extensions regularly, absolutely. The upfront time and tool investment can save you hundreds (if not thousands) in salon costs over time — and give you complete control over your look.
Final Thoughts: Should You DIY Fusion Extensions?
If you’re detail-oriented and don’t mind sitting still for a while, then yes — you can absolutely apply fusion extensions yourself. Will it be perfect on your first try? Maybe not. But will you get better every time? Absolutely.
And hey, worst case scenario, you can always call in a stylist to clean it up. Either way, you’ll walk away knowing exactly how those silky strands get installed — and that’s pretty empowering.
Let me know if you’d like a downloadable checklist, video tutorial, or product recommendations to go with this guide.


