
Hand tied extensions deliver natural volume and seamless results—but poor placement can ruin everything. If you’re struggling with where and how to place each weft, you’re not alone.
The best hand tied extension placement follows the natural head shape, maintains even tension, and uses hidden beaded rows to anchor lightweight wefts for a flawless blend and long-term wear.
Let’s walk through the right installation methods, ideal row mapping, and key maintenance tips so your hand tied services bring results that last.
Hand tied weft installation
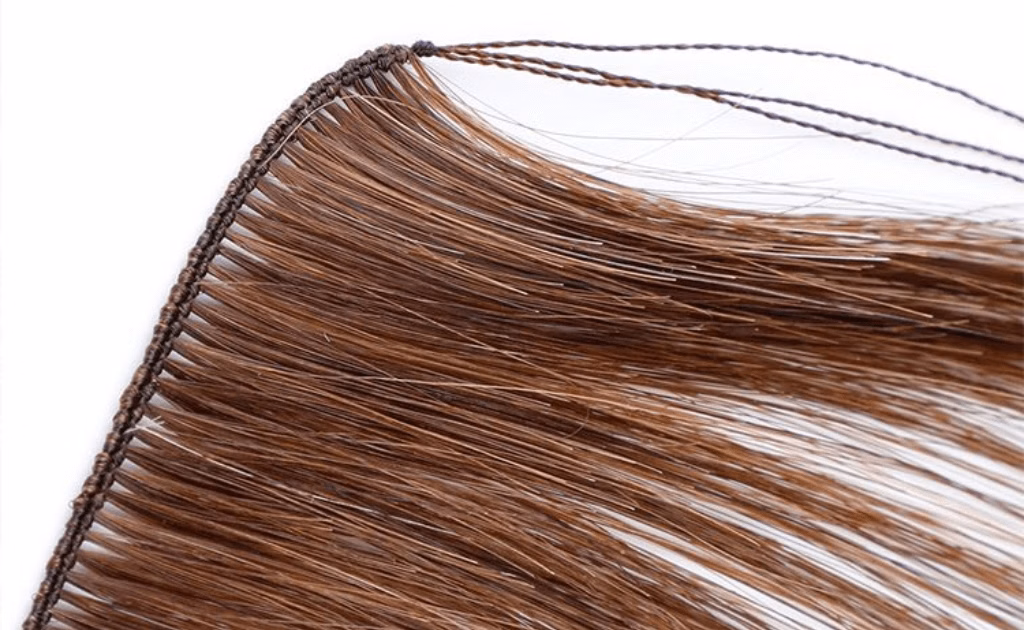
Installing hand tied wefts can feel overwhelming if you’re new to the method. You want secure attachment—but also need the look to stay light and invisible.
Hand tied wefts should be sewn onto a foundation of silicone-lined microbeads or thread anchors placed on clean, sectioned rows. This ensures tight, even support without creating bulk or breakage.
Step-by-step breakdown of installation
1. Prepare the hair
Start with freshly washed, dry hair. Section the hair cleanly—usually 1-2 inches above the nape, depending on the head shape and desired volume.
2. Anchor the row
Use beads or thread with minimal tension. Beads should lie flat against the scalp and not pinch the natural hair.
3. Sew the weft
Double-thread a curved needle. Start from one end, and use a blanket stitch or lock stitch, sewing the weft through the anchor row. Avoid sewing too tight or skipping anchor points.
4. Stack rows if needed
Depending on the density and head size, multiple rows may be stacked vertically. Leave enough space between rows to allow flexibility and prevent bulk.
Common mistakes
| Mistake | Result |
|---|---|
| Beads too tight | Headaches, breakage |
| Too few beads | Uneven support, slippage |
| Skipping anchor points | Loose wefts, short wear time |
| Overstacking wefts | Bulky results, discomfort |
Proper install keeps the weft flexible and invisible while staying secure for daily wear.

Mapping a flawless placement
Hand tied extension placement should follow natural head curvature, with rows placed strategically from the nape to just below the crown. Leave enough hair above and below each row for a seamless, hidden finish.
1. Consider head shape
Flat heads may need rows curved slightly downward. Rounder heads require horizontal rows with careful spacing.
2. Follow the hairline
Avoid placing wefts too close to the front hairline or crown. Leave at least 1–2 inches of buffer space.
3. Use density mapping
Match weft thickness to natural density. Finer-haired clients may need fewer rows with more spacing.
4. Leave wiggle room
Clients should be able to tie hair back, part both ways, and style flexibly without exposing the wefts.
Quick reference table
| Area | Row Count | Notes |
|---|---|---|
| Nape | 1–2 rows | For length and low ponytail blend |
| Midsection | 1–2 rows | Add density and volume |
| Crown (optional) | 1 thin row | Optional for blending only |
2 rows of hand tied extensions placement
Sometimes, less is more. But how do you make two rows look full?
Two-row placements should follow mid-nape and occipital bone level for optimal blend and movement. Row spacing, hair selection, and stitching angle all influence the final result.
%two row placement before after
Maximizing results with minimal rows
Ideal positions
- First row: 1–1.5 inches above the nape
- Second row: at or just above the occipital bone
Key technique tips
- Use higher gram wefts if client wants thicker results
- Angle stitching slightly downward for layered fall
- Leave natural hair below first row for ponytail cover
This setup works best for:
- Fine to medium hair
- Clients seeking moderate volume and length
- Budget-conscious customers
With precision placement and quality hair, two rows can look just as full as three—without extra weight or stress.

Hand tied extension tutorial
Learning how to install hand tied wefts can open big doors professionally. But following the right tutorial saves time, reduces error, and builds confidence.
The best tutorial for hand tied extensions includes step-by-step anchor placement, weft sewing technique, placement strategy, and move-up process. Visuals and real head demos make a difference.
What a great tutorial should include
Core modules:
- Row mapping on a mannequin or live model
- Anchor methods: bead vs thread
- Needle type and stitch patterns
- Weft overlap and stacking techniques
- Final blending and styling
Bonus insights
- Removing tape-in or keratin properly before switching to wefts
- How to store and reuse full cuticle hand tied hair
- Troubleshooting tension spots or shedding
For stylists offering luxury services, mastering the hand tied method is essential. Clients love it. And your business will grow with higher-ticket appointments and fewer complaints.
How often should I move up hand tied extensions?
Timing matters in maintenance. Waiting too long can cause matting or tension. Too soon, and you waste product life.
Hand tied extensions should be moved up every 6–10 weeks depending on hair growth rate, lifestyle, and product quality. Clients with faster growth or active lifestyles may need tighter timelines.
%stylist performing hand tied move up
How to build the right schedule
Influencing factors
| Factor | Impact |
|---|---|
| Hair growth speed | Faster growth = sooner move up needed |
| Scalp oil levels | Oily scalps weaken beads over time |
| Exercise habits | Sweat can break down bonds faster |
| Hair texture | Curly/coarse hair may tangle sooner |
Always educate your client on signs it’s time:
- Tangling at the roots
- Wefts slipping or lifting
- Parting patterns shifting
Reinstallation maintains comfort and appearance. Don’t stretch wear time—prioritize the hair’s health.
What not to do with hand tied extensions?
Even the best install can go wrong with bad habits. Knowing what to avoid is as important as knowing what to do.
Do not brush wet. Do not sleep with loose hair. Do not install on compromised scalps. And never stack wefts on weak anchor rows.
Common aftercare mistakes
1. Sleeping with wet hair
This leads to tangles, mildew smell, and friction damage.
2. Using oil-based products near beads
Oils break down adhesives or lubricate beads, causing slippage.
3. Skipping detangling routines
Clients should detangle daily with loop brush. No yanking.
4. Using heat too close to thread
Melted thread or burned wefts will weaken the structure.
Proper aftercare is what lets good hair last 1–2 years. Always provide a care sheet and retail safe brushes and products for client use.
My opinion!
Hand tied hair extensions are one of the best options for luxury clients today. The wefts are soft, reusable, and natural looking—but not every method fits every head. In many cases, keratin tips or tape may work better for short hair, or clip-ins for temporary events. What matters most is choosing what fits your client’s lifestyle and goals. At Hibiscus Hair, we help you deliver that personalized result with full cuticle hair, factory-direct quality, and professional guidance built for salon success.
Conclusion
Correct placement makes all the difference. Hand tied extensions deliver top-tier results—but only with precision mapping, safe anchoring, and professional education.


