Tape-ins can be a salon’s fastest, flattest, most repeatable extension service—if the prep and placement are exact. This guide gives you the pro workflow, counts, tools, and aftercare to cut redos and boost retention.
Yes—tape-ins install easily with a strict system: clarify and dry 100%; map rows; take sticky-note–thin sections; place bottom tab 1–2 mm off scalp; align top tab; press 5–10 s; brick-lay rows; avoid oils 48 h; move up every 6–8 weeks.

Keep reading for exact pack counts by density, a step-by-step install map, removal and retape protocol, product specs, and a ready-to-print aftercare card you can hand to every client.
Cons and pros of tape in hair extensions–for salon professionals
Tapes can be a top profit service, yet they need system and discipline.
Tape-ins are fast and scalable with assistants, gentle on clients when mapped well, and easy to remove with the right solvent. The drawbacks are adhesive management, moisture control, and re-taping workload at move-ups.
Salon benefits
- Speed and consistency: A trained team can install a full head in 45–90 minutes. Sections follow a repeatable grid, so junior staff can assist without risk. This raises chair throughput.
- Client comfort: The panels lie flat and feel light. Clients with tender scalps often prefer tapes over heavy rows. The low-profile top works close to parts for great invisibility.
- Color work: Mixed shades and rooted panels build multidimensional looks without chemical lightening. Stylists can upsell with strategic color placement.
- Reusability: Quality full cuticle hair reuses well. Clean removal preserves client hair and extension hair, which builds loyalty and lifetime value.
Salon challenges
- Adhesive discipline: Oils, silicones, and heavy masks near the root break bonds. You must teach clients a strict care script and stock safe home care.
- Humidity and sweat: Gym routines, hot yoga, and frequent swimming test bond integrity. You must adjust placement, tape choice, and follow-up intervals.
- Move-up workload: Retape cycles require time for clean removal, residue control, clarifying, drying, and precise re-mounting.
- Scalp/skin considerations: Very sensitive scalps may react to adhesives; patch tests and medical-grade tapes help. Very oily scalps often need shorter wear cycles.
| For the salon | Pros | Cons |
|---|---|---|
| Installation | Fast, assistant-friendly | Needs tight sectioning standards |
| Client comfort | Flat, light, flexible | Adhesive hates oils/heat at base |
| Business model | Reusable hair, recurring revenue | Move-up blocks need scheduling |
| Aesthetics | High invisibility near parts | Slippage if clients ignore care |
Are tape in hair extensions easy to install?
The motions are simple; the standard is not. Tapes are easy when sectioning, tension, and prep are strict.Yes, tapes are easy after training and with a checklist. Clean prep, even tension, straight panels, and correct pressure are the keys to zero slip and tidy lines.
Ease comes from systemization. I recommend a three-phase protocol: Prep → Placement → Press. In prep, you clarify the root (twice if needed), dry 100%, and remove all residue. In placement, you map your rows outside the “splash zone” (temporal and crown areas that catch oils and sweat), and you control sandwich weight—fine hair needs thinner sandwiches or singles with a skin weft top. In press, you commit to firm, even pressure for 5–10 seconds per tab with a silicone press tool or your thumbs through a comb guard.
Small habits change outcomes. Keep sections as thin as a sticky note. Stop 1–2 mm short of the scalp so the panel can pivot freely. Never capture baby hairs. Align panel edges to avoid adhesive overhang. Replace any panel that touches conditioner or oil during install. Build a failed-panel jar mentality: if a tab feels wrong, bin it and use a fresh one. Easy installs come from respecting these tiny rules every time.

How many tapes are needed for a full head?
Counts depend on head size, density, and goal. Use grams and coverage zones, not a one-size answer.
Most full heads use 30–50 sandwiches (60–100 single tabs). Fine hair or partials may take 15–25 sandwiches; volume makeovers can reach 60+.
Think in zones and grams:
- Zones: Nape, mid-occpital, parietal, temporal, crown. Avoid the top 1–2 rows near the natural part.
- Grams: Standard tabs carry 2–3 g per sandwich for most pro stock.
Typical planning:
- Fine hair, fullness only: 15–25 sandwiches (30–50 singles), 40–60 g. Focus on nape and mid-occpital. Keep panels thin and low.
- Medium density, length + fullness: 30–40 sandwiches (60–80 singles), 80–120 g. Add parietal rows and minimal temporal tabs.
- Thick hair or long glam goals: 45–60+ sandwiches (90–120+ singles), 140–200 g. Use longer panels and strategic stacking.
| Goal | Sandwiches | Singles | Grams (approx.) |
|---|---|---|---|
| Fill-in / partial | 10–15 | 20–30 | 30–45 g |
| Full head natural | 30–40 | 60–80 | 80–120 g |
| Maximum length | 45–60 | 90–120 | 140–200 g |
Always map first. If you crowd panels in the temporal area, visibility rises and oils break bonds. Leave buffer from the hairline and parting.
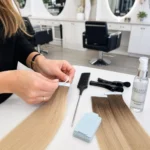
How to apply tape in hair extensions?
Clean prep and precision placement decide longevity. Follow this sequence every time.
A reliable install uses a strict workflow: consult and map, clarify and dry, section and buffer, place with correct tension, press and set, blend and document.
1) Consultation and mapping
- Confirm goals: length, fullness, color effects, lifestyle (gym, swim, work).
- Check scalp health and sebum level. Avoid active scalp conditions.
- Select tape width (3–4 cm standard; micro tapes for edges), hair weight, and color mix.
- Draw a placement map: avoid 1–2 cm from hairline and 2–3 cm from part. Mark buffer zones at temples and crown.
2) Deep cleanse and dry
- Shampoo roots twice with a clarifying shampoo. No conditioner at roots.
- Rinse thoroughly and towel-blot. Blow-dry 100% with cool–warm air. No oils, no serums.
- Flat iron length lightly if needed for blending reference (do not heat the roots).
3) Tools and station
- Rat-tail comb, section clips, silicone pressing tool or comb, alcohol pads, weft/tape remover, spare tabs, shears, thinning shears, blending scissors, weft sealant (for retape), cape, and gloves.
4) Sectioning
- Create a horseshoe part at the nape. Keep section thickness the same as a sticky note. Comb all baby hairs away. Place a protective finger or comb between scalp and section.
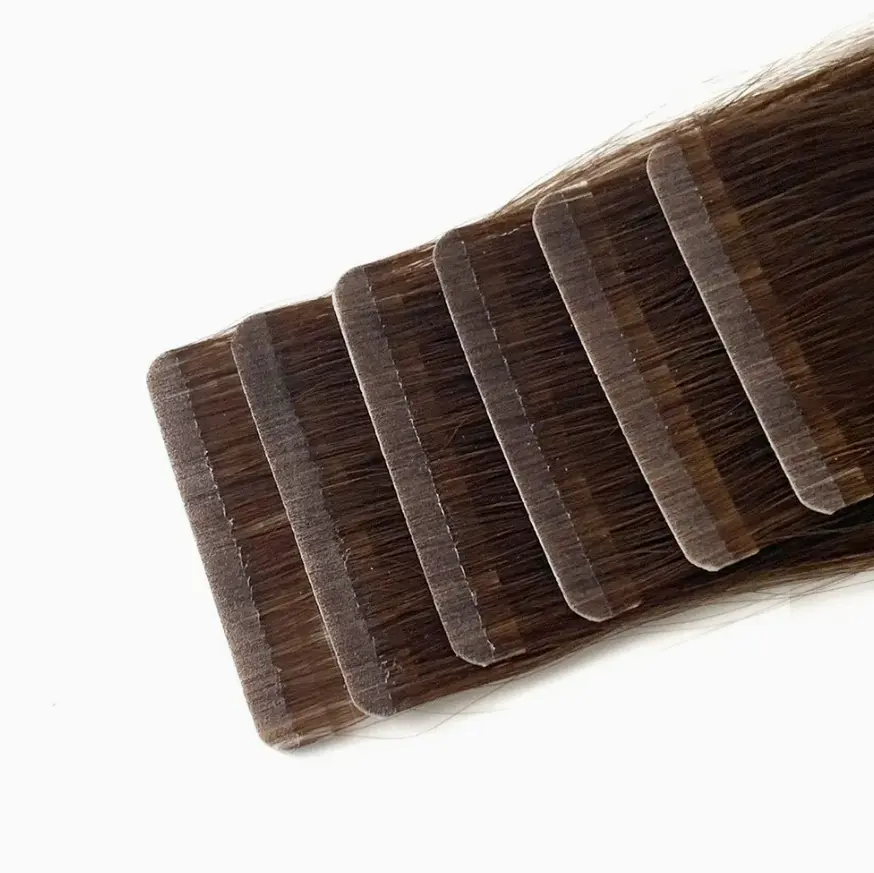
5) Placement and “sandwich”
- Lift the section, place the bottom tab adhesive upward under the section, 1–2 mm off the scalp. Let hair fall onto the adhesive; lightly tap to pre-bond.
- Check that no hairs cross the edges. If stray hairs touch the adhesive edge, redo the section.
- Align the top tab adhesive downward over the section to make a sandwich. Corners must align to avoid glue exposure.
- Apply even pressure with thumbs or a silicone press tool for 5–10 seconds. Use a comb backer to avoid heat from hands.
- Work row by row, leaving 0.5–1 cm between sandwiches. Stagger rows for a brick-lay pattern.
6) Special zones
- Temples: Use micro or half tabs. Reduce density and drop placement lower.
- Crown/parietal ridge: Keep at least two finger widths away from the natural part. Angle panels to follow hair fall.
- Cowlicks: Place lower and mirror natural direction to prevent flip.
7) Blend and finish
- Dry lengths if damp from prep. Point-cut ends for weight balance. Add soft layers to blend.
- Take before/after photos. Record map, grams, colors, and batch numbers for retape.
8) Client education
- No washing for 48 hours. No oils or masks near roots. Brush from ends up, holding roots. Dry roots after workouts. Sleep in a loose braid or silk scrunchie.
How long do tape in hair extensions last?
Wear cycle depends on oil, sweat, and care. Hair quality decides how many reuses you get.Most clients move up every 6–8 weeks. Full cuticle, single-donor hair often lasts 9–12 months with correct retape; coated economy hair may last 1–3 months.
Two clocks run at once: bond life and fiber life.
- Bond life (6–8 weeks): Natural hair grows 1–1.5 cm a month. As panels grow out, leverage increases, combs catch, and visibility rises. Sweat, oils, and heavy conditioners shorten bond life. Clients with very oily scalps or athletes often need 4–6 week cycles.
- Fiber life: Full cuticle Remy and full cuticle single-donor hair last much longer. No acid bath and no heavy silicone coating mean the cuticle stays intact. These grades handle multiple removals, clarifiers, and re-taping. Lower-grade coated hair looks glossy at first but dries and tangles once the coating washes off.
Set expectations:
- Fine or fragile clients: lower grams, shorter cycles.
- High-heat stylers: enforce heat protectant and tip temperature limits.
- Swimmers: pre-wet with fresh water, use a cap if possible, and clarify gently after.

How to remove and retape tape in hair extensions?
Safe removal protects client hair and preserves the extensions for reuse.
Use a proper remover, controlled peel, residue cleanse, thorough dry, re-tab with fresh tape, and reinstall on clean sections. Rushing removal causes breakage and sticky mess.
Removal
- Saturate: Spray professional remover along the seam; focus on edges first. Wait 30–60 seconds.
- Peel: Slide the top tab off with gentle rocking. If resistance remains, add remover and wait. Never rip.
- Clean base: Use a remover-soaked cotton pad to wipe adhesive from the lower tab and client hair. Use a fine-tooth comb to glide out residue while supporting the section.
- Clarify roots: After all panels are out, shampoo roots twice with a clarifier. No conditioner at the roots. Dry 100%.
Retape
- De-gunk panels: Lay panels adhesive-side up on foil. Use adhesive remover to dissolve residue. Scrape gently with a plastic blade if needed. Rinse lengths with gentle shampoo; avoid soaking the top too long.
- Dry and prep: Blow-dry panels fully. Alcohol-wipe the top strip to remove oils.
- Fresh tabs: Apply new medical-grade tabs edge-to-edge. Press firmly with a silicone roller or thumb. Do not touch adhesive with fingers.
- Reinstall: Follow the same install map, adjusting density or placement as needed.
Tips:
- Replace any panel with a damaged top. Adhesive failure later costs time and trust.
- Never stack new tape over old residue. Clean base = long wear.
- Keep remover off the lengths as much as possible to protect the cuticle.

Aftercare script for clients
Simple rules keep bonds clean and hair soft.
Clients should avoid oils at roots, wash less often, dry roots after sweat, brush daily, and sleep in a braid. Provide a written card and approved products.
Give every client a card:
- First 48 hours: Do not wash. Do not workout heavily. No sauna or steam.
- Washing: Use sulfate-free shampoo. Keep conditioner and masks from mid-lengths down. Rinse thoroughly. Wash 2–3 times weekly.
- Drying: Towel blot. Dry the root area on cool–warm until panels are fully dry. Do not leave roots wet.
- Styling: Use heat protectant. Keep irons away from the tape seam. Temperature ≤ 180°C / 356°F on lengths.
- Brushing: Use a loop or soft-bristle brush. Hold roots and brush ends to roots. Brush morning and night.
- Sleep: Silk pillowcase or bonnet. Loose braid or low ponytail.
- Activities: Before swimming, wet hair with fresh water and apply a light mid-length conditioner. Rinse after. Clarify gently once weekly if water is hard; follow with a light mask mid-lengths only.
Build compliance with texts or email check-ins at week two and week four. Small reminders prevent slip and matting.
Product selection tips
Right materials make installs easier and reuses longer.Choose full cuticle hair, correct tape widths, and adhesive that matches lifestyle. Stock micro tapes for edges and standard 4 cm panels for core rows.
- Hair quality: For salons building repeat business, use full cuticle Remy or full cuticle single-donor hair. No acid bath, no heavy silicone. The cuticle alignment gives less tangle and longer reuse. Economy coated hair looks shiny day one, then dries and frizzes after a few washes.
- Tape widths: 4 cm (standard) for most heads; 2–3 cm micros for temples, crown edges, and short layers. Keep widths consistent per row for clean balance.
- Adhesive type: Medical-grade, heat-resistant, and humidity-tolerant. For athletes or oily scalps, select a stronger, sweat-resistant formula and shorten move-up intervals.
- Color and root shades: Use rooted tabs or shadow-root wefts near parts to hide the seam. Mix tones for depth rather than over-toning later.
- Storage and hygiene: Store tabs sealed and away from heat. Clean hands or gloves during application. Oils from fingers weaken bonds.
Create a salon “kit”: clarifier, remover, alcohol pads, replacement tabs, press tool, combs, clips, blending shears, and an aftercare card stack. Kits standardize quality across your team.

My opinion
Tape-ins reward discipline. When the team follows a repeatable map and keeps adhesive rules tight, tapes are one of the most comfortable, invisible, and profitable services. Skipping prep, crowding the hairline, or letting oils near bonds turns an easy service into a redo. Build a checklist, train assistants, and document each install for stress-free move-ups.
FAQ
How soon can clients wash after installation?
After 48 hours. The adhesive needs time to cure. Early washing or sweating can lift tabs.
Can we heat-seal tapes during install?
Do not apply direct heat to the adhesive. Use firm pressure only. Heat can soften the glue and reduce long-term hold.
What if a single tab lifts at the corner?
Remove and replace that sandwich. Do not try to “glue” a corner back down on a client’s head.
Can tapes go in very fine hair?
Yes, with micro widths, lighter grams, and lower placement. Avoid top zones and keep sections very thin.
Do tapes work for swimmers or gym clients?
Yes, with stricter aftercare, sweat-resistant adhesive, and shorter 4–6 week cycles. Dry the roots after each session.
How many times can the hair be reused?
Full cuticle hair often lasts 4–6 cycles or 9–12 months with proper removal and retape. Economy coated hair may give 1–2 cycles.
What causes slipping the most?
Conditioner or oil at the roots, thick sections, capturing baby hairs, and poor pressure during install.
How do we prevent sticky buildup at move-up?
Use a quality remover, allow dwell time, wipe residue with alcohol pads, clarify roots twice, and dry 100% before re-taping.
Conclusion
Standardize prep, mapping, and pressure. Use quality hair and adhesive. Educate clients. Tape-ins become fast, comfortable, and reliable revenue your team can deliver every day.
Hibiscus Hair Manufacturer has been dedicated to producing high-quality tape hair extensions for 25 years and is a recognized leader in the industry. If you are interested in finding a reliable hair extensions supplier and wholesale for your brand, please visit our website for more information: