
If you’re a hairstylist or salon owner looking to master F tip hair extensions, you’re in the right place. These extensions offer a seamless, natural look without the need for beads or metal rings. The trick? The soft plastic tip that mimics the flexibility of natural hair, making installation smooth and comfortable for clients.
Quick Answer: How to Install F Tip Hair Extensions
Section the natural hair.
Insert the natural hair through a nano ring.
Place the F tip extension inside the ring.
Use pliers to clamp the ring securely.
Repeat across the head for a full installation.
Keep Reading – There’s More You Need to Know
Getting F tip extensions right is all about precision and technique. Let’s break it down step by step so you can install them flawlessly every time.
What Are F Tip Hair Extensions?
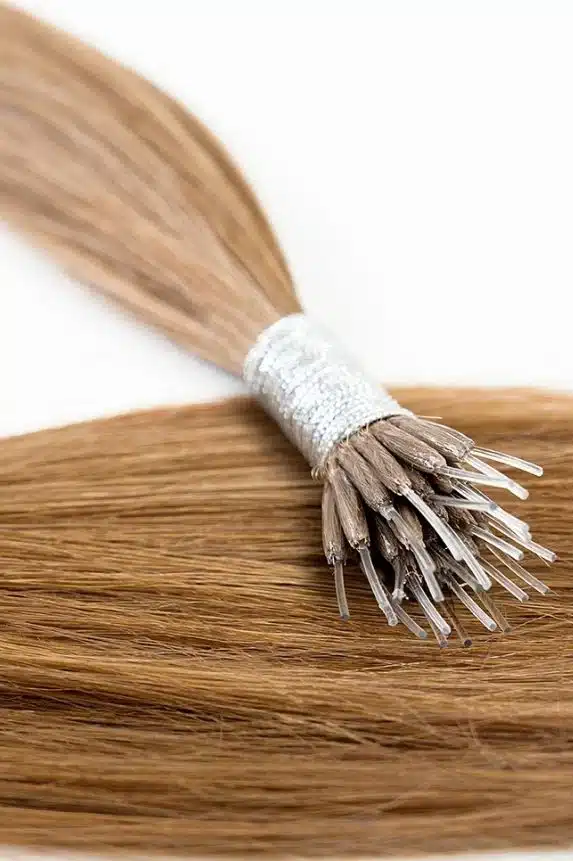
F tip extensions are a type of strand-by-strand extension that feature a flexible plastic tip at the top instead of keratin, metal, or beads. Unlike U tip or I tip extensions, F tip hair remains soft and comfortable, making it ideal for clients with fine or sensitive hair.
Why Choose F Tip Over Other Methods?
✅ No Heat or Glue Required – Unlike U tip, there’s no need for fusion tools.
✅ Comfortable & Lightweight – The plastic tip is flexible, preventing stiffness.
✅ Durable & Reusable – Can last 6-12 months with proper care.
✅ Natural Movement – Moves and blends seamlessly with the client’s hair.
Step-by-Step Guide:How to Apply F Tip Hair Extensions
Step 1: Prep the Hair
Before installing, wash and dry the client’s hair thoroughly. Avoid conditioners or styling products near the roots to prevent slippage.
Sectioning is key – Start at the nape of the neck and work your way up.
Use sectioning clips to keep the rest of the hair out of the way.
Step 2: Thread the Natural Hair Through the Nano Ring
F tip extensions use nano rings for attachment, which are smaller and less detectable than standard micro rings.
Take a small section of the client’s hair (about the same thickness as the extension strand).
Use a loop tool to pull the hair through a nano ring.
Position the ring close to the scalp, but leave some space for movement.
Step 3: Insert the F Tip Extension
Slide the plastic-tipped extension into the nano ring, aligning it with the client’s natural hair.
Make sure the extension lays flat against the scalp for a seamless finish.
Step 4: Secure the Extension with Pliers
Use professional extension pliers to clamp the nano ring securely.
Ensure the ring is tight enough to hold the extension in place but not so tight that it causes discomfort.
Step 5: Repeat the Process
Work in neat, even rows up the head.
Leave a small gap between each extension to allow for natural movement.
Avoid placing extensions too close to the hairline to keep them discreet.
How to Blend & Style F Tip Extensions for a Natural Look
Once installed, it’s time to make everything blend seamlessly:
✔ Trim the ends if needed to match the client’s haircut.
✔ Style as usual – F tip extensions can be curled, straightened, and washed just like natural hair.
✔ Use a loop brush to avoid pulling on the bonds.
Maintenance & Aftercare Tips for F Tip Extensions
�� Brushing: Use a soft-bristle or loop brush, starting from the ends and working up.
�� Washing: Use sulfate-free shampoo, focusing on the scalp rather than the bonds.
�� Heat Styling: Avoid direct heat on the nano rings to prevent weakening the attachment.
�� Sleep Protection: Recommend a silk pillowcase or braiding the hair at night to prevent tangling.
�� Reinstallation: Move up the extensions every 6-8 weeks as the natural hair grows.
FAQ: Everything You Need to Know About F Tip Extensions
1.How long do F tip hair extensions last?
With proper care, F tip extensions can last 6-12 months before needing replacement. However, the nano rings should be moved up every 6-8 weeks as natural hair grows.
2.Are F tip extensions better than I tip or U tip?
It depends on the client’s needs:
F Tip – Best for fine hair, flexible and lightweight.
I Tip – Uses metal beads, more durable but slightly more noticeable.
U Tip – Requires heat bonding, more secure but not as flexible.
3.Can F tip extensions be reused?
Yes! Since F tip extensions don’t use glue or heat, they can be removed and reinstalled multiple times.
4.Are F tip extensions safe for thin or fragile hair?
Absolutely! Their lightweight design makes them ideal for thin or fine hair since they don’t add excess weight or strain on the scalp.
5.Can clients wash and style their hair as usual?
Yes, but they should use sulfate-free products and avoid applying heavy conditioners near the roots. Heat styling is fine, but direct heat on the nano rings should be avoided.
Final Thoughts: Mastering F Tip Hair Extensions
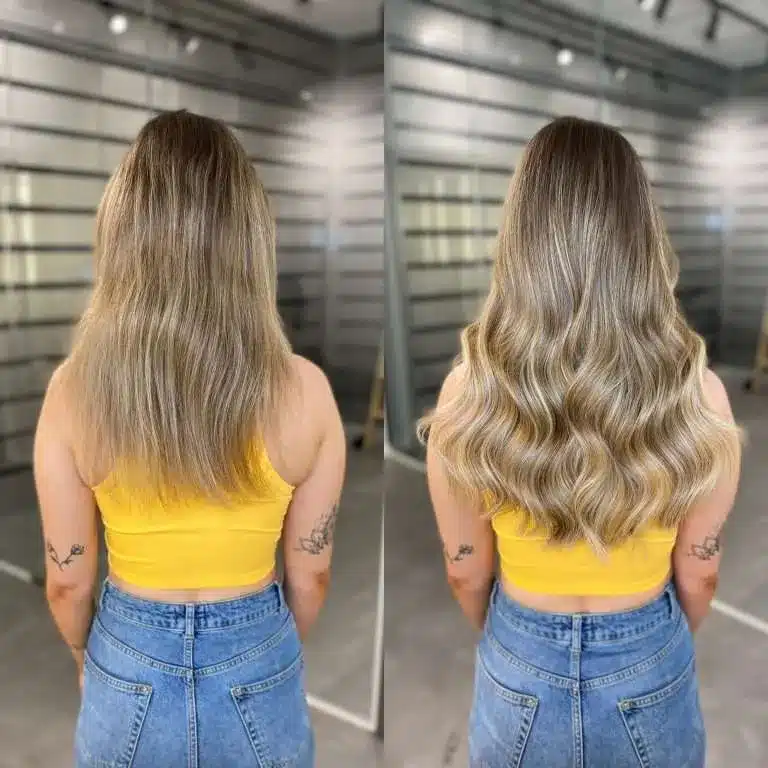
F tip extensions are a game-changer for hairstylists who want to offer a comfortable, natural-looking option to their clients. By following this step-by-step installation guide, you can ensure flawless results that keep your clients coming back.
Got questions? Drop them in the comments, and let’s talk all things hair extensions!


