
Have you ever had a client ask, “Are beaded hair extensions really good for my hair?” I hear this question all the time, both from stylists and end users who want a method that feels lighter and more natural.
Beaded hair extensions come with clear benefits and real limits. They offer glue-free, reusable wear, but they also require correct installation, good habits, and the right hair type to avoid damage or discomfort.

If you are thinking about offering beaded systems, or you already wear them and want better results, it helps to understand how they work in real life, not just in theory.
What Are Beaded Hair Extensions?
Many people think beaded hair extensions are one single method. In fact, the term covers more than one system, and this is where confusion often starts.
Beaded hair extensions are extensions attached with small beads or rings that clamp onto natural hair. They do not use glue or heat, and they can hold either single hair bundles or hair wefts.
Definition in Simple Terms
A bead is opened, natural hair goes inside, extension hair goes inside, and the bead is closed. The bead creates pressure that keeps the extension in place. That is the core idea.
Because there is no adhesive, the hair can be removed and reinstalled many times. This is why many salons like beaded methods for long-term clients.
1.Strand-Based Beaded Extensions
Strand-based systems use small hair bundles. Each bundle is attached with one bead.
Common names include micro bead, micro ring, or micro link extensions. These names often sound different, but the structure is very similar.
This type gives flexible placement. It works well for adding volume in small areas. It also demands high skill. Each section must match the bundle weight.

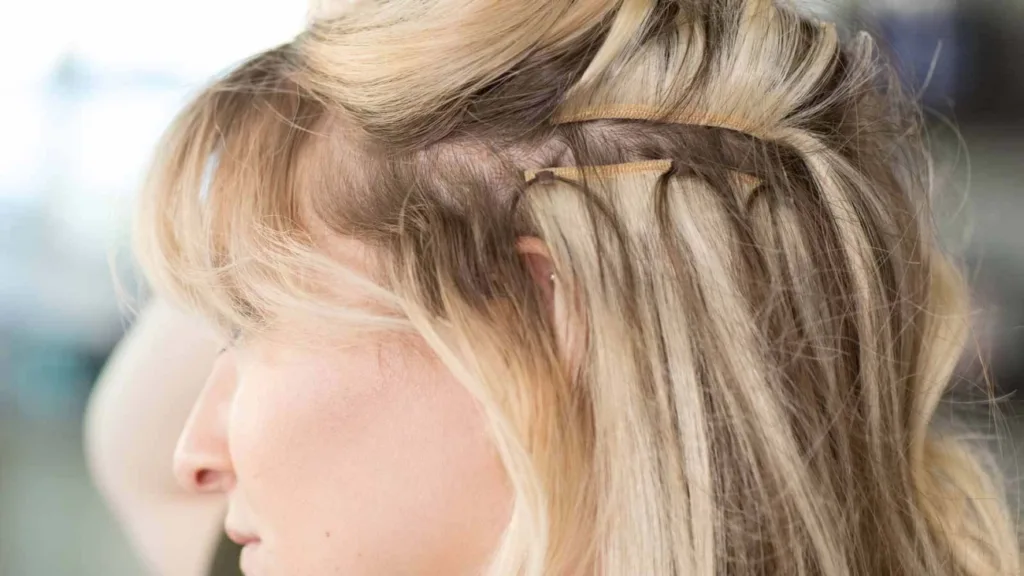
2.Beaded Weft Hair Extensions
Beaded weft systems use beads as anchor points for a hair weft. The weft is either sewn onto the bead row or clamped in place.
This method spreads weight across a line instead of points. Many stylists prefer it for fuller looks and thicker hair.

Key Differences at a Glance
| System Type | Hair Unit | Feel on Scalp | Skill Level |
|---|---|---|---|
| Strand-based | Single bundle | Very light | High |
| Beaded weft | Hair weft | Even pressure | Medium to high |
Understanding this difference helps you choose the right method for the right head.
Beaded Hair Extensions Pros and Cons?
Beaded systems are often marketed as “safe” and “damage-free.” That is only true when they are done right.
Beaded hair extensions offer flexibility and reuse, but they also create pressure points that must be managed carefully.
Pros of Beaded Hair Extensions
One clear benefit is no glue. There is no sticky residue. The hair stays clean. This helps with long-term wear and color consistency.
Another benefit is reuse. High-quality hair can be moved up many times. This lowers long-term cost for clients who commit to maintenance.
Clients also like the natural movement. When installed well, beaded extensions move with the natural hair and feel light.
Cons of Beaded Hair Extensions
The biggest downside is tension. Beads hold hair by pressure. If sections are too small or beads are too tight, hair can break.
Slipping is another issue. Slipping often comes from smooth natural hair, wrong bead size, or poor lining inside the bead.
Some clients feel the beads when they sleep or touch their scalp. This feeling usually improves, but it can be uncomfortable at first.
Honest Comparison
| Aspect | Beaded Extensions | Tape or Keratin |
|---|---|---|
| Glue or heat | No | Yes |
| Reuse | High | Medium |
| Comfort margin | Smaller | Larger |
| Skill dependency | Very high | High |
Beaded systems reward precision. They punish shortcuts.
Beaded Hair Extensions Tutorial?
Beaded hair extensions use beads as the main fixing point, but the installation logic is very different depending on the system. Strand-based beaded extensions and beaded weft extensions must be treated as two separate methods.
Below are clear, step-by-step installation flows designed to match professional installation videos and help viewers understand each movement and decision.
Strand-Based Beaded Hair Extensions Installation (Bundle Method)
This method attaches individual hair bundles using one bead per bundle. Precision and balance are critical.
Step 1: Hair Assessment and Section Planning
Natural hair density, texture, and growth direction should be checked first.
Strand-based systems work best when bundle weight matches section size. Weak hairlines and crown swirl areas should be avoided. Placement should focus on stable zones of the head.
Step 2: Create Clean Micro Sections
Each hair bundle requires its own clean section.
Sections should be square or slightly rectangular, with clear lines. Uneven sections lead to uneven tension and early slipping.
Section size must match bundle weight. Small sections increase tension. Large sections reduce grip.
Step 3: Select the Correct Bead Size
Bead size should match natural hair thickness.
Fine hair requires small, silicone-lined beads. Medium hair can support standard micro beads. Oversized beads should be avoided in strand-based systems due to poor grip and visibility.
Step 4: Insert Hair and Position the Bead
The bead is opened and placed onto the natural hair first.
The extension bundle is then inserted into the bead. Natural hair and extension hair should sit evenly inside the bead.
The bead should sit close to the scalp but never tight. A small allowance is needed for natural hair growth.
Step 5: Clamp the Bead Flat
The bead should be closed slowly and evenly.
Beads must be clamped flat. Twisted or angled beads create rotation, pulling, and discomfort during daily movement.
Step 6: Maintain Even Spacing
Spacing between bundles should remain consistent across the head.
Overloading one area creates stress points. Balanced placement improves comfort and wear time.
Step 7: Final Comfort Check
After installation, movement should feel natural.
There should be no sharp pulling, pinching, or twisting sensation. Early discomfort often becomes worse over time.
Beaded Weft Hair Extensions Installation (Weft Method)
This method uses beads as anchor points to support a hair weft. Weight distribution and row structure are the focus.
%beaded weft hair extensions installation
Step 1: Row Design and Placement Planning
The number of rows depends on desired fullness and natural hair strength.
Fine hair usually supports one to two light rows. Medium to thick hair can support more rows, but weight must remain balanced. Rows should stay away from the hairline and crown for proper coverage.
Step 2: Create Straight Horizontal Partings
Each row begins with a clean horizontal parting.
Partings should be parallel to the floor to help the weft sit flat and blend naturally. Messy or curved partings often lead to twisting after washing.
Step 3: Place Beads Along the Row
Beads are placed evenly along the parting to form anchor points.
Typical spacing ranges from 1 to 1.5 cm, adjusted based on hair density and weft weight. Each bead should hold an equal amount of natural hair.
Step 4: Adjust Bead Height and Tension
Before attaching the weft, bead position should be checked.
Beads should sit close to the scalp without causing pressure. Proper placement provides security without discomfort.
Step 5: Attach the Weft to the Bead Row
The weft is placed on top of the bead row.
Depending on the system, the weft is sewn onto the beads or clamped in place. The weft should lie flat without folding or bunching.
Excessive pulling should be avoided. The weft should rest on the beads, not hang from them.
Step 6: Seal the Row and Check Alignment
After attachment, the row should appear straight and even from end to end.
Bead angles should be adjusted if any edges touch the scalp. Comfort should be prioritized over tightness.
Step 7: Repeat Rows With Proper Spacing
If multiple rows are needed, sufficient vertical space must be left between rows.
Rows placed too close increase tension and reduce comfort. Proper spacing improves durability and movement.
Step 8: Final Movement and Blending Check
Hair should move freely with no visible beads.
Comfort on the first day is a strong indicator of stable wear until the next maintenance appointment.
These two installation methods reflect professional standards and align well with step-by-step installation videos. Clear sectioning, balanced weight, and controlled tension determine the final result.
Do Beaded Weft Extensions Damage Your Hair?
This is one of the most common fears I hear, and it is a fair question.
Beaded weft extensions do not damage hair by design, but they can cause damage if tension, spacing, or maintenance is wrong.
When Damage Happens
Damage often comes from:
- Beads placed too close together
- Too much weight on one row
- Skipping move-up appointments
Hair grows, but beads stay in place. Over time, this creates pulling.
When Hair Stays Healthy
Hair stays healthy when:
- Sections are clean and balanced
- Weight is spread evenly
- Move-ups are done on time
High-quality hair also helps. Better hair tangles less and reduces stress during brushing.
Key Takeaway
Beads are tools. They are not gentle or harsh by themselves. The hand using them matters most.
How to Sleep With Beaded Hair Extensions?
Sleep habits affect beaded systems more than many people expect.
Sleeping correctly reduces tension, slipping, and bead discomfort.
Before Bed
Hair should be dry. Wet hair stretches and pulls inside beads.
Hair should be loosely braided or tied into a low ponytail. This keeps beads from shifting.
During Sleep
A silk or satin pillowcase reduces friction. Less friction means less pulling.
Some clients prefer a silk bonnet. This also helps control movement.
What to Avoid
Never sleep with hair loose and wet. Never sleep with tight buns. These habits shorten the life of beaded extensions fast.
How to Wash Your Hair With Bead Extensions?
Washing is not difficult, but it must be gentle and structured.
Correct washing keeps beads stable and hair smooth.
Washing Technique
Hair should be washed upright. Do not flip hair upside down.
Shampoo should be worked between rows, not rubbed in circles. Rubbing causes tangling near beads.
Conditioner should stay away from bead areas. Conditioner near beads increases slipping risk.
Drying Matters
Hair should be dried fully, especially near beads. Moisture trapped near beads can weaken grip over time.
My Opinion
I see many clients fall in love with beaded hair extensions for the freedom they give. I also see disappointment when expectations are wrong.
I believe beaded systems are best for clients who commit to maintenance. They are not “install and forget” extensions.
I also believe hair quality matters more with beads. Poor hair shows problems faster because there is no glue to hide issues.
When done well, beaded extensions feel natural and flexible. When rushed, they become uncomfortable. Education and honesty decide the outcome.
FAQ
Are beaded hair extensions good for fine hair?
Yes, but only with correct bead size and light weight.
Do beaded extensions slip easily?
They slip when bead size or section size is wrong.
How often do beaded extensions need maintenance?
Most need move-ups every 6 to 8 weeks.
Can I reuse beaded hair extensions?
Yes. High-quality hair can be reused many times.
Are beads visible?
They can be if placement or density is wrong.
Do beads hurt at first?
Mild pressure is normal at first. Pain is not.
Conclusion
Beaded hair extensions offer freedom and reuse. They work best with correct technique, good habits, and realistic expectations.


